
Metal³
The Metal³ project (pronounced: “Metal Kubed”) provides components for bare metal host management with Kubernetes. You can enrol your bare metal machines, provision operating system images, and then, if you like, deploy Kubernetes clusters to them. From there, operating and upgrading your Kubernetes clusters can be handled by Metal³. Moreover, Metal³ is itself a Kubernetes application, so it runs on Kubernetes, and uses Kubernetes resources and APIs as its interface.
Metal³ is one of the providers for the Kubernetes sub-project Cluster API. Cluster API provides infrastructure agnostic Kubernetes lifecycle management, and Metal³ brings the bare metal implementation.
This is paired with one of the components from the OpenStack ecosystem, Ironic for booting and installing machines. Metal³ handles the installation of Ironic as a standalone component (there’s no need to bring along the rest of OpenStack). Ironic is supported by a mature community of hardware vendors and supports a wide range of bare metal management protocols which are continuously tested on a variety of hardware. Backed by Ironic, Metal³ can provision machines, no matter the brand of hardware.
In summary, you can write Kubernetes manifests representing your hardware and your desired Kubernetes cluster layout. Then Metal³ can:
- Discover your hardware inventory
- Configure BIOS and RAID settings on your hosts
- Optionally clean a host’s disks as part of provisioning
- Install and boot an operating system image of your choice
- Deploy Kubernetes
- Upgrade Kubernetes or the operating system in your clusters with a non-disruptive rolling strategy
- Automatically remediate failed nodes by rebooting them and removing them from the cluster if necessary
You can even deploy Metal³ to your clusters so that they can manage other clusters using Metal³…
Metal³ is open-source and welcomes community contributions. The community meets at the following venues:
- #cluster-api-baremetal on Kubernetes Slack
- Metal³ development mailing list
- From the mailing list, you’ll also be able to find the details of a weekly Zoom community call on Wednesdays at 14:00 GMT
About this guide
This user guide aims to explain the Metal³ feature set, and provide how-tos for using Metal³. It’s not a tutorial (for that, see the Getting Started Guide). Nor is it a reference (for that, see the API Reference Documentation, and of course, the code itself.)
Project overview
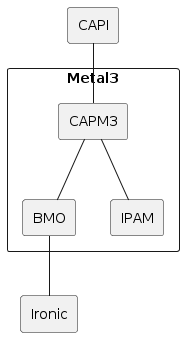
Metal3 consists of multiple sub-projects. The most notable are Bare Metal Operator, Cluster API provider Metal3 and the IP address manager. There is no requirement to use all of them.
The stack, when including Cluster API and Ironic, looks like this:
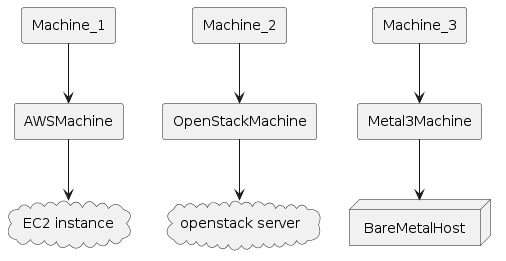
From a user perspective it may be more useful to visualize the Kubernetes resources. When using Cluster API, Metal3 works as any other infrastructure provider. The Machines get corresponding Metal3Machines, which in turn reference the BareMetalHosts.
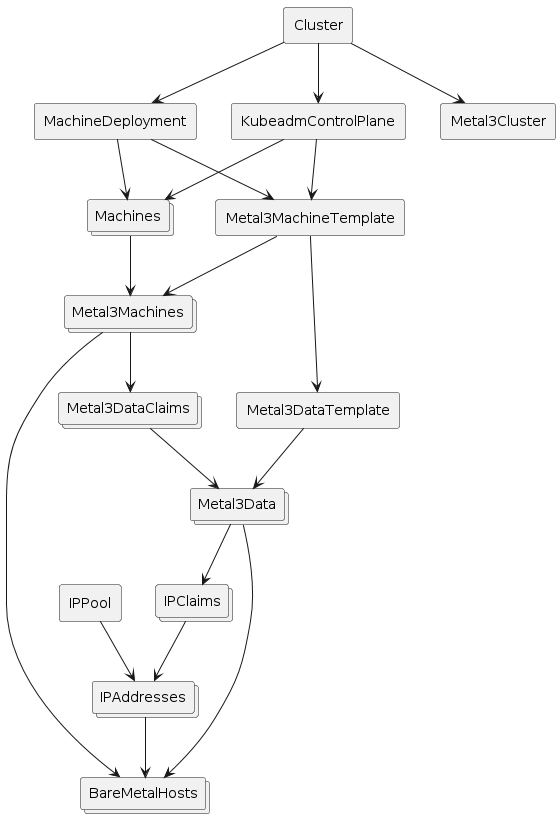
The following diagram shows more details about the Metal3 objects. Note that it is not showing everything and is meant just as an overview.
How does it work?
Metal3 relies on Ironic for interacting with the physical machines. Ironic in turn communicates with Baseboard Management Controllers (BMCs) to manage the machines. Ironic can communicate with the BMCs using protocols such as Redfish, IPMI, or iDRAC. In this way, it can power on or off the machines, change the boot device, and so on. For more information, see Ironic in Metal3
For more advanced operations, like writing an image to the disk, the Ironic Python Agent (IPA) is first booted on the machine. Ironic can then communicate with the IPA to perform the requested operation.
The BareMetal Operator (BMO) is a Kubernetes controller that exposes parts of Ironic’s capabilities through the Kubernetes API. This is essentially done through the BareMetalHost custom resource.
The Cluster API infrastructure provider for Metal3 (CAPM3) provides the necessary functionality to make Metal3 work with Cluster API. This means that Cluster API can be used to provision bare metal hosts into workload clusters. Similar to other infrastructure providers, CAPM3 adds custom resources such as Metal3Cluster and Metal3MachineTemplate in order to implement the Cluster API contract.
A notable addition to the contract is the management of metadata through Metal3DataTemplates and related objects. Users can provide metadata and network data through these objects. For network data specifically, it is worth mentioning the Metal3 IP address manager (IPAM) that can be used to assign IP addresses to the hosts.
Requirements
- Server(s) with baseboard management capabilities (i.e. Redfish, iDRAC, IPMI, etc.). For development you can use virtual machines with Sushy-tools. More information here.
- An Ironic instance. More information here.
- A Kubernetes cluster (the management cluster) where the user stores and manages the Metal3 resources. A kind cluster is enough for bootstrapping or development.
Quick-start for Metal3
This guide has been tested on Ubuntu server 24.04. It should be seen as an example rather than the absolute truth about how to deploy and use Metal3. We will cover two environments and two scenarios. The environments are
- a baremetal lab with actual physical servers and baseboard management controllers (BMCs), and
- a virtualized baremetal lab with virtual machines and sushy-tools acting as BMC.
In both of these, we will show how to use Bare Metal Operator and Ironic to manage the servers through a Kubernetes API, as well as how to turn the servers into Kubernetes clusters managed through Cluster API. These are the two scenarios.
In a nut-shell, this is what we will do:
- (Optional) Setup virtualized lab environment
- Setup a disk image server
- Setup a management cluster
- Create BareMetalHosts to represent the servers
- (Scenario 1) Provision the BareMetalHosts
- (Scenario 2) Deploy Cluster API and turn the BareMetalHosts into a Kubernetes cluster
Prerequisites
You will need the following tools installed.
- docker (or podman)
- kind or minikube (management cluster, not needed if you already have a “real” cluster that you want to use)
- clusterctl
- kubectl
- virsh and virt-install for the virtualized setup
There are multiple files you will create when following this quick start guide.
Set the QUICK_START_BASE environment variable to the base where you are
creating all the files. For example
export QUICK_START_BASE=$(pwd)
Baremetal lab configuration
The baremetal lab has two servers that we will call bml-01 and bml-02, as well
as a management computer where we will set up Metal3. The servers are equipped
with iLO 4 BMCs. These BMCs are connected to an “out of band” network
(192.168.1.0/24) and they have the following IP addresses.
- bml-01: 192.168.1.28
- bml-02: 192.168.1.14
There is a separate network for the servers (192.168.0.0/24). The management
computer is connected to both of these networks with IP addresses 192.168.1.7
and 192.168.0.150 respectively.
Finally, we will need the MAC addresses of the servers to keep track of which is which.
- bml-01: 9C:63:C0:AC:10:42
- bml-02: 80:c1:6e:7a:5a:a8
Virtualized configuration
If you do not have the hardware or perhaps just want to test things out without committing to a full baremetal lab, you may simulate it with virtual machines. In this section we will show how to create a virtual machine and use sushy-tools as a baseboard management controller for it.
The configuration is a bit simpler than in the baremetal lab because we don’t have a separate out of band network here. In the end we will have the BMC available as
- bml-vm-01: 192.168.222.1:8000/redfish/v1/Systems/bmh-vm-01
and the MAC address:
- bml-vm-01: 00:60:2f:31:81:01
Start by defining a libvirt network:
<network>
  <name>baremetal-e2e</name>
  <forward mode='nat'>
    <nat>
      <port start='1024' end='65535'/>
    </nat>
  </forward>
  <bridge name='metal3'/>
  <ip address='192.168.222.1' netmask='255.255.255.0'>
    <dhcp>
      <range start='192.168.222.3' end='192.168.222.99'/>
      <!-- Reserve IP for convenience -->
      <host mac='00:60:2f:31:81:01' name='bmh-vm-01' ip='192.168.222.101'/>
      <bootp file='http://192.168.222.2:6180/boot.ipxe'/>
    </dhcp>
  </ip>
</network>
Save this as net.xml.
Metal3 relies on baseboard management controllers to manage the baremetal servers, so we need something similar for our virtual machines. This comes in the form of sushy-tools.
We need to create a configuration file for sushy-tools:
# Listen on the local IP address 192.168.222.1
SUSHY_EMULATOR_LISTEN_IP = u'192.168.222.1'

# Bind to TCP port 8000
SUSHY_EMULATOR_LISTEN_PORT = 8000

# Serve this SSL certificate to the clients
SUSHY_EMULATOR_SSL_CERT = None

# If SSL certificate is being served, this is its RSA private key
SUSHY_EMULATOR_SSL_KEY = None

# The OpenStack cloud ID to use. This option enables OpenStack driver.
SUSHY_EMULATOR_OS_CLOUD = None
# The libvirt URI to use. This option enables libvirt driver.
SUSHY_EMULATOR_LIBVIRT_URI = u'qemu:///system'

# Instruct the libvirt driver to ignore any instructions to
# set the boot device. Allowing the UEFI firmware to instead
# rely on the EFI Boot Manager
# Note: This sets the legacy boot element to dev="fd"
# and relies on the floppy not existing, it likely won't work
# if your VM has a floppy drive.
SUSHY_EMULATOR_IGNORE_BOOT_DEVICE = False

# The map of firmware loaders dependent on the boot mode and
# system architecture. Ideally the x86_64 loader will be capable
# of secure boot or not based on the chosen nvram.
SUSHY_EMULATOR_BOOT_LOADER_MAP = {
    u'UEFI': {
        u'x86_64': u'/usr/share/OVMF/OVMF_CODE.secboot.fd'
    },
    u'Legacy': {
        u'x86_64': None
    }
}
Finally, we start up the virtual baremetal lab and create VMs to simulate the servers. Feel free to adjust things as you see fit, but make sure to note the MAC address. That will be needed later. You can choose how many VMs to create. At least one is needed, although more could be nice for scenario 2, to have more than one node in the cluster.
#!/usr/bin/env bash

# Define and start the baremetal-e2e network
virsh -c qemu:///system net-define "${QUICK_START_BASE}/net.xml"
virsh -c qemu:///system net-start baremetal-e2e

# We need to create veth pair to connect the baremetal-e2e net (defined above)
# and the docker network used by kind. This is to allow controllers in
# the kind cluster to communicate with the VMs and vice versa.
# For example, Ironic needs to communicate with IPA.
# These options are the same as what kind creates by default,
# except that we hard code the IPv6 subnet and specify a bridge name.
#
# NOTE! If you used kind before, you already have this network but
# without the fixed bridge name. Please remove it first in that case!
# docker network rm kind
docker network create -d=bridge \
    -o com.docker.network.bridge.enable_ip_masquerade=true \
    -o com.docker.network.driver.mtu=1500 \
    -o com.docker.network.bridge.name="kind" \
    --ipv6 --subnet "fc00:f853:ccd:e793::/64" \
    kind

# Next create the veth pair
sudo ip link add metalend type veth peer name kindend
sudo ip link set metalend master metal3
sudo ip link set kindend master kind
sudo ip link set metalend up
sudo ip link set kindend up

# Then we need to set routing rules as well
sudo iptables -I FORWARD -i kind -o metal3 -j ACCEPT
sudo iptables -I FORWARD -i metal3 -o kind -j ACCEPT

# Start the sushy-emulator container that acts as BMC
docker run --name sushy-tools --rm --network host -d \
  -v /var/run/libvirt:/var/run/libvirt \
  -v "${QUICK_START_BASE}/sushy-emulator.conf:/etc/sushy/sushy-emulator.conf" \
  -e SUSHY_EMULATOR_CONFIG=/etc/sushy/sushy-emulator.conf \
  quay.io/metal3-io/sushy-tools:latest sushy-emulator

# Generate a VM definition xml file and then define the VM
# use --ram=8192 for Scenario 2
SERIAL_LOG_PATH="/var/log/libvirt/qemu/bmh-vm-01-serial0.log"
virt-install \
  --connect qemu:///system \
  --name bmh-vm-01 \
  --description "Virtualized BareMetalHost" \
  --osinfo=ubuntu-lts-latest \
  --ram=4096 \
  --vcpus=2 \
  --disk size=8 \
  --boot uefi,hd,network \
  --import \
  --serial file,path="${SERIAL_LOG_PATH}" \
  --xml "./devices/serial/@type=pty" \
  --xml "./devices/serial/log/@file=${SERIAL_LOG_PATH}" \
  --xml "./devices/serial/log/@append=on" \
  --network network=baremetal-e2e,mac="00:60:2f:31:81:01" \
  --noautoconsole \
  --print-xml > "${QUICK_START_BASE}/bmh-vm-01.xml"

virsh -c qemu:///system define "${QUICK_START_BASE}/bmh-vm-01.xml"
Common setup
This section is common for both the baremetal configuration and the virtualized environment. Specific configuration will always differ between environments though. We will go through how to configure and deploy Ironic and Baremetal Operator.
Image server
In order to do anything useful, we will need a server for hosting disk images that can be used to provision the servers. In this guide, we will use an nginx container for this. We download some images that will be used later.
#!/usr/bin/env bash

mkdir "${QUICK_START_BASE}/disk-images"

pushd "${QUICK_START_BASE}/disk-images" || exit
wget https://cloud-images.ubuntu.com/jammy/current/jammy-server-cloudimg-amd64.img --quiet
wget https://cloud-images.ubuntu.com/jammy/current/SHA256SUMS --quiet
sha256sum --ignore-missing -c SHA256SUMS
wget https://artifactory.nordix.org/artifactory/metal3/images/k8s_v1.34.1/CENTOS_10_NODE_IMAGE_K8S_v1.34.1.qcow2 --quiet
# Generate checksum file for the qcow2 image
sha256sum CENTOS_10_NODE_IMAGE_K8S_v1.34.1.qcow2 > CENTOS_10_NODE_IMAGE_K8S_v1.34.1.qcow2.sha256sum
# Convert to raw.
# This helps lower memory requirements, since the raw image can be streamed to disk
# instead of first loaded to memory by IPA for conversion.
qemu-img convert -f qcow2 -O raw CENTOS_10_NODE_IMAGE_K8S_v1.34.1.qcow2 CENTOS_10_NODE_IMAGE_K8S_v1.34.1.raw
# Generate checksum file for the raw image
sha256sum CENTOS_10_NODE_IMAGE_K8S_v1.34.1.raw > CENTOS_10_NODE_IMAGE_K8S_v1.34.1.raw.sha256sum
# Local cache of IPA
wget https://tarballs.opendev.org/openstack/ironic-python-agent/dib/ipa-centos9-master.tar.gz --quiet
popd || exit
Then we start image server.
#!/usr/bin/env bash
docker run --name image-server --rm -d -p 80:8080 \
  -v "${QUICK_START_BASE}/disk-images:/usr/share/nginx/html" nginxinc/nginx-unprivileged
DHCP server
The BareMetalHosts must be able to call back to Ironic when going through the inspection phase. This means that they must have IP addresses in a network where they can reach Ironic. Any DHCP server can be used for this. We use the Ironic container image that includes dnsmasq. It is deployed automatically together with Ironic.
Management cluster
If you already have a Kubernetes cluster that you want to use, go ahead and use that. Please ensure that it is connected to the relevant networks so that Ironic can reach the BMCs and so that the BareMetalHosts can reach Ironic.
If you do not have a cluster already, you can create one using kind. Please note that this is absolutely not intended for production environments.
We will use the following configuration file for kind, save it as kind.yaml:
apiVersion: kind.x-k8s.io/v1alpha4
kind: Cluster
nodes:
- role: control-plane
  # Open ports for Ironic
  extraPortMappings:
  # Ironic httpd
  - containerPort: 6180
    hostPort: 6180
    listenAddress: "0.0.0.0"
    protocol: TCP
  # Ironic API
  - containerPort: 6385
    hostPort: 6385
    listenAddress: "0.0.0.0"
    protocol: TCP
As you can see, it has a few ports forwarded from the host. This is to make Ironic reachable when it is running inside the kind cluster.
We will also need to install cert-manager and Ironic Standalone Operator. Finally, we deploy Ironic and Bare Metal Operator.
#!/usr/bin/env bash

kind create cluster --config "${QUICK_START_BASE}/kind.yaml"

# (Optional) Initialize CAPM3. This is only needed for scenario 2, but it also installs
# cert-manager, which is needed for pretty much everything else.
# If you skip this, make sure you install cert-manager separately!
clusterctl init --infrastructure=metal3 --ipam=metal3

kubectl apply -k "${QUICK_START_BASE}/irso"
kubectl -n ironic-standalone-operator-system wait --for=condition=Available --timeout=300s deploy/ironic-standalone-operator-controller-manager

# Now we can deploy Ironic and BMO
kubectl create ns baremetal-operator-system
# Apply Ironic with retry logic (up to 5 attempts with 10 second delays).
# The IrSO webhook is not guaranteed to be ready when the IrSO deployment is,
# so some retries may be needed.
MAX_RETRIES=5
RETRY_DELAY=10
RETRY_COUNT=0
echo "Applying Ironic configuration..."
while [[ "${RETRY_COUNT}" -lt "${MAX_RETRIES}" ]]; do
  if kubectl apply -k "${QUICK_START_BASE}/ironic"; then
    echo "Successfully applied Ironic configuration"
    break
  else
    RETRY_COUNT=$((RETRY_COUNT + 1))
    echo "Failed to apply Ironic configuration. Retrying in ${RETRY_DELAY} seconds... (Attempt ${RETRY_COUNT}/${MAX_RETRIES})"
    sleep ${RETRY_DELAY}
  fi
done
if [[ "${RETRY_COUNT}" -eq "${MAX_RETRIES}" ]]; then
  echo "ERROR: Failed to apply Ironic configuration after ${MAX_RETRIES} attempts. Exiting."
  exit 1
fi
kubectl apply -k "${QUICK_START_BASE}/bmo"
We use the following manifest to deploy Ironic. Feel free to adjust as needed for your environment.
# kustomization.yaml
# kustomization.yaml
apiVersion: kustomize.config.k8s.io/v1beta1
kind: Kustomization
namespace: baremetal-operator-system
resources:
- ironic.yaml
- certificate.yaml
# ironic.yaml
# ironic.yaml
apiVersion: ironic.metal3.io/v1alpha1
kind: Ironic
metadata:
  name: ironic
  namespace: baremetal-operator-system
spec:
  networking:
    dhcp:
      rangeBegin: "192.168.222.100"
      rangeEnd: "192.168.222.200"
      networkCIDR: "192.168.222.0/24"
    interface: "eth0"
    ipAddress: "192.168.222.2"
    ipAddressManager: "keepalived"
  tls:
    certificateName: ironic-cert
# certificate.yaml
# certificate.yaml
apiVersion: cert-manager.io/v1
kind: Issuer
metadata:
  name: selfsigned-issuer
  namespace: baremetal-operator-system
spec:
  selfSigned: {}
---
apiVersion: cert-manager.io/v1
kind: Certificate
metadata:
  name: ironic-cacert
  namespace: baremetal-operator-system
spec:
  commonName: ironic-ca
  isCA: true
  issuerRef:
    kind: Issuer
    name: selfsigned-issuer
  secretName: ironic-cacert
---
apiVersion: cert-manager.io/v1
kind: Issuer
metadata:
  name: ca-issuer
  namespace: baremetal-operator-system
spec:
  ca:
    secretName: ironic-cacert
---
apiVersion: cert-manager.io/v1
kind: Certificate
metadata:
  name: ironic-cert
  namespace: baremetal-operator-system
spec:
  ipAddresses:
  - 192.168.222.2
  dnsNames:
  - ironic.baremetal-operator-system.svc
  issuerRef:
    kind: Issuer
    name: ca-issuer
  secretName: ironic-cert
For the Ironic Standalone Operator, we use a kustomization and patch that looks like this:
# kustomization.yaml
apiVersion: kustomize.config.k8s.io/v1beta1
kind: Kustomization
namespace: ironic-standalone-operator-system

resources:
- https://github.com/metal3-io/ironic-standalone-operator/releases/latest/download/install.yaml

patches:
- path: patch-configmap.yaml
patch-configmap.yaml
apiVersion: v1
kind: ConfigMap
metadata:
  name: ironic-standalone-operator-ironic-standalone-operator-config
  namespace: ironic-standalone-operator-system
data:
  IPA_BASEURI: "http://192.168.222.1"
For the Bare Metal Operator, we use a kustomization that looks like this:
# kustomization.yaml
apiVersion: kustomize.config.k8s.io/v1beta1
kind: Kustomization
namespace: baremetal-operator-system
# This is the kustomization that we build on. You can download it and change
# the URL to a relative path if you do not want to access it over the network.
# Note that the ref=main specifies the version to use.
# We use main here simply because the integration with IrSO is not included in a release yet.
resources:
- https://github.com/metal3-io/baremetal-operator/config/use-irso?ref=main
Create BareMetalHosts
Now that we have Bare Metal Operator deployed, let’s put it to use by creating BareMetalHosts (BMHs) to represent our servers. You will need the protocol and IPs of the BMCs, as well as credentials for accessing them, and the servers MAC addresses.
Create one secret for each BareMetalHost, containing the credentials for accessing its BMC. No credentials are needed in the virtualized setup but you still need to create the secret with some values. Here is an example:
apiVersion: v1
kind: Secret
metadata:
  name: bml-01
type: Opaque
stringData:
  username: replaceme
  password: replaceme
Then continue by creating the BareMetalHost manifest. You can put it in the same
file as the secret if you want. Just remember to separate the two resources with
one line containing ---.
Here is an example of a BareMetalHost referencing the secret above with MAC
address and BMC address matching our bml-01 server (see supported
hardware for information on BMC addressing).
apiVersion: metal3.io/v1alpha1
kind: BareMetalHost
metadata:
  name: bml-01
spec:
  online: true
  bootMACAddress: 9C:63:C0:AC:10:42
  bootMode: UEFI
  bmc:
    address: idrac-virtualmedia://192.168.1.28
    credentialsName: bml-01
    disableCertificateVerification: true
Here is the same for the virtualized BareMetalHost:
apiVersion: metal3.io/v1alpha1
kind: BareMetalHost
metadata:
  name: bmh-vm-01
spec:
  online: true
  bootMACAddress: 00:60:2f:31:81:01
  bootMode: UEFI
  hardwareProfile: libvirt
  bmc:
    address: redfish-virtualmedia+http://192.168.222.1:8000/redfish/v1/Systems/bmh-vm-01
    credentialsName: bml-01
Apply these in the cluster with kubectl apply -f path/to/file.
You should now be able to see the BareMetalHost go through registering and
inspecting phases before it finally becomes available. Check with
kubectl get bmh. The output should look similar to this:
NAME      STATE         CONSUMER   ONLINE   ERROR   AGE
bml-01    available                true             26m
(Scenario 1) Provision BareMetalHosts
If you want to manage the BareMetalHosts directly, keep reading. If you would rather use Cluster API to make Kubernetes clusters out of them, skip to the next section.
Edit the BareMetalHost to add details of what image you want to provision it with. For example:
apiVersion: metal3.io/v1alpha1
kind: BareMetalHost
metadata:
  name: bml-vm-01
spec:
  online: true
  bootMACAddress: 00:60:2f:31:81:01
  bootMode: UEFI
  hardwareProfile: libvirt
  bmc:
    address: redfish-virtualmedia+http://192.168.222.1:8000/redfish/v1/Systems/bmh-vm-01
    credentialsName: bml-01
  image:
    checksumType: sha256
    checksum: http://192.168.222.1/SHA256SUMS
    format: qcow2
    url: http://192.168.222.1/jammy-server-cloudimg-amd64.img
Note that the URL for the disk image is not using the out of band network.
Image provisioning works so that the Ironic Python Agent is first booted on the
machine. From there (i.e. not in the out of band network) it downloads the disk
image and writes it to disk. If the machine has several disks, and you want to
specify which one to use, set rootDeviceHints
(otherwise, /dev/sda is used by default).
The manifest above is enough to provision the BareMetalHost, but unless you have everything you need already baked in the disk image, you will most likely want to add some user-data and network-data. We will show here how to configure authorized ssh keys using user-data (see instance customization for more details).
First, we create a file (user-data.yaml) with the user-data:
#cloud-config
users:
- name: user
  ssh_authorized_keys:
  - ssh-ed25519 ABCD... user@example.com
Then create a secret from it.
kubectl create secret generic user-data --from-file=value=user-data.yaml --from-literal=format=cloud-config
Add the following to the BareMetalHost manifest to make it use the user-data:
spec:
  ...
  userData:
    name: user-data
    namespace: default
Apply the changes with kubectl apply -f path/to/file. You should now see the
BareMetalHost go into provisioning and eventually become provisioned.
NAME      STATE         CONSUMER   ONLINE   ERROR   AGE
bml-01    provisioned              true             2h
You can now check the logs of the DHCP server to see what IP the BareMetalHost
got (docker logs dnsmasq) and try to ssh to it.
(Scenario 2) Metal3 and Cluster API
If you want to turn the BareMetalHosts into Kubernetes clusters, you should consider using Cluster API and the infrastructure provider for Metal3. In this section we will show how to do it.
Initialize the Cluster API core components and the infrastructure provider for Metal3 (if you didn’t already do it):
clusterctl init --infrastructure metal3 --ipam=metal3
Now we need to set some environment variables that will be used to render the manifests from the cluster template. Most of them are related to the disk image that we downloaded above.
Note: There are many ways to configure and expose the API endpoint of the cluster. You need to decide how to do it. It will not “just work”. Here are some options:
- Configure a specific IP for the control-plane server through the DHCP server. This is doesn’t require anything extra but it is also very limited. You will not be able to upgrade the cluster for example.
- Set up a load balancer separately and use that as API endpoint.
- Use keepalived or kube-vip or similar to assign a VIP to one of the control-plane nodes.
#!/usr/bin/env bash

# Baremetal lab image variables
# export IMAGE_URL="http://192.168.0.150/CENTOS_10_NODE_IMAGE_K8S_v1.34.1.qcow2"
# export IMAGE_CHECKSUM="http://192.168.0.150/CENTOS_10_NODE_IMAGE_K8S_v1.34.1.qcow2.sha256sum"
# export IMAGE_FORMAT="qcow2"
# Export the checksum from the disk image file (extract just the hash part, not the filename)
IMAGE_CHECKSUM=$(awk '{print $1}' "${QUICK_START_BASE}/disk-images/CENTOS_10_NODE_IMAGE_K8S_v1.34.1.raw.sha256sum")
export IMAGE_CHECKSUM
# Virtualized setup variables
export IMAGE_URL="http://192.168.222.1/CENTOS_10_NODE_IMAGE_K8S_v1.34.1.raw"
export IMAGE_FORMAT="raw"
# Common variables
export IMAGE_CHECKSUM_TYPE="sha256"
export KUBERNETES_VERSION="v1.34.1"
# Make sure this does not conflict with other networks
export POD_CIDR='["192.168.10.0/24"]'
# These can be used to add user-data
export CTLPLANE_KUBEADM_EXTRA_CONFIG="
    preKubeadmCommands:
    - systemctl enable --now crio
    users:
    - name: user
      sshAuthorizedKeys:
      - ssh-ed25519 ABCD... user@example.com"
export WORKERS_KUBEADM_EXTRA_CONFIG="
      preKubeadmCommands:
      - systemctl enable --now crio
      users:
      - name: user
        sshAuthorizedKeys:
        - ssh-ed25519 ABCD... user@example.com"
# NOTE! You must ensure that this is forwarded or assigned somehow to the
# server(s) that is selected for the control-plane.
# We reserved this address in the net.xml as a basic way to get a fixed IP.
export CLUSTER_APIENDPOINT_HOST="192.168.222.101"
export CLUSTER_APIENDPOINT_PORT="6443"
With the variables in place, we can render the manifests and apply:
clusterctl generate cluster my-cluster --control-plane-machine-count 1 --worker-machine-count 0 | kubectl apply -f -
You should see BareMetalHosts be provisioned as they are “consumed” by the Metal3Machines:
NAME      STATE         CONSUMER                        ONLINE   ERROR   AGE
bml-02    provisioned   my-cluster-controlplane-8z46n   true             68m
If all goes well and the API endpoint is correctly configured, you should eventually get a working cluster. Note that it will not become fully healthy until a CNI is deployed.
Deploy Calico as CNI:
clusterctl get kubeconfig my-cluster > kubeconfig.yaml
kubectl --kubeconfig=kubeconfig.yaml apply --server-side -f https://raw.githubusercontent.com/projectcalico/calico/v3.31.0/manifests/calico.yaml
Check cluster health with clusterctl describe cluster my-cluster:
NAME                                                REPLICAS  AVAILABLE  READY  UP TO DATE  STATUS           REASON            SINCE  MESSAGE
Cluster/my-cluster                                  1/1       1          1      1           Available: True  Available         48s
├─ClusterInfrastructure - Metal3Cluster/my-cluster                                          Ready: True      NoReasonReported  32m
└─ControlPlane - KubeadmControlPlane/my-cluster     1/1       1          1      1
  └─Machine/my-cluster-2zc9x                        1         1          1      1           Ready: True      Ready             48s
Cleanup
Delete clusters:
#!/usr/bin/env bash

set -x

# If a cluster was created using Cluster API, delete that first
kubectl delete cluster my-cluster

# Delete all BareMetalHosts with `kubectl delete bmh <name>`. This ensures that
# the servers are cleaned and powered off.
kubectl delete bmh --all

# Delete the management cluster
kind delete cluster
Stop image server. It is automatically removed when stopped.
docker stop image-server
You may also want to delete the disk images:
rm -r disk-images
If you did the virtualized setup you will also need to cleanup the sushy-tools container and the VM(s).
#!/usr/bin/env bash

set -x

# Stop and remove containers
docker rm -f sushy-tools

# Cleanup VM
virsh -c qemu:///system destroy --domain "bmh-vm-01"
virsh -c qemu:///system undefine --domain "bmh-vm-01" --remove-all-storage --nvram

# Cleanup network
virsh -c qemu:///system net-destroy baremetal-e2e
virsh -c qemu:///system net-undefine baremetal-e2e

# Cleanup network interfaces and docker network
sudo ip link delete metalend type veth
docker network rm kind

# Cleanup iptables rules
sudo iptables -D FORWARD -i kind -o metal3 -j ACCEPT
sudo iptables -D FORWARD -i metal3 -o kind -j ACCEPT
Baremetal provisioning
This is a guide to provision baremetal servers using the Metal3 project. It is a generic guide with basic implementation, different hardware may require different configuration.
In this guide we will use minikube as management cluster.
All commands are executed on the host where minikube is set up.
This is a separate machine, e.g. your laptop or one of the servers, that has access to the network where the servers are in order to provision them.
Install requirements on the host
Install following requirements on the host:
- Python
- Golang
- Docker for ubuntu and podman for Centos
- Ansible
See Install Ironic for other requirements.
Configure host
-
Create network settings. We are creating 2 bridge interfaces: provisioning and external. The provisioning interface is used by Ironic to provision the BareMetalHosts and the external interface allows them to communicate with each other and connect to internet.
# Create a veth interface peer.
sudo ip link add ironicendpoint type veth peer name ironic-peer

# Create provisioning bridge.
sudo brctl addbr provisioning

sudo ip addr add dev ironicendpoint 172.22.0.1/24
sudo brctl addif provisioning ironic-peer
sudo ip link set ironicendpoint up
sudo ip link set ironic-peer up

# Create the external bridge
sudo brctl addbr external

sudo ip addr add dev external 192.168.111.1/24
sudo ip link set external up

# Add udp forwarding to firewall, this allows to use ipmitool (port 623)
# as well as allowing TFTP traffic outside the host (random port)
iptables -A FORWARD -p udp -j ACCEPT

# Add interface to provisioning bridge
brctl addif provisioning eno1

# Set VLAN interface to be up
ip link set up dev bmext

# Check if bmext interface is added to the bridge
brctl show baremetal | grep bmext

# Add bmext to baremetal bridge
brctl addif baremetal bmext
Prepare image cache
-
Start httpd container. This is used to host the the OS images that the BareMetalHosts will be provisioned with.
sudo docker run -d --net host --privileged --name httpd-infra -v /opt/metal3-dev-env/ironic:/shared --entrypoint /bin/runhttpd --envDownload the node image and put it in the folder where the httpd container can host it.
wget -O /opt/metal3-dev-env/ironic/html/images https://artifactory.nordix.org/artifactory/metal3/images/k8s_v1.33.0Convert the qcow2 image to raw format and get the hash of the raw image
# Change IMAGE_NAME and IMAGE_RAW_NAME according to what you download from artifactory
cd /opt/metal3-dev-env/ironic/html/images
IMAGE_NAME="CENTOS_9_NODE_IMAGE_K8S_v1.33.0.qcow2"
IMAGE_RAW_NAME="CENTOS_9_NODE_IMAGE_K8S_v1.33.0-raw.img"
qemu-img convert -O raw "${IMAGE_NAME}" "${IMAGE_RAW_NAME}"

# Create sha256 hash
sha256sum "${IMAGE_RAW_NAME}" | awk '{print $1}' > "${IMAGE_RAW_NAME}.sha256sum"
Launch management cluster using minikube
-
Create a minikube cluster to use as management cluster.
minikube start # Configuring ironicendpoint with minikube minikube ssh sudo brctl addbr ironicendpoint minikube ssh sudo ip link set ironicendpoint up minikube ssh sudo brctl addif ironicendpoint eth2 minikube ssh sudo ip addr add 172.22.0.9/24 dev ironicendpoint -
Initialize Cluster API and the Metal3 provider.
kubectl create namespace metal3
clusterctl init --core cluster-api --bootstrap kubeadm --control-plane kubeadm --infrastructure metal3
# NOTE: In clusterctl init you can change the version of provider like this 'cluster-api:v1.13.2',
# if no version is given by default latest stable release will be used.
Install provisioning components
-
Exporting necessary variables for baremetal operator and Ironic deployment.
# The URL of the kernel to deploy. export DEPLOY_KERNEL_URL="http://172.22.0.1:6180/images/ironic-python-agent.kernel" # The URL of the ramdisk to deploy. export DEPLOY_RAMDISK_URL="http://172.22.0.1:6180/images/ironic-python-agent.initramfs" # The URL of the Ironic endpoint. export IRONIC_URL="http://172.22.0.1:6385/v1/" # The URL of the Ironic inspector endpoint - only before BMO 0.5.0. #export IRONIC_INSPECTOR_URL="http://172.22.0.1:5050/v1/" # Do not use a dedicated CA certificate for Ironic API. # Any value provided in this variable disables additional CA certificate validation. # To provide a CA certificate, leave this variable unset. # If unset, then IRONIC_CA_CERT_B64 must be set. export IRONIC_NO_CA_CERT=true # Disables basic authentication for Ironic API. # Any value provided in this variable disables authentication. # To enable authentication, leave this variable unset. # If unset, then IRONIC_USERNAME and IRONIC_PASSWORD must be set. #export IRONIC_NO_BASIC_AUTH=true # Disables basic authentication for Ironic inspector API (when used). # Any value provided in this variable disables authentication. # To enable authentication, leave this variable unset. # If unset, then IRONIC_INSPECTOR_USERNAME and IRONIC_INSPECTOR_PASSWORD must be set. #export IRONIC_INSPECTOR_NO_BASIC_AUTH=true -
Launch baremetal operator.
# Clone BMO repo git clone https://github.com/metal3-io/baremetal-operator.git # Run deploy.sh ./baremetal-operator/tools/deploy.sh -b -k -t -
Launch Ironic.
# Run deploy.sh
./baremetal-operator/tools/deploy.sh -i -k -t
Create Secrets and BareMetalHosts
Create yaml files for each BareMetalHost that will be used. Below is an example.
---
apiVersion: v1
kind: Secret
metadata:
  name: <<secret_name_bmh1>>
type: Opaque
data:
  username: <<username_bmh1>>
  password: <<password_bmh1>>
---
apiVersion: metal3.io/v1alpha1
  kind: BareMetalHost
  metadata:
    name: <<id_bmh1>>
  spec:
    online: true
    bootMACAddress: <<mac_address_bmh1>>
    bootMode: legacy
    bmc:
      address: <<address_bmh1>> // this depends on the protocol that are mentioned above, they depend on hardware vendor
      credentialsName: <<secret_name_bmh1>>
      disableCertificateVerification: true
Apply the manifests.
kubectl apply -f ./bmh1.yaml -n metal3
At this point, the BareMetalHosts will go through registering and
inspection phases before they become available.
Wait for all of them to be available. You can check their status with
kubectl get bmh -n metal3.
The next step is to create a workload cluster from these BareMetalHosts.
Create and apply cluster, control plane and worker template
#API endpoint IP and port for target cluster
export CLUSTER_APIENDPOINT_HOST="192.168.111.249"
export CLUSTER_APIENDPOINT_PORT="6443"

# Export node image variable and node image hash variable that we created before.
# Change name according to what was downloaded from artifactory
export IMAGE_URL=http://172.22.0.1/images/CENTOS_9_NODE_IMAGE_K8S_v1.33.0-raw.img
export IMAGE_CHECKSUM=http://172.22.0.1/images/CENTOS_9_NODE_IMAGE_K8S_v1.33.0-raw.img.sha256sum
export IMAGE_CHECKSUM_TYPE=sha256
export IMAGE_FORMAT=raw

# Generate templates with clusterctl, change control plane and worker count according to
# the number of BareMetalHosts
clusterctl generate cluster capm3-cluster \
  --kubernetes-version v1.33.0 \
  --control-plane-machine-count=3 \
  --worker-machine-count=3 \
  > capm3-cluster-template.yaml

# Apply the template
kubectl apply -f capm3-cluster-template.yaml
Bare Metal Operator
The Bare Metal Operator (BMO) is a Kubernetes controller that manages
bare-metal hosts, represented in Kubernetes by BareMetalHost (BMH) custom
resources.
BMO is responsible for the following operations:
- Inspecting the host’s hardware and reporting the details on the corresponding BareMetalHost. This includes information about CPUs, RAM, disks, NICs, and more.
- Optionally preparing the host by configuring RAID, changing firmware settings or updating the system and/or BMC firmware.
- Provisioning the host with a desired image.
- Cleaning the host’s disk contents before and after provisioning.
Under the hood, BMO uses Ironic to conduct these actions.
Enrolling BareMetalHosts
To enroll a bare-metal machine as a BareMetalHost, you need to know at least
the following properties:
- The IP address and credentials of the BMC - the remote management controller of the host.
- The protocol that the BMC understands. Most common are IPMI and Redfish. See supported hardware for more details.
- Boot technology that can be used with the host and the chosen protocol. Most hardware can use network booting, but some Redfish implementations also support virtual media (CD) boot.
- MAC address that is used for booting. Important: it’s a MAC address of an actual NIC of the host, not the BMC MAC address.
- The desired boot mode: UEFI or legacy BIOS. UEFI is the default and should be used unless there are serious reasons not to.
This is a minimal example of a valid BareMetalHost:
apiVersion: metal3.io/v1alpha1
kind: BareMetalHost
metadata:
  name: node-0
  namespace: metal3
spec:
  bmc:
    address: ipmi://192.168.111.1:6230
    credentialsName: node-0-bmc-secret
  bootMACAddress: 00:5a:91:3f:9a:bd
  online: true
When this resource is created, it will undergo inspection that will populate
more fields as part of the status.
Deploying BareMetalHosts
To provision a bare-metal machine, you will need a few more properties:
- The URL and checksum of the image. Images should be in QCOW2 or raw format. It is common to use various cloud images with BMO, e.g. Ubuntu or CentOS. Important: not all images are compatible with UEFI boot - check their description.
- Optionally, user data: a secret with a configuration or a script that is interpreted by the first-boot service embedded in your image. The most common service is cloud-init, some distributions use ignition.
- Optionally, network data: a secret with the network configuration that is interpreted by the first-boot service. In some cases, the network data is embedded in the user data instead.
Here is a complete example of a host that will be provisioned with a CentOS 9 image:
apiVersion: metal3.io/v1alpha1
kind: BareMetalHost
metadata:
  name: node-0
  namespace: metal3
spec:
  bmc:
    address: ipmi://192.168.111.1:6230
    credentialsName: node-0-bmc-secret
  bootMACAddress: 00:5a:91:3f:9a:bd
  image:
    checksum: http://172.22.0.1/images/CENTOS_9_NODE_IMAGE_K8S_v1.33.0.qcow2.sha256sum
    url: http://172.22.0.1/images/CENTOS_9_NODE_IMAGE_K8S_v1.33.0.qcow2
  networkData:
    name: test1-workers-tbwnz-networkdata
    namespace: metal3
  online: true
  userData:
    name: test1-workers-vd4gj
    namespace: metal3
status:
  hardware:
    cpu:
      arch: x86_64
      count: 2
    hostname: node-0
    nics:
    - ip: 172.22.0.73
      mac: 00:5a:91:3f:9a:bd
      name: enp1s0
    ramMebibytes: 4096
    storage:
    - hctl: "0:0:0:0"
      name: /dev/sda
      serialNumber: drive-scsi0-0-0-0
      sizeBytes: 53687091200
      type: HDD
Integration with the cluster API
CAPM3 is the Metal3 component that is responsible for
integration between Cluster API resources and BareMetalHosts. When using Metal3
with CAPM3, you will enroll BareMetalHosts as described above first, then use
Metal3MachineTemplate to describe how hosts should be deployed, i.e. which
images and user data to use.
This happens for example when the user scales a MachineDeployment so that the server should be added to the cluster, or during an upgrade when it must change the image it is booting from:
Install Baremetal Operator
Installing Baremetal Operator (BMO) involves usually three steps:
- Clone Metal3 BMO repository
https://github.com/metal3-io/baremetal-operator.git. - Adapt the configuration settings to your specific needs.
- Deploy BMO in the cluster with or without Ironic.
Note: This guide assumes that a local clone of the repository is available.
Configuration Settings
Review and edit the file ironic.env found in config/default.
The operator supports several configuration options for controlling
its interaction with Ironic.
DEPLOY_RAMDISK_URL – The URL for the ramdisk of the image
containing the Ironic agent.
DEPLOY_KERNEL_URL – The URL for the kernel to go with the deploy
ramdisk.
DEPLOY_ISO_URL – The URL for the ISO containing the Ironic agent for
drivers that support ISO boot. Optional if kernel/ramdisk are set.
IRONIC_ENDPOINT – The URL for the operator to use when talking to
Ironic.
IRONIC_CACERT_FILE – The path of the CA certificate file of Ironic, if needed
IRONIC_INSECURE – (“True”, “False”) Whether to skip the ironic certificate
validation. It is highly recommend to not set it to True.
IRONIC_CLIENT_CERT_FILE – The path of the Client certificate file of Ironic,
if needed. Both Client certificate and Client private key must be defined for
client certificate authentication (mTLS) to be enabled.
IRONIC_CLIENT_PRIVATE_KEY_FILE – The path of the Client private key file of Ironic,
if needed. Both Client certificate and Client private key must be defined for
client certificate authentication (mTLS) to be enabled.
IRONIC_SKIP_CLIENT_SAN_VERIFY – (“True”, “False”) Whether to skip the ironic
client certificate SAN validation.
BMO_CONCURRENCY – The number of concurrent reconciles performed by the
Operator. Default is the number of CPUs, but no less than 2 and no more than 8.
PROVISIONING_LIMIT – The desired maximum number of hosts that could be (de)provisioned
simultaneously by the Operator. The limit does not apply to hosts that use
virtual media for provisioning. The Operator will try to enforce this limit,
but overflows could happen in case of slow provisioners and / or higher number of
concurrent reconciles. For such reasons, it is highly recommended to keep
BMO_CONCURRENCY value lower than the requested PROVISIONING_LIMIT. Default is 20.
IRONIC_EXTERNAL_URL_V6 – This is the URL where Ironic will find the image
for nodes that use IPv6. In dual stack environments, this can be used to tell
Ironic which IP version it should set on the BMC.
Deprecated options
IRONIC_INSPECTOR_ENDPOINT – The URL for the operator to use when talking to
Ironic Inspector. Only supported before baremetal-operator 0.5.0.
Kustomization Configuration
It is possible to deploy baremetal-operator with three different operator
configurations, namely:
- operator with ironic
- operator without ironic
- ironic without operator
A detailed overview of the configuration is presented in the following sections.
Notes on external Ironic
When an external Ironic is used, the following requirements must be met:
-
Either HTTP basic or no-auth authentication must be used (Keystone is not supported).
-
API version 1.74 (Xena release cycle) or newer must be available.
Authenticating to Ironic
Because hosts under the control of Metal³ need to contact the Ironic API during inspection and provisioning, it is highly advisable to require authentication on those APIs, since the provisioned hosts running user workloads will remain connected to the provisioning network.
Configuration
The baremetal-operator supports connecting to Ironic with the following
auth_strategy modes:
noauth(no authentication - not recommended)http_basic(HTTP Basic access authentication)
Note that Keystone (OpenStack Identity) authentication methods are not yet supported.
Authentication configuration is read from the filesystem, beginning at the root
directory specified in the environment variable METAL3_AUTH_ROOT_DIR. If this
variable is empty or not specified, the default is /opt/metal3/auth.
Within the root directory, there is a separate subdirectory ironic for
Ironic client configuration.
noauth
This is the default, and will be chosen if the auth root directory does not exist. In this mode, the baremetal-operator does not attempt to do any authentication against the Ironic APIs.
http_basic
This mode is configured by files in each authentication subdirectory named
username and password, and containing the Basic auth username and password,
respectively.
Running Bare Metal Operator with or without Ironic
This section explains the deployment scenarios of deploying Bare Metal Operator(BMO) with or without Ironic as well as deploying only Ironic scenario.
These are the deployment use cases addressed:
-
Deploying baremetal-operator with Ironic.
-
Deploying baremetal-operator without Ironic.
-
Deploying only Ironic.
Current structure of baremetal-operator config directory
tree config/
config/
├── basic-auth
│   ├── default
│   │   ├── credentials_patch.yaml
│   │   └── kustomization.yaml
│   └── tls
│       ├── credentials_patch.yaml
│       └── kustomization.yaml
├── certmanager
│   ├── certificate.yaml
│   ├── kustomization.yaml
│   └── kustomizeconfig.yaml
├── crd
│   ├── bases
│   │   ├── metal3.io_baremetalhosts.yaml
│   │   ├── metal3.io_firmwareschemas.yaml
│   │   └── metal3.io_hostfirmwaresettings.yaml
│   ├── kustomization.yaml
│   ├── kustomizeconfig.yaml
│   └── patches
│       ├── cainjection_in_baremetalhosts.yaml
│       ├── cainjection_in_firmwareschemas.yaml
│       ├── cainjection_in_hostfirmwaresettings.yaml
│       ├── webhook_in_baremetalhosts.yaml
│       ├── webhook_in_firmwareschemas.yaml
│       └── webhook_in_hostfirmwaresettings.yaml
├── default
│   ├── ironic.env
│   ├── kustomization.yaml
│   ├── manager_auth_proxy_patch.yaml
│   ├── manager_webhook_patch.yaml
│   └── webhookcainjection_patch.yaml
├── kustomization.yaml
├── manager
│   ├── kustomization.yaml
│   └── manager.yaml
├── namespace
│   ├── kustomization.yaml
│   └── namespace.yaml
├── OWNERS
├── prometheus
│   ├── kustomization.yaml
│   └── monitor.yaml
├── rbac
│   ├── auth_proxy_client_clusterrole.yaml
│   ├── auth_proxy_role_binding.yaml
│   ├── auth_proxy_role.yaml
│   ├── auth_proxy_service.yaml
│   ├── baremetalhost_editor_role.yaml
│   ├── baremetalhost_viewer_role.yaml
│   ├── firmwareschema_editor_role.yaml
│   ├── firmwareschema_viewer_role.yaml
│   ├── hostfirmwaresettings_editor_role.yaml
│   ├── hostfirmwaresettings_viewer_role.yaml
│   ├── kustomization.yaml
│   ├── leader_election_role_binding.yaml
│   ├── leader_election_role.yaml
│   ├── role_binding.yaml
│   └── role.yaml
├── render
│   └── capm3.yaml
├── samples
│   ├── metal3.io_v1alpha1_baremetalhost.yaml
│   ├── metal3.io_v1alpha1_firmwareschema.yaml
│   └── metal3.io_v1alpha1_hostfirmwaresettings.yaml
├── tls
│   ├── kustomization.yaml
│   └── tls_ca_patch.yaml
└── webhook
    ├── kustomization.yaml
    ├── kustomizeconfig.yaml
    ├── manifests.yaml
    └── service_patch.yaml
The config directory has one top level folder for deployment, namely default
and it deploys only baremetal-operator through kustomization file calling
manager folder. In addition, basic-auth, certmanager, crd, namespace,
prometheus, rbac, tls and webhook folders have their own kustomization
and yaml files. samples folder includes yaml representation of sample CRDs.
Current structure of ironic-deployment directory
tree ironic-deployment/
ironic-deployment/
├── base
│   ├── ironic.yaml
│   └── kustomization.yaml
├── components
│   ├── basic-auth
│   │   ├── auth.yaml
│   │   ├── ironic-auth-config
│   │   ├── ironic-auth-config-tpl
│   │   ├── ironic-htpasswd
│   │   └── kustomization.yaml
│   ├── keepalived
│   │   ├── ironic_bmo_configmap.env
│   │   ├── keepalived_patch.yaml
│   │   └── kustomization.yaml
│   └── tls
│       ├── certificate.yaml
│       ├── kustomization.yaml
│       ├── kustomizeconfig.yaml
│       └── tls.yaml
├── default
│   ├── ironic_bmo_configmap.env
│   └── kustomization.yaml
├── overlays
│   ├── basic-auth_tls
│   │   ├── basic-auth_tls.yaml
│   │   └── kustomization.yaml
│   └── basic-auth_tls_keepalived
│       └── kustomization.yaml
├── OWNERS
└── README.md
The ironic-deployment folder contains kustomizations for deploying Ironic.
It makes use of kustomize components for basic auth, TLS and keepalived configurations.
This makes it easy to combine the configurations, for example basic auth + TLS.
There are some ready made overlays in the overlays folder that shows how this
can be done. For more information, check the readme in the ironic-deployment
folder.
Deployment commands
There is a useful deployment script that configures and deploys BareMetal Operator and Ironic. It requires some variables :
- IRONIC_HOST : domain name for Ironic
- IRONIC_HOST_IP : IP on which Ironic is listening
In addition you can configure the following variables. They are optional. If you leave them unset, then passwords and certificates will be generated for you.
- KUBECTL_ARGS : Additional arguments to kubectl apply
- IRONIC_USERNAME : username for ironic
- IRONIC_PASSWORD : password for ironic
- IRONIC_CACERT_FILE : CA certificate path for ironic
- IRONIC_CAKEY_FILE : CA certificate key path, unneeded if ironic
- certificates exist
- IRONIC_CERT_FILE : Ironic certificate path
- IRONIC_KEY_FILE : Ironic certificate key path
- MARIADB_KEY_FILE: Path to the key of MariaDB
- MARIADB_CERT_FILE: Path to the cert of MariaDB
- MARIADB_CAKEY_FILE: Path to the CA key of MariaDB
- MARIADB_CACERT_FILE: Path to the CA certificate of MariaDB
Before version 0.5.0, Ironic Inspector parameters were also used:
- IRONIC_INSPECTOR_USERNAME : username for inspector
- IRONIC_INSPECTOR_PASSWORD : password for inspector
- IRONIC_INSPECTOR_CERT_FILE : Inspector certificate path
- IRONIC_INSPECTOR_KEY_FILE : Inspector certificate key path
- IRONIC_INSPECTOR_CACERT_FILE : CA certificate path for inspector, defaults to IRONIC_CACERT_FILE
- IRONIC_INSPECTOR_CAKEY_FILE : CA certificate key path, unneeded if inspector certificates exist
Then run :
./tools/deploy.sh [-b -i -t -n -k]
-b: deploy BMO-i: deploy Ironic-t: deploy with TLS enabled-n: deploy without authentication-k: deploy with keepalived
This will deploy BMO and / or Ironic with the proper configuration.
Useful tips
It is worth mentioning some tips for when the different configurations are useful as well. For example:
-
Only BMO is deployed, in a case when Ironic is already running, e.g. as part of Cluster API Provider Metal3 (CAPM3) when a successful pivoting state was met and ironic being deployed.
-
BMO and Ironic are deployed together, in a case when CAPM3 is not used and baremetal-operator and ironic containers to be deployed together.
-
Only Ironic is deployed, in a case when BMO is deployed as part of CAPM3 and only Ironic setup is sufficient, e.g. clusterctl provided by Cluster API(CAPI) deploys BMO, so that it can take care of moving the BaremetalHost during the pivoting.
Important Note When the baremetal-operator is deployed through metal3-dev-env, baremetal-operator container inherits the following environment variables through configmap:
$PROVISIONING_IP
$PROVISIONING_INTERFACE
In case you are deploying baremetal-operator locally, make sure to populate and export these environment variables before deploying.
Host State Machine
During its lifetime, a BareMetalHost resource goes through a series of
various states. Some of them are stable (the host stays in them indefinitely
without user input), some are transient (the state will change once a certain
operation completes). These fields in the status resource define the current
state of the host:
status.provisioning.state– the current phase of the provisioning process.status.operationHistory– the history of the main provisioning phases: registration, inspection, provisioning and deprovisioning.status.operationalStatus– the overall status of the host.status.errorType– the type of the current error (if any).status.poweredOn– the current power state of the host.
This is how the status of a healthy provisioned host may look like:
status:
 # ...
  operationHistory:
    deprovision:
      end: null
      start: null
    inspect:
      end: "2024-06-17T13:09:07Z"
      start: "2024-06-17T13:03:54Z"
    provision:
      end: "2024-06-17T13:11:18Z"
      start: "2024-06-17T13:09:26Z"
    register:
      end: "2024-06-17T13:03:54Z"
      start: "2024-06-17T12:54:18Z"
  operationalStatus: OK
  poweredOn: true
  provisioning:
    ID: e09032ea-1b7d-4c50-bfcd-b94ff7e8d431
    bootMode: UEFI
    image:
      checksumType: sha256
      checksum: http://192.168.0.150/SHA256SUMS
      format: qcow2
      url: http://192.168.0.150/jammy-server-cloudimg-amd64.img
    rootDeviceHints:
      deviceName: /dev/sda
    state: provisioned
 # ...
OperationalStatus
OK– the host is healthy and operational.discovered– the host is known to Metal3 but lacks the required information for the normal operation (usually, the BMC credentials).error– error has occurred, see thestatus.errorTypeandstatus.errorMessagefields for details.delayed– cannot proceed with the provisioning because the maximum number of the hosts in the given state has been reached.detached– the host is detached, no provisioning actions are possible (see detached annotation for details).
Provisioning state machine
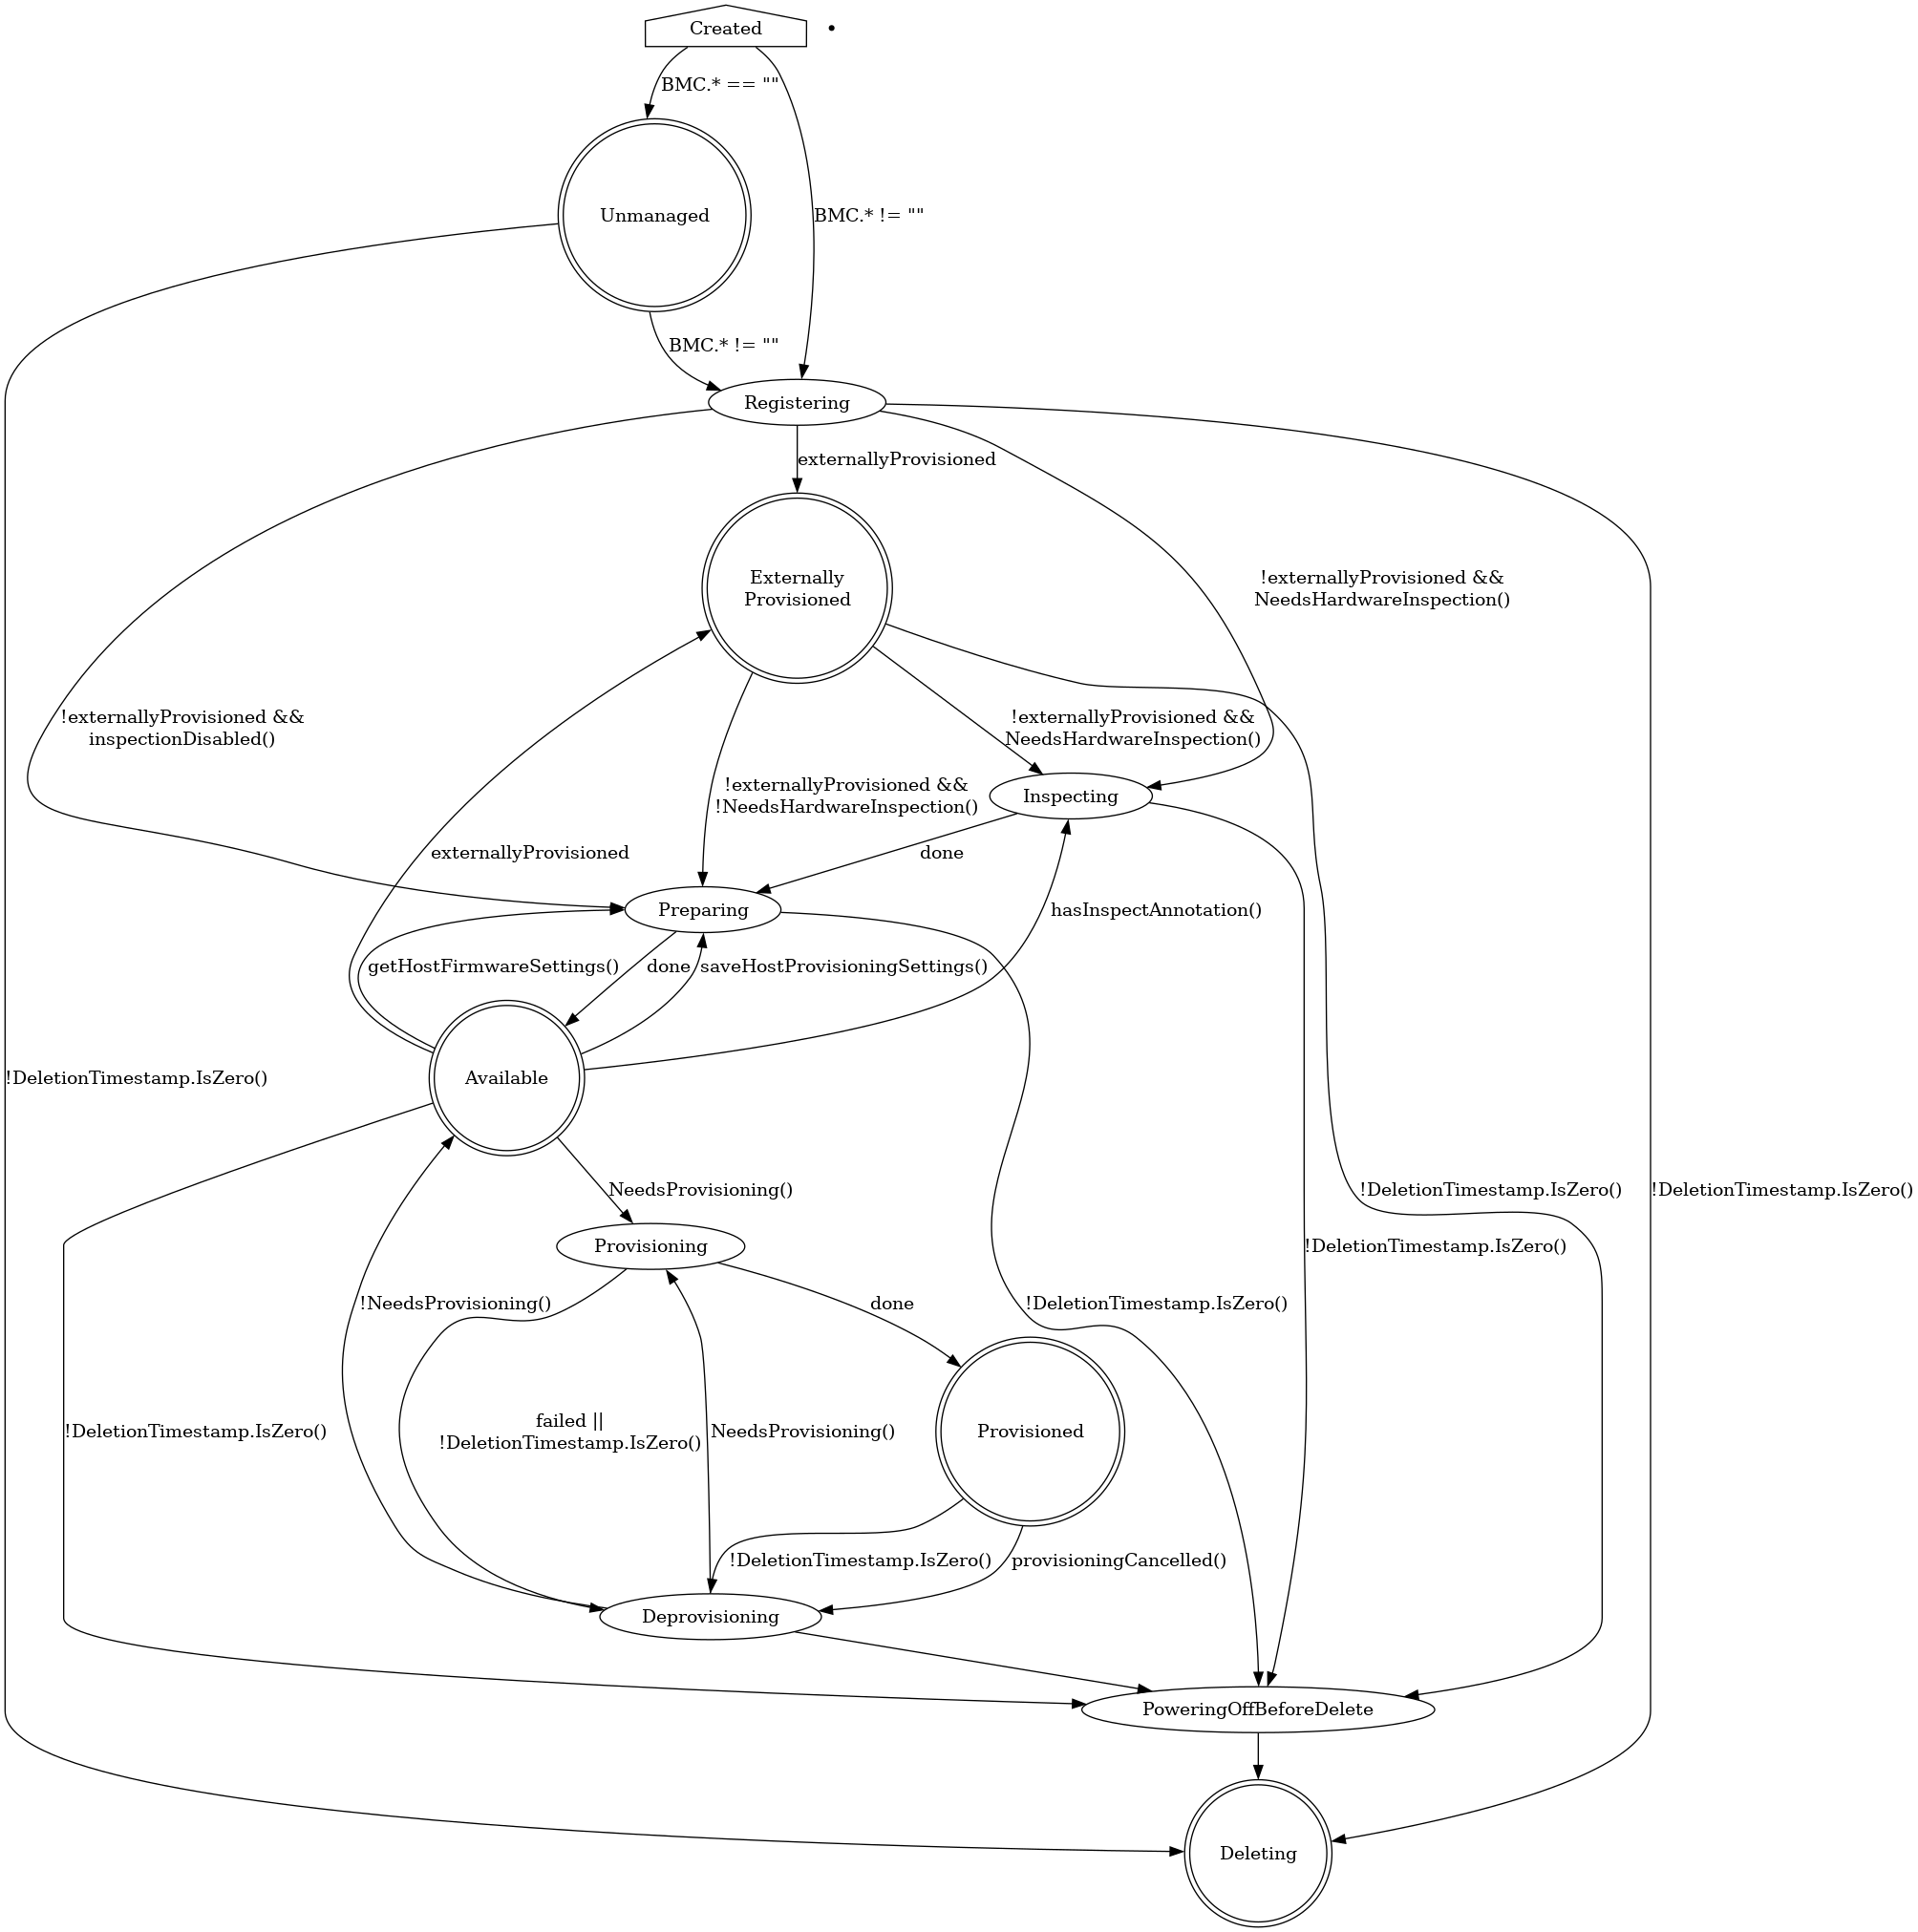
Provisioning states
Creating
Newly created hosts get an empty provisioning state briefly before moving
either to unmanaged or registering.
Unmanaged
An unmanaged host is missing both the BMC address and credentials
secret name, and does not have any information to access the BMC
for registration.
The corresponding operational status is discovered.
Externally Provisioned
An externally provisioned host has been deployed
using another tool. Hosts reach this state when they are created with the
externallyProvisioned field set to true. Hosts in this state are monitored,
and only their power status is managed.
Registering
The host will stay in the registering state while the BMC access details are
being validated.
Inspecting
After the host is registered, an IPA ramdisk will be booted on it. The agent
collects information about the available hardware components and sends it back
to Metal3. The host will stay in the inspecting state until this process is
completed.
Preparing
When setting up RAID or changing firmware settings, the host will be in
preparing state.
Available
A host in the available state is ready to be provisioned. It will move to the
provisioning state once the image field is populated.
Provisioning
While an image is being copied to the host, and the host is configured
to run the image, the host will be in the provisioning state.
Provisioned
After an image is copied to the host and the host is running the
image, it will be in the provisioned state.
Deprovisioning
When the previously provisioned image is being removed from the host,
it will be in the deprovisioning state.
Powering off before delete
When the host that is not currently unmanaged is marked to be deleted, it
will be powered off first and will stay in the powering off before delete
until it’s done or until the retry limit is reached.
Deleting
When the host is marked to be deleted and has been successfully powered off, it
will move from its current state to deleting, at which point the resource
record is deleted.
Supported hardware
Metal3 supports many vendors and models of enterprise-grade hardware with a BMC (Baseboard Management Controller) that supports one of the remote management protocols described in this document. On top of that, one of the two boot methods must be supported:
-
Network boot. Most hardware supports booting a Linux kernel and initramfs via TFTP. Metal3 augments it with iPXE - a higher level network boot firmware with support for scripting and TCP-based protocols such as HTTP.
Booting over network relies on DHCP and thus requires a provisioning network for isolated L2 traffic between the Metal3 control plane and the machines.
-
Virtual media boot. Some hardware model support directly booting an ISO 9660 image as a virtual CD device over HTTP(s). An important benefit of this approach is the ability to boot hardware over L3 networks, potentially without DHCP at all.
IPMI
IPMI is the oldest and by far the most widely available remote management protocol. Nearly all enterprise-grade hardware supports it. Its downside include reduced reliability and a weak security, especially if not configured properly.
WARNING: only network boot over iPXE is supported for IPMI.
| BMC address format | Notes |
|---|---|
ipmi://<host>:<port> | Port is optional, defaults to 623. |
<host>:<port> | IPMI is the default protocol in Metal3. |
Redfish and its variants
Redfish is a vendor-agnostic protocol for remote hardware management. It is based on HTTP(s) and JSON and thus does not suffer from the limitations of IPMI. It also exposes modern features such as virtual media boot, RAID management, firmware settings and updates.
Ironic (and thus Metal3) aims to support Redfish as closely to the standard as possible, with a few workarounds for known issues and explicit support for Dell iDRAC. Note, however, that all features are optional in Redfish, so you may encounter a Redfish-capable hardware that is not supported by Metal3. Furthermore, some features (such as virtual media boot) may require buying an additional license to function.
Since a Redfish API endpoint can manage several servers (systems in Redfish
terminology), BMC addresses for Redfish-based drivers include a system ID -
the URL of the particular server. For Dell machines it usually looks like
/redfish/v1/Systems/System.Embedded.1, while other vendors may simply use
/redfish/v1/Systems/1. Check the hardware documentation to find out which
format is right for your machine.
| Technology | Boot method | BMC address format | Notes |
|---|---|---|---|
| Generic Redfish | iPXE | redfish://<host>:<port>/<systemID> | |
| Virtual media | redfish-virtualmedia://<host>:<port>/<systemID> | Must not be used for Dell machines. | |
| Dell iDRAC 8+ | iPXE | idrac-redfish://<host>:<port>/<systemID> | |
| Virtual media | idrac-virtualmedia://<host>:<port>/<systemID> | Requires firmware v6.10.30.00+ for iDRAC 9, v2.75.75.75+ for iDRAC 8. | |
| HPE iLO 5+ | iPXE | redfish://<host>:<port>/<systemID> | Requires firmware v1.57+ for iLO 6. No RAID management in iLO 5. |
| Virtual media | redfish-virtualmedia://<host>:<port>/<systemID> | Requires firmware v1.57+ for iLO 6. No RAID management in iLO 5. |
Users have also reported success with certain models of SuperMicro, Lenovo, ZT Systems and Cisco UCS hardware, but hardware from these vendors is not regularly tested by the team.
All drivers based on Redfish allow optionally specifying the carrier protocol
in the form of +http or +https, for example: redfish+http://... or
idrac-virtualmedia+https. When not specified, HTTPS is used by default.
NOTE: ilo5-redfish and ilo5-virtualmedia are aliases for redfish and
redfish-virtualmedia respectively and should no longer be used.
Redfish interoperability
As noted above, Redfish allows for very different valid implementations, some of which are not compatible with Ironic (and thus Metal3). The Ironic project publishes a Redfish interoperability profile – a JSON document that describes the required and optionally supported Redfish API features. Its available versions can be found in the Ironic source tree. The Redfish-Interop-Validator tool can be used to validate a server against this profile.
Check the Ironic interoperability documentation for a rendered version of the latest profile. All features required for Ironic are also required for Metal3. Most optional features except for the out-of-band inspection are also supported, although the hardware metrics support via ironic-prometheus-exporter is currently experimental and undocumented.
Previously available vendor-specific protocols
| Technology | Protocol | Boot method | BMC address format | Status |
|---|---|---|---|---|
| Fujitsu iRMC | iRMC | iPXE | irmc://<host>:<port> | Removed in BMO 0.13 / Ironic Image 35.0. |
| HPE iLO 4 | iLO | iPXE | ilo4://<host>:<port> | Removed in BMO 0.12 / Ironic Image 33.0. |
| iLO | Virtual media | ilo4-virtualmedia://<host>:<port> | Removed in BMO 0.12 / Ironic Image 33.0. | |
| HPE iLO 5 | iLO | iPXE | ilo5://<host>:<port> | Removed in BMO 0.12 / Ironic Image 33.0. |
Baremetal Operator features
Basic features
- Provisioning and Deprovisioning
- Automated Cleaning
- Automatic Secure Boot
- Controlling Inspection
- Firmware Settings
- Firmware Updates
- Instance Customization
- RAID Setup
- Rebooting Hosts
- Specifying Root Device
Provisioning and Deprovisioning
The most fundamental feature of Metal3 Bare Metal Operator is provisioning of
bare-metal machines with a user-provided image. This document explains how to
provision machines using the BareMetalHost API directly. Users of the Cluster
API should consult the CAPM3 documentation instead.
Provisioning
A freshly enrolled host gets provisioned when the two conditions are met:
- the state is
available(see state machine), - either its
imagefield or itscustomDeployfield is not empty.
NOTE: customDeploy is an advanced feature that is not covered in this
document.
To start the provisioning process, you need at least two bits of information:
- the URL of the image you want to put on the target host,
- the value or the URL of the image checksum using either SHA256 or SHA512 (MD5 is supported but deprecated and not compatible with FIPS 140 mode).
The minimum example looks like this:
apiVersion: metal3.io/v1alpha1
kind: BareMetalHost
metadata:
  name: host-0
  namespace: my-cluster
spec:
  online: true
  bootMACAddress: 80:c1:6e:7a:e8:10
  bmc:
    address: ipmi://192.168.1.13
    credentialsName: host-0-bmc
  image:
    checksum: http://192.168.0.150/SHA256SUMS
    url: http://192.168.0.150/jammy-server-cloudimg-amd64.img
    checksumType: auto
In most real cases, you will also want to provide
- first-boot configuration as described in instance customization,
- hints to choose the target root device,
- the format of the image you use.
As a result, a more complete example will look like this:
apiVersion: metal3.io/v1alpha1
kind: BareMetalHost
metadata:
  name: host-0
  namespace: my-cluster
spec:
  online: true
  bootMACAddress: 80:c1:6e:7a:e8:10
  bmc:
    address: ipmi://192.168.1.13
    credentialsName: host-0-bmc
  image:
    checksum: http://192.168.0.150/SHA256SUMS
    url: http://192.168.0.150/jammy-server-cloudimg-amd64.img
    checksumType: auto
    format: raw
  rootDeviceHints:
    wwn: "0x55cd2e415652abcd"
  userData:
    name: host-0-userdata
When the provisioning state of the host becomes provisioned, your instance is
ready to use. Note, however, that booting the operating system and applying the
first boot scripts will take a few more minutes after that.
Using OCI registries
Starting with BMO 0.12 and Ironic 33.0, Metal3 supports deploying images from OCI artifacts. Such artifacts can be uploaded to most OCI-compatible registries, e.g. using helper tools such as ORAS.
Images can be provided by using a URL with an oci:// scheme in the
image.url field. You can use the short form with only a tag:
apiVersion: metal3.io/v1alpha1
kind: BareMetalHost
metadata:
  name: host-0
  namespace: my-cluster
spec:
  online: true
  bootMACAddress: 80:c1:6e:7a:e8:10
  bmc:
    address: ipmi://192.168.1.13
    credentialsName: host-0-bmc
  image:
    url: oci://registry.example.com/project/myimage:1.2.3
  rootDeviceHints:
    wwn: "0x55cd2e415652abcd"
  userData:
    name: host-0-userdata
However, in this variant there is no way to provide a checksum (the checksum
field is ignored for OCI images). Thus, it is highly recommended to use the
full form with the hash:
apiVersion: metal3.io/v1alpha1
kind: BareMetalHost
metadata:
  name: host-0
  namespace: my-cluster
spec:
  online: true
  bootMACAddress: 80:c1:6e:7a:e8:10
  bmc:
    address: ipmi://192.168.1.13
    credentialsName: host-0-bmc
  image:
    url: oci://registry.example.com/project/myimage@sha256:<digest>
  rootDeviceHints:
    wwn: "0x55cd2e415652abcd"
  userData:
    name: host-0-userdata
Warning: BMO does not yet support authenticated registries; support is expected in BMO 0.13 or later. Registries that serve images over plain HTTP instead of HTTPS require Ironic 34.0 or later.
Note: the type of the image can be auto-detected or provided via the
disktype attribute in the image manifest.
See Ironic documentation on OCI registries for more details, including limitations of the feature and examples of using the ORAS command.
Note on images
Two image formats are commonly used with Metal3: QEMU’s qcow2 and raw disk images. Both formats have their upsides and downsides:
-
Qcow images are usually smaller and thus require less network bandwidth to transfer, especially if you provision many machines with different images at the same time.
-
Raw images can be streamed directly from the remote location to the target block device without any conversion. However, they can be very large.
When the format is omitted, Ironic will download the image into the local cache
and inspect its format. If you want to use the streaming feature, you need to
provide the raw format explicitly. If you want to forcibly cache the image
(for example, because the remote image server is not accessible from the
machine being provisioned), omit the format or use qcow2 images.
HINT: cloud-init is capable of growing the last partition to occupy the remaining free space. Use this feature instead of creating very large raw images with a lot of empty space.
NOTE: the special format value live-iso triggers a live ISO
provisioning that works differently from a normal one.
Notes on checksums
Starting from BMO v0.10.0, leaving checksumType empty prompts Ironic to
automatically detect the checksum type based on its length. In earlier versions,
this behavior can be achieved by setting checksumType to auto.
The checksum value can be provided either as a URL or as the hash value
directly. Providing a URL is more convenient in case of public cloud images,
but it provides a weaker defense against man-in-the-middle attacks.
Deprovisioning
To remove an instance from the host and make it available for new deployments,
remove the image, userData, networkData, metaData and customDeploy
fields (if present). Depending on the host configuration, it will either start
the automated cleaning process or will become
available right away.
Reprovisioning
If you want to apply a new image or new user or network data to the host, you need to deprovision and provision it again. This can be done in two ways:
-
If the URL of the image changes, the re-provisioning process will start automatically. Make sure to update the user and network data in the same or earlier edit operation.
-
If the URL of the image is the same, you need to remove the
imagefield, then add it back once the state of theBareMetalHostchanges todeprovisioning.
WARNING: updating the userData and networkData fields alone does not
trigger a new provisioning.
Automated Cleaning
One of the Ironic’s feature exposed to Metal3 Baremetal Operator is node automated cleaning. When enabled, automated cleaning kicks off when a node is provisioned first time and on every deprovisioning.
There are two automated cleaning modes available which can be configured via
automatedCleaningMode field of a BareMetalHost spec:
metadata(the default) enables the removal of partitioning tables from all disksdisableddisables the cleaning process
For example:
apiVersion: metal3.io/v1alpha1
kind: BareMetalHost
metadata:
  name: example-host
spec:
  automatedCleaningMode: metadata
  bootMACAddress: 00:8a:b6:8e:ac:b8
  bmc:
    address: ipmi://192.168.111.1:6230
    credentialsName: example-node-bmc-secret
  online: true
Note: Ironic supports full data removal, which is not currently exposed in Metal3.
For a host with cleaning disabled, no cleaning will be performed during deprovisioning. This is faster but may cause conflicts on subsequent provisionings (e.g. Ceph is known not to tolerate stale data partitions).
Warning: when disabling cleaning, consider setting root device hints to specify the exact block device to install to. Otherwise, subsequent provisionings may end up with different root devices, potentially causing incorrect configuration because of duplicated config drives.
If you are using Cluster-api-provider-metal3, please see its cleaning documentation.
Automatic secure boot
The automatic secure boot feature allows enabling and disabling UEFI (Unified
Extensible Firmware Interface) secure boot when provisioning a host. This
feature requires supported hardware and compatible OS image. The current
hardwares that support enabling UEFI secure boot are iLO, iRMC and
Redfish drivers.
Check also:
Why do we need it
We need the Automatic secure boot when provisioning a host with high security requirements. Based on checksum and signature, the secure boot protects the host from loading malicious code in the boot process before loading the provisioned operating system.
How to use it
To enable Automatic secure boot, first check if hardware is supported and then
specify the value UEFISecureBoot for bootMode in the BareMetalHost custom
resource. Please note, it is enabled before booting into the deployed instance
and disabled when the ramdisk is running and on tear down. Below you can check
the example:
apiVersion: metal3.io/v1alpha1
kind: BareMetalHost
metadata:
  name: node-1
spec:
  online: true
  bootMACAddress: 00:5c:52:31:3a:9c
  bootMode: UEFISecureBoot
  ...
This will enable UEFI before booting the instance and disable it when
deprovisioned. Note that the default value for bootMode is UEFI.
Controlling Inspection
Re-running inspection
The inspect annotation can be used to request the BareMetal Operator to
(re-)inspect an available BareMetalHost, for example, when the hardware
changes. If an inspection request is made while the host is any other
state than available, the request will be ignored.
To request a new inspection, simply annotate the host with inspect.metal3.io.
Once inspection is requested, you should see the BMH in inspecting state
until inspection is completed, and by the end of inspection the
inspect.metal3.io annotation will be removed automatically.
Here is an example:
apiVersion: metal3.io/v1alpha1
kind: BareMetalHost
metadata:
  name: example
  annotations:
    # The inspect annotation with no value
    inspect.metal3.io: ""
spec:
  ...
Disabling inspection
If you do not need the HardwareData collected by inspection, you can disable it
by setting the inspect.metal3.io annotation to disabled, for example:
apiVersion: metal3.io/v1alpha1
kind: BareMetalHost
metadata:
  name: example
  annotations:
    inspect.metal3.io: disabled
spec:
  ...
For advanced use cases, such as providing externally gathered inspection data, see external inspection.
Firmware Settings
Metal3 supports modifying firmware settings of the hosts before provisioning them. This feature can be used, for example, to enable or disable CPU virtualization extensions, huge pages or SRIOV support. The corresponding functionality in Ironic is called BIOS settings.
Reading and modifying firmware settings is only supported for drivers based on Redfish, iRMC or iLO (see supported hardware). The commonly used IPMI driver does not support this feature.
HostFirmwareSettings Resources
A HostFirmwareSettings resource is automatically created for each host that
supports firmware settings with the same name and in the same namespace as
host. BareMetal Operator puts the current settings in the status.settings
field:
apiVersion: metal3.io/v1alpha1
kind: HostFirmwareSettings
metadata:
  creationTimestamp: "2024-05-28T16:31:06Z"
  generation: 1
  name: worker-0
  namespace: my-cluster
  ownerReferences:
  - apiVersion: metal3.io/v1alpha1
    blockOwnerDeletion: true
    controller: true
    kind: BareMetalHost
    name: worker-0
    uid: 663a1453-d4d8-43a3-b459-64ea94d1435f
  resourceVersion: "20653"
  uid: 46fc9ccb-0717-4ced-93aa-babbe1a8cd5b
spec:
  settings: {}
status:
  conditions:
  - lastTransitionTime: "2024-05-28T16:31:06Z"
    message: ""
    observedGeneration: 1
    reason: Success
    status: "True"
    type: Valid
  - lastTransitionTime: "2024-05-28T16:31:06Z"
    message: ""
    observedGeneration: 1
    reason: Success
    status: "False"
    type: ChangeDetected
  lastUpdated: "2024-05-28T16:31:06Z"
  schema:
    name: schema-f229959d
    namespace: my-cluster
  settings:
    BootMode: Uefi
    EmbeddedSata: Raid
    L2Cache: 10x256 KB
    NicBoot1: NetworkBoot
    NumCores: "10"
    ProcTurboMode: Enabled
    QuietBoot: "true"
    SecureBootStatus: Enabled
    SerialNumber: QPX12345
In this example (taken from a virtual testing environment):
-
The
spec.settingsmapping is empty - no change is requested by the user. -
The
status.settingsmapping is populated with the current values detected by Ironic. -
The
Validcondition isTrue, which means thatspec.settingsare valid according to the host’sFirmwareSchema. The condition will be set toFalseif any value inspec.settingsfails validation. -
The
ChangeDetectedcondition isFalse, which means that the desired settings and the real settings do not diverge. This condition will be set toTrueafter you modifyspec.settingsuntil the change is reflected instatus.settings. -
The
schemafield contains a link to the firmware schema (see below).
Warning: Ironic does not constantly update the current settings to avoid an unnecessary load on the host’s BMC. The current settings are updated on enrollment, provisioning and deprovisioning only.
FirmwareSchema resources
One or more FirmwareSchema resources are created for hosts that support
firmware settings. Each schema object represents a list of possible settings
and limits on their values.
apiVersion: metal3.io/v1alpha1
kind: FirmwareSchema
metadata:
  creationTimestamp: "2024-05-28T16:31:06Z"
  generation: 1
  name: schema-f229959d
  namespace: my-cluster
  ownerReferences:
  - apiVersion: metal3.io/v1alpha1
    kind: HostFirmwareSettings
    name: worker-1
    uid: bd97a81c-c736-4a6d-aee5-32dccb26e366
  - apiVersion: metal3.io/v1alpha1
    kind: HostFirmwareSettings
    name: worker-0
    uid: d8fb3c8a-395e-4c0a-9171-5928a68305b3
spec:
  hardwareModel: KVM (8.6.0)
  hardwareVendor: Red Hat
  schema:
    BootMode:
      allowable_values:
      - Bios
      - Uefi
      attribute_type: Enumeration
      read_only: false
    NumCores:
      attribute_type: Integer
      lower_bound: 10
      read_only: true
      unique: false
      upper_bound: 20
    QuietBoot:
      attribute_type: Boolean
      read_only: false
      unique: false
The following fields are included for each setting:
attribute_type– The type of the setting (Enumeration,Integer,String,Boolean, orPassword).read_only– The setting is read-only and cannot be modified.unique– The setting’s value is unique in this host (e.g. serial numbers).
For type Enumeration:
allowable_values– A list of allowable values.
For type Integer:
lower_bound– The lowest allowed integer value.upper_bound– The highest allowed integer value.
For type String:
min_length– The minimum length that the string value can have.max_length– The maximum length that the string value can have.
Note: the FirmwareSchema has a unique identifier derived from its
settings and limits. Multiple hosts may therefore have the same
FirmwareSchema identifier so its likely that more than one
HostFirmwareSettings reference the same FirmwareSchema when hardware of the
same vendor and model are used.
How to change firmware settings
To change one or more settings for a host, update the corresponding
HostFirmwareSettings resource, changing or adding the required settings to
spec.settings. For example:
apiVersion: metal3.io/v1alpha1
kind: HostFirmwareSettings
metadata:
  name: worker-0
  namespace: my-cluster
  # ...
spec:
  settings:
    QuietBoot: true
status:
  # ...
Hint: you don’t need to copy over the settings you don’t want to change.
If the host is in the available state, it will be moved to the preparing
state and the new settings will be applied. After some time, the host will move
back to available, and the resulting changes will be reflected in the
status of the HostFirmwareSettings object. Applying firmware settings
requires 1-2 reboots of the machine and thus may take 5-20 minutes.
Warning: if the host is not in the available state, the settings will be
pending until it gets to this state (e.g. as a result of deprovisioning).
Alternatively, you can create a HostFirmwareSettings object together with
the BareMetalHost object. In this case, the settings will be applied after
inspection is finished.
See also
The functionality described here can be used either on newly provisioned nodes (Day 1 operation, as described here) or on already provisioned nodes (Day 2 operation, utilizing Live Updates / Servicing feature).
Firmware Updates
Metal3 supports updating firmware and retrieving the current firmware versions of the bare metal hosts. This feature can be used to update the system firmware (e.g. BIOS) or BMC firmware.
Updating the firmware components is only supported for Redfish-based drivers (see supported hardware).
HostFirmwareComponents Resources
A HostFirmwareComponents resource can be created manually or automatically
for each host that supports firmware components with the same name and in the
same namespace as host. BareMetal Operator puts the current components
information in the status.components field:
apiVersion: metal3.io/v1alpha1
kind: HostFirmwareComponents
metadata:
  creationTimestamp: "2024-08-08T16:44:34Z"
  generation: 1
  name: worker-0
  namespace: my-cluster
  ownerReferences:
  - apiVersion: metal3.io/v1alpha1
    kind: BareMetalHost
    name: worker-0
    uid: bef07c46-0674-4c65-8613-d29920e207b1
  resourceVersion: "21527"
  uid: 1f9d5b76-5b17-44a1-84f8-7242daafc51d
spec:
  updates: []
status:
  components:
  - component: bios
    currentVersion: 2.3.5
    initialVersion: 2.3.5
  - component: bmc
    currentVersion: 6.10.30.00
    initialVersion: 6.10.30.00
  conditions:
  - lastTransitionTime: "2024-08-08T16:44:35Z"
    message: ""
    observedGeneration: 1
    reason: OK
    status: "True"
    type: Valid
  - lastTransitionTime: "2024-08-08T16:44:35Z"
    message: ""
    observedGeneration: 1
    reason: OK
    status: "False"
    type: ChangeDetected
  lastUpdated: "2024-08-08T16:44:35Z"
This example was taken from a real hardware and was automatically generated:
-
The
spec.updateslist is empty - no change is requested by the user. -
The
status.updateswill only be present whenspec.updatesis not empty and an update was executed. -
The
status.componentsinformation is populated with the current values detected by Ironic. If an update is executed, the updated information will be available when the host transitions fromavailablestate. -
The
Validcondition isTrue, which means thatspec.updatesare valid, since it was automatically generated. We allow thespec.updatesto be an empty list. The condition will be set toFalseif any value inspec.updatesfails validation. -
The
ChangeDetectedcondition isFalse, which means that the information provided in status matches the information from Ironic and fromspec.updates. This condition will be set toTrueafter you modifyspec.updatesuntil the change is reflected instatus.updates.
Warning: The components in status are only updated on enrollment and provisioning. We do not periodically retrieve firmware versions unless an update is executed.
Note: When manually creating the HostFirmwareComponent resource,
the information for status and metadata will be updated during
inspecting.
How to change firmware components
To change one or more components for a host, update the corresponding
HostFirmwareComponents resource, changing or adding the required components
to spec.updates. For example:
apiVersion: metal3.io/v1alpha1
kind: HostFirmwareComponents
metadata:
  name: worker-0
  namespace: my-cluster
  # ...
spec:
  updates:
  - component: <bmc or bios>
    url: https://newfirmwareforcomponent/file
status:
  # ...
The firmware update for the components are only executed when the host is in
preparing state. When adding a new BareMetalHost and manually creating the
HostFirmwareComponents resource for it, you can specify the updates that
must occur for that host before it goes to available.
In case you have a host that is provisioned, and you would like to execute a
firmware update, you will need to edit the HostFirmwareComponents CR and
then trigger deprovisioning so it can go to preparing
to execute the updates.
The newer information about the firmware for the host will only be available
in the CRD after the host moves to preparing.
apiVersion: metal3.io/v1alpha1
kind: HostFirmwareComponents
metadata:
  name: worker-0
  namespace: my-cluster
  # ...
spec:
  updates:
  - component: <bmc or bios>
    url: https://newfirmwareforcomponent/file
status:
  # ...
  components:
  - component: bios
    currentVersion: 2.13.3
    initialVersion: 2.13.3
  - component: bmc
    currentVersion: 6.10.30.00
    initialVersion: 6.10.80.00
    lastVersionFlashed: 6.10.30.00
    updatedAt: "2024-08-06T16:54:16Z"
  # ...
A new update is applied when the URL for a component changes, not when a version change is detected.
See also
The functionality described here can be used either on newly provisioned nodes (Day 1 operation, as described here) or on already provisioned nodes (Day 2 operation, utilizing Live Updates / Servicing feature).
The corresponding functionality in Ironic is called Firmware Updates.
Instance Customization
When provisioning bare-metal machines, it is usually required to customize the resulting instances. Common use cases include injecting SSH keys, adding users, installing software, starting services or configuring networking.
It is recommended to use UserData or NetworkData together with a first-boot configuration software such as cloud-init, Glean or Ignition. Most cloud images already come with one of these programs installed and configured.
Note: all customizations described in this document apply only to the final instance provisioned by Metal3 and do not apply during the inspection, preparing and provisioning phases.
Modified images
Rather than using an official cloud image, a user may build a custom image per cluster or even per host. There are numerous tools to achieve that, the one that the Metal3 community often employs is diskimage-builder.
This approach has two major downsides:
- Per-host images take a lot of disk space, especially since Ironic has a local image cache.
- diskimage-builder allows only basic customization out of box, code will need to be written for anything complex.
It is recommended to use UserData or NetworkData instead when possible.
NetworkData
Network data describes the desired networking configuration for the deployed operating system, and is typically applied on first-boot via tools such as cloud-init.
The data is specified in the OpenStack network_data.json format supported by cloud-init and Glean. The format is not very well documented, but you can consult the network_data JSON schema shipped with OpenStack.
Usually, one network data secret is created per host and should be linked to
it. For example, given a local file host-0-network.json, you can create a
secret:
kubectl create secret generic host-0-networkdata --from-file=networkData=host-0-network.json
Then you can attach it to the host during its enrollment or when starting provisioning:
apiVersion: metal3.io/v1alpha1
kind: BareMetalHost
metadata:
  name: host-0
  namespace: my-cluster
spec:
  online: true
  bootMACAddress: 80:c1:6e:7a:e8:10
  bmc:
    address: ipmi://192.168.1.13
    credentialsName: host-0-bmc
  image:
    checksum: http://192.168.0.150/SHA256SUMS
    url: http://192.168.0.150/jammy-server-cloudimg-amd64.img
    checksumType: auto
  networkData:
    name: host-0-networkdata
NetworkData examples
Configure one NIC to use DHCP over IPv4, use Google DNS:
{
  "links": [
    {
      "id": "enp130s0f0",
      "type": "phy",
      "ethernet_mac_address": "11:22:33:44:55:66"
    }
  ],
  "networks": [
    {
      "id": "enp130s0f0",
      "link": "enp130s0f0",
      "type": "ipv4_dhcp"
    }
  ],
  "services": [
    {
      "type": "dns",
      "address": "8.8.8.8"
    }
  ]
}
Configure a bond between two physical NICs, use DHCP over IPv4 for it:
{
    "links": [
        {
            "id": "link0",
            "type": "phy",
            "ethernet_mac_address": "00:00:00:00:00:01",
            "mtu": 9000
        },
        {
            "id": "link1",
            "type": "phy",
            "ethernet_mac_address": "00:00:00:00:00:02",
            "mtu": 9000
        },
        {
            "id": "bond0",
            "type": "bond",
            "bond_links": [
                "link0",
                "link1"
            ],
            "bond_mode": "802.3ad",
            "bond_xmit_hash_policy": "layer3+4",
            "mtu": 9000
        }
    ],
    "networks": [
        {
            "id": "network0",
            "link": "bond0",
            "network_id": "data",
            "type": "ipv4_dhcp"
        }
    ],
    "services": []
}
Hint: you can use the inspection data from a HardwareData resource to
learn the NIC names and their MAC addresses:
$ kubectl get hardwaredata -n my-cluster host-0 -o jsonpath='{.spec.hardware.nics}' | jq .
[
  {
    "ip": "192.168.111.25",
    "mac": "00:f8:a8:a0:d0:d2",
    "model": "0x1af4 0x0001",
    "name": "enp2s0"
  },
  {
    "ip": "fd2e:6f44:5dd8:c956::19",
    "mac": "00:f8:a8:a0:d0:d2",
    "model": "0x1af4 0x0001",
    "name": "enp2s0"
  },
  {
    "mac": "00:f8:a8:a0:d0:d0",
    "model": "0x1af4 0x0001",
    "name": "enp1s0"
  }
]
UserData
User data describes the desired configuration of the instance in a format specific to the first-boot software:
- cloud-init supports two formats: cloud-config YAML and a shell script (distinguished by the header).
- Ignition uses its own format.
- Glean does not support user data at all.
For example, you can create a cloud-config file host-0.yaml:
#cloud-config
users:
- name: metal3
  ssh_authorized_keys:
  - ssh-ed25519 ABCD... metal3@example.com
kubectl create secret generic host-0-userdata -n my-cluster --from-file=userData=host-0.yaml
Then you can attach it to the host during its enrollment or when starting provisioning:
apiVersion: metal3.io/v1alpha1
kind: BareMetalHost
metadata:
  name: host-0
  namespace: my-cluster
spec:
  online: true
  bootMACAddress: 80:c1:6e:7a:e8:10
  bmc:
    address: ipmi://192.168.1.13
    credentialsName: host-0-bmc
  image:
    checksum: http://192.168.0.150/SHA256SUMS
    url: http://192.168.0.150/jammy-server-cloudimg-amd64.img
  userData:
    name: host-0-userdata
Implementation notes
User and network data are passed to the instance via a so called config drive, which is a small additional disk partition created on the root device during provisioning. This partition contains user and network data, as well as meta data with a host name, as files.
Ironic is responsible for creating a partition image (usually, in the ISO 9660 format) and passing it to the IPA ramdisk together with the rest of the deployment information. Once the instance boots, the partition is mounted by the first boot software and the configuration loaded from it.
Both cloud-init and Ignition support various data sources, from which user and network data are fetched. Depending on the image type, different sources may be enabled by default:
-
In case of cloud-init, make sure that the config drive data source is enabled. This is not the same as the OpenStack data source, although both are used with OpenStack.
-
For Ignition to work, you must use an OpenStack Platform image (see supported platforms).
Live updates (servicing)
Live updates (servicing) enables baremetal-operator to conduct certain actions on already provisioned BareMetalHosts. These actions currently include:
Live updates (servicing) is an opt-in feature. Operators may enable this
feature by creating a HostUpdatePolicy custom resource.
HostUpdatePolicy custom resource definition
HostUpdatePolicy is the custom resource which controls applying live updates. Each part of the functionality can be controlled separately by setting the respective entry in the HostUpdatePolicy spec:
firmwareSettings- controls changes to firmware settingsfirmwareUpdates- controls BIOS and BMC firmware updates
Allowed values for firmwareSettings and firmwareUpdates fields
Each of the fields can be set to one of the two values:
onReboot- enables performing the requested change on next reboot, oronPreparing- (default setting) limits applying this type of change to Preparing state (which only applies to nodes which are being provisioned)
Example HostUpdatePolicy definition
Here is an example of a HostUpdatePolicy CRD:
apiVersion: metal3.io/v1alpha1
kind: HostUpdatePolicy
metadata:
  name: ostest-worker-0
  namespace: openshift-machine-api
spec:
  firmwareSettings: onReboot
  firmwareUpdates: onReboot
How to perform Live updates on a BareMetalHost
- create a HostUpdatePolicy resource with the name matching the BMH to be updated
- use the format above, ensure
firmwareSettingsand/orfirmwareUpdatesis set toonReboot - make changes to HostFirmwareSettings and/or HostFirmwareComponents as required
- make sure the modified resources are considered valid (see
Conditions) - if you’re updating a Kubernetes node, make sure to drain it and mark as not schedulable
- issue a reboot request via the reboot annotation
- wait for the
operationalStatusto becomeOKagain - if you’re updating a Kubernetes node, make it schedulable again
Example commands
Below commands may be used to perform servicing operation on a bareMetalHost:
cat << EOF > hup.yaml
apiVersion: metal3.io/v1alpha1
kind: HostUpdatePolicy
metadata:
  name: ostest-worker-0
  namespace: openshift-machine-api
spec:
  firmwareSettings: onReboot
  firmwareUpdates: onReboot
EOF
kubectl apply -f hup.yaml

kubectl patch hostfirmwaresettings ostest-worker-0 --type merge -p \
    '{"spec": {"settings": {"QuietBoot": "true"}}}'

kubectl patch hostfirmwarecomponents ostest-worker-0 --type merge -p \
    '{"spec": {"updates": [{"component": "bios",
                        "url": "http://10.6.48.30:8080/firmimgFIT.d9"}]}}'

kubectl cordon worker-0

kubectl annotate bmh ostest-worker-0 reboot.metal3.io=""
Once the operation is complete, the node can be un-drained with the below command:
kubectl uncordon worker-0
Resulting workflow
Once changes similar to the above are made to the relevant CRDs, the following will occur:
- BMO will generate servicing steps (similar to manual cleaning steps) required to perform the requested changes
- BMH will transition to
servicingoperationalStatus - BMO will make calls to Ironic which will perform the servicing operation
- Ironic will reboot the BMH into the IPA image and perform requested changes
- depending on the hardware, more than one reboot may be required
- once servicing completes, BMO will update the operationalStatus to
OK - in case errors are encountered, BMO will set operationalStatus to
error, set errorMessage to the explanation of the error, and retry the operation after a short delay
RAID setup
RAID is a technology that allows creating volumes with certain properties out of two or more physical disks. Depending on the RAID level, you may be able to merge several disks into a larger one or achieve redundancy.
Metal3 supports two RAID implementation:
- Hardware RAID is implemented by hardware itself and can be configured through the machine’s BMC.
- Software RAID is implemented by the Linux kernel and can be configured
using the standard
mdadmtool.
To create or delete RAID volumes, you need to edit the spec.raid field of the
BareMetalHost resource, changing either the hardwareRAIDVolumes or the
softwareRAIDVolumes array. If the host is in the available state, it will
be moved to the preparing state and the new settings will be applied. After
some time, the host will move back to available, and the resulting changes
will be reflected in its status.raid field.
Note: RAID setup requires 1-2 reboots of the machine and thus may take 5-20 minutes.
Warning: never try to configure both hardware and software RAID at the same time on the same host. While theoretically possible, this mode makes little sense and is not supported well by the underlying Ironic service.
Hardware RAID
Hardware RAID is a type of RAID that is configured by a special component of the bare-metal machine - RAID controller. The resulting RAID volumes are normally presented transparently to the operating system and can be used as normal disks.
Not all hardware models and Metal3 drivers support RAID: check supported hardware for details.
Automatic allocation
One approach is to define the required level, disk count and volume size, letting Ironic to automatically select the disks to place RAID on, for example:
spec:
  raid:
    hardwareRAIDVolumes:
    - name: volume1
      level: "5"
      numberOfPhysicalDisks: 3
      sizeGibibytes: 350
The most common RAID levels are 0, 1, 5 and 1+0. Levels 2, 6,
5+0 and 6+0 are also supported by Metal3 but may not be supported by all
hardware models. The level dictates the minimum number of physical disks and
the maximum size of a RAID volume.
Note: because of values like 1+0, RAID level is a string, not a number.
You can use the boolean rotational field to limit the types of physical
disks:
trueto use only rotational disks (traditional spinning hard drives)falseto use non-rotational storage (flash-based: SSD, NVMe)- any types are used by default
Manual allocation
Alternatively, you can provide the controller and a list of disk identifiers.
Note that these are internal disk identifiers as reported by the BMC, not
standard Linux names like /dev/sda. For example, on a Dell machine:
spec:
  raid:
    hardwareRAIDVolumes:
    - name: volume2
      level: "0"
      controller: RAID.Integrated.1-1
      physicalDisks:
      - Disk.Bay.5:Enclosure.Internal.0-1:RAID.Integrated.1-1
      - Disk.Bay.6:Enclosure.Internal.0-1:RAID.Integrated.1-1
      - Disk.Bay.7:Enclosure.Internal.0-1:RAID.Integrated.1-1
If you do not specify the size of the volume, the maximum possible size will be used (depending on size of the physical disks).
Removing RAID
To remove the RAID configuration, set hardwareRAIDVolumes to an empty list:
spec:
  raid:
    hardwareRAIDVolumes: []
Warning: there is a crucial difference between setting
hardwareRAIDVolumes to an empty list and removing the raid field
completely: the former will remove any existing volumes, the latter will not
touch any existing RAID configuration.
Software RAID
Warning: software RAID support is experimental. Please report any issues you encounter.
Software RAID is configured by the mdadm utility from within the
IPA ramdisk, which will be automatically
booted by Ironic when the host moves to the preparing state.
A subset of the hardware RAID API is provided for software RAID volumes with the following limitations:
- The only supported levels are
0,1and1+0. - Only one or two RAID volumes can be created on a host.
- The first volume must have level
1and should be used as the root device. - It is not possible to specify the number of physical disks.
- The backing physical disks must not have any data or partitions on them.
- Your instance image must have Linux software RAID support, including the
mdadmutility. Other operating systems may not work at all.
Check the Ironic software RAID guide for more implementation details.
Software RAID: automatic allocation
You can specify the sizes and the levels of the volume(s) and let Ironic do the rest. You can also omit the size of the last volume:
spec:
  raid:
    softwareRAIDVolumes:
    - level: "1"
      sizeGibibytes: 10
    - level: "0"
Note: the same physical disks will be used for both volumes. Each physical disk will have partitions corresponding to each of the volumes.
Software RAID: manual allocation
You can specify the backing physical disks using the same format as rootDeviceHints, for example:
spec:
  raid:
    softwareRAIDVolumes:
    - level: "1"
      physicalDisks:
      - serialNumber: abcd
      - serialNumber: fake
Removing software RAID
To remove the RAID configuration, set softwareRAIDVolumes to an empty list:
spec:
  raid:
    softwareRAIDVolumes: []
Warning: even when automated cleaning is enabled, software RAID is not automatically removed on deprovisioning.
Rebooting hosts
The reboot annotation can be used for rebooting BareMetalHosts in the
provisioned state. The annotation key takes either of the following forms:
reboot.metal3.ioreboot.metal3.io/{key}
Note: use the online field to power hosts on/off instead of rebooting.
Simple reboot
In its basic form (reboot.metal3.io), the annotation will trigger a reboot of
the BareMetalHost. The controller will remove the annotation as soon as it has
restored power to the host.
The annotation value should be a JSON map containing the key mode and a value
hard or soft to indicate if a hard or soft reboot should be performed. If
the value is an empty string, the default is to first try a soft reboot, and if
that fails, do a hard reboot.
Phased reboot
The advanced form (reboot.metal3.io/{key}) includes a unique suffix
(indicated with {key}). In this form the host will be kept in PoweredOff
state until the annotation has been removed. This can be useful if some tasks
needs to be performed while the host is in a known stable state. The purpose
of the {key} is to allow multiple clients to use the API simultaneously in a
safe way. Each client chooses a key and touches only the annotations that has
this key to avoid interfering with other clients.
If there are multiple annotations, the controller will wait for all of them to
be removed (by the clients) before powering on the host. Similarly, if both
forms of annotations are used, the reboot.metal3.io/{key} form will take
precedence. This ensures that the host stays powered off until all clients are
ready (i.e. all annotations are removed).
Clients using this API must respect each other and clean up after themselves. Otherwise they will step on each others toes by for example, leaving an annotation indefinitely or removing someone else’s annotation before they were ready.
Examples
Immediate reboot via soft shutdown first, followed by a hard power-off if the soft shutdown fails:
apiVersion: metal3.io/v1alpha1
kind: BareMetalHost
metadata:
  name: example
  annotations:
    reboot.metal3.io: ""
spec:
  ...
Immediate reboot via hard power-off action:
apiVersion: metal3.io/v1alpha1
kind: BareMetalHost
metadata:
  name: example
  annotations:
    reboot.metal3.io: '{"mode": "hard"}'
spec:
  ...
Phased reboot, issued and managed by the client registered with the key
cli42, via soft shutdown first, followed by a hard reboot if the soft reboot
fails:
apiVersion: metal3.io/v1alpha1
kind: BareMetalHost
metadata:
  name: example
  annotations:
    reboot.metal3.io/cli42: ""
spec:
  ...
Phased reboot, issued and managed by the client registered with the key, via hard shutdown:
apiVersion: metal3.io/v1alpha1
kind: BareMetalHost
metadata:
  name: example
  annotations:
    reboot.metal3.io/cli42: '{"mode": "hard"}'
spec:
  ...
Implementation notes
The exact behavior of hard and soft reboot depends on the Ironic
configuration. Please see the Ironic configuration
reference
for more details on this, e.g. the soft_power_off_timeout variable is
relevant.
For more details please check the reboot interface proposal.
Specifying Root Device
Bare-metal machines often have more than one block device, and in many cases
a user will want to specify, which of them to use as the root device. Root
device hints allow selecting one device or a group of devices to choose from.
You can provide the hints via the spec.rootDeviceHints field on your
BareMetalHost:
spec:
  # ...
  rootDeviceHints:
    wwn: "0x55cd2e415652abcd"
Hint: root device hints in Metal3 are closely modeled on the Ironic’s root device hints, but there are important differences in available hints and the comparison operators they use.
Warning: the default root device depends on the hardware profile as
explained below. Currently, /dev/sda path is used when no hints are
specified. This value is not going to work for NVMe storage. Furthermore, Linux
does not guarantee the block device names to be consistent across reboots.
RootDeviceHints format
One or more hints can be provided, the chosen device will need to match all of them. Available hints are:
-
deviceName– A string containing a canonical Linux device path like/dev/vdaor a by-path alias like/dev/disk/by-path/pci-0000:04:00.0.Warning: as mentioned above, block device names are not guaranteed to be consistent across reboots. If possible, choose a more reliable hint, such as
wwnorserialNumber.Hint: only by-path aliases are supported, other aliases, such as by-id or by-uuid, cannot currently be used.
-
hctl– A string containing a SCSI bus address like0:0:0:0. -
model– A string containing a vendor-specific device identifier. The hint can be a substring of the actual value. -
vendor– A string containing the name of the vendor or manufacturer of the device. The hint can be a substring of the actual value. -
serialNumber– A string containing the device serial number. -
minSizeGigabytes– An integer representing the minimum size of the device in Gigabytes. -
wwn– A string containing the unique storage identifier. -
wwnWithExtension– A string containing the unique storage identifier with the vendor extension appended. -
wwnVendorExtension– A string containing the unique vendor storage identifier. -
rotational– A boolean indicating whether the device must be a rotating disk (true) or not (false). Examples of non-rotational devices include SSD and NVMe storage.
Finding the right hint value
Since the root device hints are only required for provisioning, you can use the results of inspection to get an overview of available storage devices:
kubectl get hardwaredata/<BMHNAME> -n <NAMESPACE> -o jsonpath='{.spec.hardware.storage}' | jq .
This commands produces a JSON output, where you can find all necessary fields to populate the root device hints before provisioning. For example, on a virtual testing environment:
[
  {
    "alternateNames": [
      "/dev/sda",
      "/dev/disk/by-path/pci-0000:03:00.0-scsi-0:0:0:0"
    ],
    "hctl": "0:0:0:0",
    "model": "QEMU HARDDISK",
    "name": "/dev/disk/by-path/pci-0000:03:00.0-scsi-0:0:0:0",
    "rotational": true,
    "serialNumber": "drive-scsi0-0-0-0",
    "sizeBytes": 32212254720,
    "type": "HDD",
    "vendor": "QEMU"
  }
]
Interaction with hardware profiles
Hardware profiles are a deprecated concept that was introduced to describe
homogenous types of hardware. The default hardware profile is unknown, which
implies using /dev/sda as the root device.
In a future version of BareMetalHost API, the hardware profile concept will be
disabled, and Metal3 will default to having no root device hints by default. In
this case, the default logic in Ironic will apply: the smaller block device
that is at least 4 GiB. If you want this logic to apply in the current version
of the API, use the empty profile:
spec:
  # ...
  hardwareProfile: empty
In all other cases, use explicit root device hints.
Baremetal Operator features
Advanced features
- Adopting Externally Provisioned Hosts
- Advanced Instance Customization
- Booting from Live ISO
- Changing BMC Address
- Detaching Hosts from Provisioner
- External Inspection
- Reconstructing Host Status
Adopting Externally Provisioned Hosts
BareMetal Operator allows enrolling hosts that have been previously provisioned
by a 3rd party without making them go through inspection, cleaning and
re-provisioning. Hosts are enrolled as usual, additionally setting the
externallyProvisioned field to true:
apiVersion: metal3.io/v1alpha1
kind: BareMetalHost
metadata:
  name: host-0
  namespace: my-cluster
spec:
  online: true
  bootMACAddress: 80:c1:6e:7a:e8:10
  bmc:
    address: ipmi://192.168.1.13
    credentialsName: host-0-bmc
  externallyProvisioned: true
Such hosts move from the registering provisioning state directly into
externally provisioned as shows in the state machine:
status:
  # ...
  operationalStatus: OK
  provisioning:
    ID: 8799e0d2-d2ca-4681-9385-e8bd69f6f441
    bootMode: UEFI
    image:
      url: ""
    state: externally provisioned
Note: while it’s currently not possible to get a host out of the
externally provisioned state, it’s better to future-proof your hosts by
adding a real image field so that your externally provisioned hosts look
exactly like normal ones.
Available actions
Currently, only a limited set of actions is possible on externally provisioned hosts:
- Powering on and off using the
onlinefield. - Rebooting using the reboot annotation.
- Live updates (servicing).
- Deletion without cleaning (the host is only powered off).
Warning: changing the externallyProvisioned field back to false is
currently not supported (see the tracker
bug).
Instance Customization
Below we cover more advanced instance customization, more complex use-cases and/or where customization of the metal3 deployment may be required.
For more general guidance around instance customization refer to the instance customization section.
Pre-Provisioning NetworkData
Pre-provisioning network data describes the desired networking configuration
for the deploy ramdisk running ironic-python-agent (IPA).
Usage of this API requires an IPA ramdisk image with a tool capable of interpreting and applying the data such as cloud-init, Glean or alternative. The default community supported ramdisk does not currently contain such a tool, but it is possible to build a custom image, for example using ironic-python-agent-builder with the simple-init element enabled.
Specifying pre-provisioning network data is useful in DHCP-less scenarios, where we cannot rely on DHCP to provide network configuration for the IPA ramdisk during the inspection and provisioning phases. In this situation we can use redfish virtualmedia to boot the IPA ramdisk, and the generated virtualmedia ISO will also serve as a configuration drive to provide the network configuration.
The data is specified in the OpenStack network_data.json format as described for Network data in the instance customization section.
Usually, one pre-provisioning network data secret is created per host and should be linked to it like Network data. If you require the same configuration for pre-provisioning and the deployed OS, it is only necessary to specify pre-provisioning network data - the pre-provisioning secret is automatically applied to networkData if no alternative secret is specified.
For example, given a local file host-0-network.json, you can create a secret:
kubectl create secret generic host-0-preprov-networkdata --from-file=networkData=host-0-network.json
Then you can attach it to the host during its enrollment:
apiVersion: metal3.io/v1alpha1
kind: BareMetalHost
metadata:
  name: host-0
  namespace: my-cluster
spec:
  online: true
  bootMACAddress: 80:c1:6e:7a:e8:10
  bmc:
    address: redfish-virtualmedia://192.168.1.13
    credentialsName: host-0-bmc
  preprovisioningNetworkDataName: host-0-preprov-networkdata
Booting from Live ISO
The live-iso API in Metal3 allows booting a BareMetalHost with an ISO image instead of writing an image to the local disk using the IPA deploy ramdisk.
This feature has two primary use cases:
- Running ephemeral load on hosts (e.g. calculations or simulations that do not store local data).
- Integrating a 3rd party installer (e.g. coreos installer).
Warning: this feature is designed to work with virtual media (see supported hardware. While it’s possible to boot an ISO over iPXE, the booted OS will not be able to access any data on the ISO except for the kernel and initramfs it booted from.
To boot a live ISO, you need to set the image URL to the location of the ISO
and set the format field to live-iso, for example:
apiVersion: metal3.io/v1alpha1
kind: BareMetalHost
metadata:
  name: live-iso-booted-node
spec:
  bootMACAddress: 80:c1:6e:7a:e8:10
  bmc:
    address: redfish-virtualmedia://192.168.111.1:8000/redfish/v1/Systems/1
    credentialsName: live-iso-booted-node-secret
  image:
    url: http://1.2.3.4/image.iso
    format: live-iso
  online: true
Note: image.checksum, rootDeviceHints, networkData and userData
will not be used since the image is not written to disk.
For more details, please see the design proposal.
Changing BMC Address
There are situations where you may need to change the BMC (Baseboard Management Controller) address of a BareMetalHost:
- The BMC hardware has failed and been replaced
- The BMC network configuration has changed (e.g., IP address reassignment)
- A mistake was made when initially setting the BMC address
- Network infrastructure changes require BMC address updates
This document explains how to update the BMC address of an existing BareMetalHost.
When Can the BMC Address Be Changed?
The BMC address can be updated in the following scenarios:
-
When the host is in the
registeringstate - This is the initial state when a BareMetalHost is first created and Ironic is attempting to register it. -
When the host is detached - By using the detached annotation, you can temporarily remove the host from Ironic’s management, update the BMC address, and then reattach it.
The BMC address cannot be changed while the host is actively managed by Ironic in other states without first detaching it.
Procedure for changing the BMC address
-
Check the current status of your BareMetalHost(s):
$ kubectl get baremetalhost -o wide NAME STATUS STATE CONSUMER BMC ONLINE ERROR AGE bmh1 detached provisioned metal3-k8s-426jf redfish-virtualmedia://192.168.1.32 true 108d bmh2 OK registering redfish-virtualmedia://192.168.1.33 true 3s -
If the state is
registeringor the status isdetached, you can directly edit the BMC address. -
If this is not the case, you need to detach the host first. NOTE: Make sure it is in a stable provisioning state, e.g.
ProvisionedorAvailablebefore this!kubectl annotate baremetalhost -n <namespace> <host-name> \ baremetalhost.metal3.io/detached="updating-bmc" -
Wait for the host to become detached:
kubectl -n <namespace> wait baremetalhost <host-name> --for=jsonpath='{.status.operationalStatus}'=detached -
Edit the BareMetalHost resource:
kubectl edit baremetalhost -n <namespace> <host-name> -
Update the
spec.bmc.addressfield to the new BMC address:spec: bmc: address: redfish://192.168.1.100 # Update to new address credentialsName: host-bmc-secret -
If needed, also update the BMC credentials secret.
-
Remove the detached annotation to reattach the host:
kubectl annotate baremetalhost -n <namespace> <host-name> \
  baremetalhost.metal3.io/detached-
Note the trailing
-which removes the annotation. -
Wait for the host to be reattached:
kubectl -n <namespace> wait baremetalhost <host-name> --for=jsonpath='{.status.operationalStatus}'=OK
Important Considerations
-
Ensure stable state: Do not try to change the BMC address in the middle of other operations, or if external processes or tools are interacting with the host. Make sure it is in a stable provisioning state, e.g.
ProvisionedorAvailablebefore considering a change. -
Host state is preserved: When you detach and reattach a host, the provisioning state is preserved. A
Provisionedhost will remainProvisioned, and anAvailablehost will remainAvailable. -
No deprovisioning occurs: Using the detached annotation ensures that the host is not deprovisioned when you update the BMC address.
-
BMC credentials: If the BMC replacement also changed the username or password, make sure to update the credentials secret before removing the detached annotation.
-
MAC address remains the same: The
bootMACAddressshould remain unchanged even when the BMC is replaced, as it refers to the server’s network interface, not the BMC.
Related Documentation
- Detaching Hosts from Provisioner - Detailed information about the detached annotation
References
Detaching Hosts from Provisioner
The detached annotation provides a way to prevent management of a
BareMetalHost. It works by deleting the host information from Ironic without
triggering deprovisioning. The BareMetal Operator will recreate the host in
Ironic again once the annotation is removed. This annotation can be used with
BareMetalHosts in Provisioned, ExternallyProvisioned or Available states.
Normally, deleting a BareMetalHost will always trigger deprovisioning. This can be problematic and unnecessary if we just want to, for example, move the BareMetalHost from one cluster to another. By applying the annotation before removing the BareMetalHost from the old cluster, we can ensure that the host is not disrupted by this (normally it would be deprovisioned). The next step is then to recreate it in the new cluster without triggering a new inspection. See the status annotation page for how to do this.
The detached annotation is also useful if you want to move the host under
control of a different management system without fully removing it from
BareMetal Operator. Particularly, detaching a host stops Ironic from trying to
enforce its power state as per the online field.
For more details, please see the design proposal.
How to detach
The annotation key is baremetalhost.metal3.io/detached and the value can be
anything (it is ignored). Here is an example:
apiVersion: metal3.io/v1alpha1
kind: BareMetalHost
metadata:
  name: example
  annotations:
    baremetalhost.metal3.io/detached: ""
spec:
  online: true
  bootMACAddress: 00:8a:b6:8e:ac:b8
  bootMode: legacy
  bmc:
    address: ipmi://192.168.111.1:6230
    credentialsName: example-bmc-secret
...
Now wait for the operationalStatus field to become detached.
How to attach again
If you want to attach a previously detached host, remove the annotation and
wait for the operationalStatus field to become OK.
External inspection
Similar to the status annotation, external inspection
makes it possible to skip the inspection step. The difference is that the
status annotation can only be used on the very first reconcile and allows
setting all the fields under status. In contrast, external inspection limits
the changes so that only HardwareDetails can be modified, and it can be used at
any time when inspection is disabled (with the inspect.metal3.io: disabled
annotation) or when there is no existing HardwareDetails data.
External inspection is controlled through an annotation on the BareMetalHost.
The annotation key is inspect.metal3.io/hardwaredetails and the value is a
JSON representation of the BareMetalHosts status.hardware field.
Here is an example with a BMH that has inspection disabled and is using the external inspection feature to add the HardwareDetails.
apiVersion: metal3.io/v1alpha1
kind: BareMetalHost
metadata:
  name: node-0
  namespace: metal3
  annotations:
    inspect.metal3.io: disabled
    inspect.metal3.io/hardwaredetails: |
      {"systemVendor":{"manufacturer":"QEMU", "productName":"Standard PC (Q35 + ICH9, 2009)","serialNumber":""}, "firmware":{"bios":{"date":"","vendor":"","version":""}},"ramMebibytes":4096, "nics":[{"name":"eth0","model":"0x1af4 0x0001","mac":"00:b7:8b:bb:3d:f6", "ip":"172.22.0.64","speedGbps":0,"vlanId":0,"pxe":true}], "storage":[{"name":"/dev/sda","rotational":true,"sizeBytes":53687091200, "vendor":"QEMU", "model":"QEMU HARDDISK","serialNumber":"drive-scsi0-0-0-0", "hctl":"6:0:0:0"}],"cpu":{"arch":"x86_64", "model":"Intel Xeon E3-12xx v2 (IvyBridge)","clockMegahertz":2494.224, "flags":["foo"],"count":4},"hostname":"hwdAnnotation-0"}
spec:
  ...
Why is this needed?
- It allows avoiding an extra reboot for live-images that include their own inspection tooling.
- It provides an arguably safer alternative to the status annotation in some cases.
Caveats:
- If both
baremetalhost.metal3.io/statusandinspect.metal3.io/hardwaredetailsare specified on BareMetalHost creation,inspect.metal3.io/hardwaredetailswill take precedence and overwrite any hardware data specified viabaremetalhost.metal3.io/status. - If the BareMetalHost is in the
Availablestate the controller will not attempt to match profiles based on the annotation.
Reconstructing Host Status
The status annotation is useful when you need to avoid inspection of a BareMetalHost. This can happen if the status is already known, for example, when moving the BareMetalHost from one cluster to another. By setting this annotation, the BareMetal Operator will take the status of the BareMetalHost directly from the annotation.
The annotation key is baremetalhost.metal3.io/status and the value is a JSON
representation of the BareMetalHosts status field. One simple way of
extracting the status and turning it into an annotation is using kubectl like
this:
# Save the status in json format to a file
kubectl get bmh <name-of-bmh> -o jsonpath="{.status}" > status.json
# Save the BMH and apply the status annotation to the saved BMH.
kubectl -n metal3 annotate bmh <name-of-bmh> \
  baremetalhost.metal3.io/status="$(cat status.json)" \
  --dry-run=client -o yaml > bmh.yaml
Note that the above example does not apply the annotation to the BareMetalHost
directly since this is most likely not useful to apply it on one that already
has a status. Instead it saves the BareMetalHost with the annotation applied
to a file bmh.yaml. This file can then be applied in another cluster. The
status would be discarded at this point since the user is usually not allowed
to set it, but the annotation is still there and would be used by the BareMetal
Operator to set status again. Once this is done, the operator will remove the
status annotation. In this situation you may also want to check the
detached annotation for how to remove the
BareMetalHost from the old cluster without going through deprovisioning.
Here is an example of a BareMetalHost, first without the annotation, but with status and spec, and then the other way around. This shows how the status field is turned into the annotation value.
apiVersion: metal3.io/v1alpha1
kind: BareMetalHost
metadata:
  name: node-0
  namespace: metal3
spec:
  automatedCleaningMode: metadata
  bmc:
    address: redfish+http://192.168.111.1:8000/redfish/v1/Systems/febc9f61-4b7e-411a-ada9-8c722edcee3e
    credentialsName: node-0-bmc-secret
  bootMACAddress: 00:80:1f:e6:f1:8f
  bootMode: legacy
  online: true
status:
  errorCount: 0
  errorMessage: ""
  goodCredentials:
    credentials:
      name: node-0-bmc-secret
      namespace: metal3
    credentialsVersion: "1775"
  hardwareProfile: ""
  lastUpdated: "2022-05-31T06:33:05Z"
  operationHistory:
    deprovision:
      end: null
      start: null
    inspect:
      end: null
      start: "2022-05-31T06:33:05Z"
    provision:
      end: null
      start: null
    register:
      end: "2022-05-31T06:33:05Z"
      start: "2022-05-31T06:32:54Z"
  operationalStatus: OK
  poweredOn: false
  provisioning:
    ID: 8d566f5b-a28f-451b-a70f-419507c480cd
    bootMode: legacy
    image:
      url: ""
    state: inspecting
  triedCredentials:
    credentials:
      name: node-0-bmc-secret
      namespace: metal3
    credentialsVersion: "1775"
apiVersion: metal3.io/v1alpha1
kind: BareMetalHost
metadata:
  name: node-0
  namespace: metal3
  annotations:
    baremetalhost.metal3.io/status: |
      {"errorCount":0,"errorMessage":"","goodCredentials":{"credentials":{"name":"node-0-bmc-secret","namespace":"metal3"},"credentialsVersion":"1775"},"hardwareProfile":"","lastUpdated":"2022-05-31T06:33:05Z","operationHistory":{"deprovision":{"end":null,"start":null},"inspect":{"end":null,"start":"2022-05-31T06:33:05Z"},"provision":{"end":null,"start":null},"register":{"end":"2022-05-31T06:33:05Z","start":"2022-05-31T06:32:54Z"}},"operationalStatus":"OK","poweredOn":false,"provisioning":{"ID":"8d566f5b-a28f-451b-a70f-419507c480cd","bootMode":"legacy","image":{"url":""},"state":"inspecting"},"triedCredentials":{"credentials":{"name":"node-0-bmc-secret","namespace":"metal3"},"credentialsVersion":"1775"}}
spec:
  ...
Ironic
Ironic is an open-source service for automating provisioning and lifecycle management of bare metal machines. Born as the Bare Metal service of the OpenStack cloud software suite, it has evolved to become a semi-autonomous project, adding ways to be deployed independently as a standalone service, for example using Bifrost, and integrates in other tools and projects, as in the case of Metal3.
Ironic nowadays supports the two main standard hardware management interfaces, Redfish and IPMI, and thanks to its large community of contributors, it can provide native support for many different bare-metal hardware vendors, such as Dell, Fujitsu, HPE, and Supermicro.
The Metal3 project adopted Ironic as the back-end that manages bare-metal hosts behind native Kubernetes API.
Why Ironic in Metal3
- Ironic is open source! This aligns perfectly with the philosophy behind Metal3.
- Ironic has a vendor agnostic interface provided by a robust set of RESTful APIs.
- Ironic has a vibrant and diverse community, including small and large operators, hardware and software vendors.
- Ironic provides features covering the whole hardware life-cycle: from bare metal machine registration and hardware specifications retrieval of newly discovered bare metal machines, configuration and provisioning with custom operating system images, up to machines reset, cleaning for re-provisioning or end-of-life retirement.
How Metal3 uses Ironic
Bare Metal Operator is the main component that interfaces with the Ironic API for all operations needed to provision bare-metal hosts, such as hardware capabilities inspection, operating system installation, and re-initialization when restoring a bare-metal machine to its original status.
Metal3 provides a way to install Ironic with a suitable configuration. Alternatively, Bare Metal Operator can be set up to use an externally managed Ironic instance.
Components overview
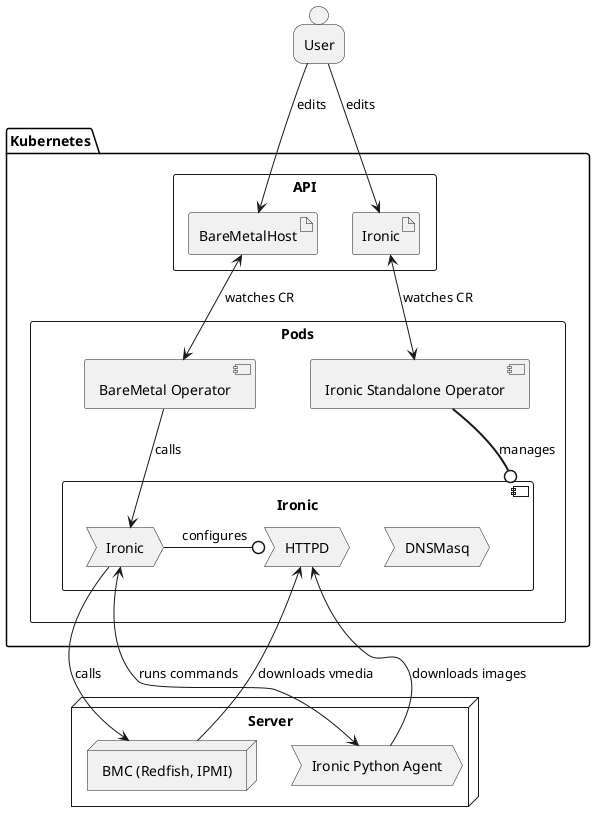
Requirements for external Ironic
- HTTP basic authentication (OpenStack Identity is not supported - see issue 1218).
- Enabled hardware types and interfaces that match the supported Metal3 drivers (at least the ones you intend to use).
- API version 1.81 (2023.1 “Antelope” release cycle) or newer must be available.
- Built-in in-band inspection (ironic-inspector is no longer supported).
- Deploy interface
directenabled and used by default. - No-op network interface (OpenStack Networking is not supported).
Optionally:
- Automated cleaning set to metadata only.
- Deploy interfaces
ramdiskandcustom-deployenabled. - Fast track mode enabled.
Ironic database
Ironic keeps information in its own database, completely independent from the
Kubernetes data storage. Metal3 treats the Kubernetes database (e.g.
BareMetalHost resources) as the authoritative source of information about the
desired state of the machines. On any discrepancies, Bare Metal Operator will
use the Ironic API to enforce the desired state.
By default, Ironic installed by Ironic Standalone Operator or older Metal3 deployment scripts used an ephemeral SQLite database for storage. The data is removed when the Metal3 pod is restarted. When this happens, Bare Metal Operator will re-create hosts in Ironic and drive them through various actions to enforce the expected state:
-
Hosts in the
provisionedstate will go through adoption without provisioning them again. -
For hosts in the
availablestate, only the BMC credentials will be verified. -
For hosts in various transient states, Bare Metal Operator will restart the action that lead to this state. For instance, a host in the
provisioningstate will undergo cleaning, then a new provisioning will be started.
Ironic Standalone Operator can also install Ironic with MariaDB.
Host enrollment and hardware inventory
When a BareMetalHost is created, Bare Metal Operator tries to find an
existing record in Ironic by its name or MAC address. The name in Ironic is
generated by joining the namespace and the host name with a tilde. For example,
host compute-0 in the metal3 namespace will receive the Ironic name
metal3~compute-0. If no record is found:
- A new record is created in Ironic.
- BMC credentials are verified by Ironic by reading the current power state of the machine.
- The inspection process is started.
Once inspection finishes successfully, the hardware inventory is fetched from
Ironic and stored in a corresponding HardwareData resource. Note that this
information is never updated unless a new inspection happens (see inspect
annotation).
Host provisioning
Provisioning is triggered by populating either the image or the
customDeploy field of the host. Under the hood, three modes of provisioning
are supported:
-
When
customDeployis provided, Bare Metal Operator will configure the host to use thecustom-agentdeploy interface. Themethodfield will be treated as the name of a custom deploy step to execute instead of the regular provisioning process. Your Ironic installation or IPA image must contain the implementation of this step. By default, Metal3 does not ship any such steps. -
When
customDeployis not provided and theimage.diskFormatfield is set tolive-iso, the host will be configured to use the ramdisk deploy interface, whileimage.urlwill be treated as a URL of an ISO 9660 image to boot. This mode is designed to integrate Metal3 with site-specific installers. -
When
customDeployis not provided and theimage.diskFormatfield is not set tolive-iso, the regular provisioning process is followed. The IPA-based service ramdisk (normally already booted on the host during inspection) will write the downloaded image to the root disk specified by therootDeviceHintsfield.
Host decommissioning
Each BareMetalHost will receive a finalizer that prevents this host from
being immediately removed on deletion. Before the finalizer is removed, the
host is:
- cleaned to remove the partitioning tables from all its disks,
- powered off to stop it from running the service ramdisk.
The cleaning process is retried several times. If due to a problem with the
host cleaning is no longer possible, disable cleaning first by setting the
automatedCleanMode field to disabled.
WARNING: it is not recommended to manually remove the finalizer when the cleaning process is taking longer than desired or is failing. Doing so, will remove the host record from Kubernetes but leave it in Ironic. The currently running action will continue in the background, and an attempt to add the host again may fail because of the conflict.
References
Ironic Python Agent (IPA)
IPA is a service
written in python that runs within a ramdisk. It provides remote access for
Ironic to perform various operations on the managed server. It also sends
information about the server to Ironic.
By default, we pull IPA images from Ironic upstream archive where an image is built on every commit to the master git branch.
However, another remote registry or a local IPA archive can be specified. ipa-downloader is responsible for downloading the IPA ramdisk image to a shared volume from where the nodes are able to retrieve it.
Data flow
IPA interacts with other components. The information exchanged and the component to which it is sent to or received from are described below. The communication between IPA and these components can be encrypted in-transit with SSL/TLS.
- Inspection: data about hardware details, such as CPU, disk, RAM and network interfaces.
- Heartbeat: periodic message informing Ironic that the node is still running.
- Lookup: data sent to Ironic that helps it determine Ironic’s node UUID for the node.
The above data is sent/received as follows.
- Inspection result is sent to Ironic
- User supplied boot image that will be written to the node’s disk is retrieved from HTTPD server
References
Ironic Container Images
The currently available ironic container images are:
| Name and link to repository | Published image | Content/Purpose |
|---|---|---|
| ironic-image | quay.io/metal3-io/ironic | Ironic services / BMC emulators |
| ironic-ipa-downloader | quay.io/metal3-io/ironic-ipa-downloader | Download and cache the ironic python agent ramdisk |
| ironic-client | quay.io/metal3-io/ironic-client | Ironic command-line interface (for debugging) |
The main ironic-image currently contains entry points to run both Ironic
itself and its auxiliary services: dnsmasq and httpd.
How to build a container image
Each repository mentioned in the list contains a Dockerfile that can be used to build the corresponding container, for example:
git clone https://github.com/metal3-io/ironic-image.git
cd ironic-image
docker build . -f Dockerfile
In some cases a make sub-command is provided to build the image using
docker, usually make docker.
Customizing source builds
When building the ironic image, it is also possible to specify a different
source for ironic, ironic-lib or the sushy library using the build arguments
IRONIC_SOURCE, IRONIC_LIB_SOURCE and SUSHY_SOURCE. It is also possible
to apply local patches to the source. See ironic-image
README for
details.
Special resources: sushy-tools and virtualbmc
The Dockerfiles needed to build
sushy-tools (Redfish
emulator) and VirtualBMC (IPMI
emulator) containers can be found in the ironic-image container repository,
under the resources directory.
Ironic Standalone Operator
Ironic Standalone Operator (IrSO) is a Kubernetes controller that installs and manages Ironic in a configuration suitable for Metal3. IrSO has the following features:
- Flexible networking configuration, support for Keepalived.
- Using SQLite or MariaDB as the database backend.
- Optional support for a DHCP service (dnsmasq).
- Optional support for automatically downloading an IPA image.
IrSO uses ironic-image under the hood.
Installing Ironic Standalone Operator
The official installation process requires cert-manager, please make sure to install it first and wait for it to fully initialize.
On every source code change, a new IrSO image is built and published at
quay.io/metal3-io/ironic-standalone-operator. Starting with release 0.5.1,
we also publish a manifest for each release. You can install it this way:
IRSO_VERSION=0.8.0
kubectl apply -f \
    https://github.com/metal3-io/ironic-standalone-operator/releases/download/v${IRSO_VERSION}/install.yaml
kubectl wait --for=condition=Available --timeout=120s \
  -n ironic-standalone-operator-system deployment/ironic-standalone-operator-controller-manager
For older versions (or to use an unreleased checkout) you can use the Kustomize templates provided in the source repository:
git clone https://github.com/metal3-io/ironic-standalone-operator
cd ironic-standalone-operator
git checkout -b <DESIRED BRANCH OR main>

make install deploy
kubectl wait --for=condition=Available --timeout=60s \
  -n ironic-standalone-operator-system deployment/ironic-standalone-operator-controller-manager
API resources
IrSO uses the Ironic custom resource to manage Ironic itself and all of its auxiliary services.
See installing Ironic with IrSO for information on how to use these resources.
How is Ironic installed?
By default, IrSO installs Ironic as a single pod on a control plane node. This is because Ironic currently requires host networking, and thus it’s not advisable to let it co-exist with tenant workload.
Installed components
An Ironic installation always contains these three components:
ironicis the main API service, as well as the conductor process that handles actions on bare-metal machines.httpdis the web server that serves images and configuration for iPXE and virtual media boot, as well as works as the HTTPS frontend for Ironic.ramdisk-logsis a script that unpacks any ramdisk logs and outputs them for consumption viakubectl logsor similar tools.
There is also a standard init container:
ramdisk-downloaderdownloads images of the deployment/inspection ramdisk and stores them locally for easy access.
When network boot (iPXE) is enabled, another component is deployed:
dnsmasqserves DHCP and functions as a PXE server for bootstrapping iPXE.
With Keepalived support enabled:
keepalivedmanages the IP address on the provisioning interface.
Supported versions
See the supported release versions page for information on which versions of IrSO are currently supported.
Installing Ironic
This document covers installing Ironic in different scenarios. You need to answer a few questions before you can pick the one that suits you:
-
Which physical network interface will be used for provisioning? Without any configuration, Ironic will use the host cluster networking.
-
If you use a dedicated network interface, are you going to use the built-in Keepalived service to configure the IP address on the control plane node where the Ironic pod is located? If not, you need to make sure the interface has a usable address on this node.
-
Do you want to use network boot (iPXE) during provisioning? DHCP adds more requirements and requires explicit configuration. Without it, only virtual media provisioning is possible (see supported hardware).
-
Are you going to use TLS for the Ironic API? It is not recommended to run without TLS. To enable it, you need to manage the TLS secret. Cert Manager is the recommended service for it.
-
Do you need persistence for the Ironic’s internal database? The examples in this guide assume no persistence, i.e. that all data is lost on the pod restart! This ephemeral mode of operation suits Metal3 well, since BMO treats BareMetalHost resources as the primary source of truth. However, for use cases outside of Metal3, you need to configure an external database.
Prerequisites
A separate provisioning network is required when network boot is used.
The following ports must be accessible by the hosts being provisioned:
- TCP 6385 (Ironic API)
- TCP 6180 (HTTP server serving OS and virtual media images)
- TCP 6183 (HTTP server with TLS)
The main Ironic service must be able to access the hosts’ BMC addresses, as well as port 9999 (ramdisk API) on the hosts.
When virtual media is used, the hosts’ BMCs must be able to access ports 6180 or 6183 (depending on whether TLS is used).
NOTE: all ports can be changed on the Ironic resource.
Network boot requirements
When network boot (iPXE) is used instead of virtual media, you need a dedicated provisioning network. The following ports must be accessible:
- UDP 67/68/546/547 (DHCP and DHCPv6; when network boot is used)
- UDP 69 (TFTP; when network boot is used)
Using Ironic
Regardless of the scenario you choose, you will need to create at least an
Ironic object and wait for it to become ready:
NAMESPACE="test-ironic"  # change to match your deployment
kubectl create -f ironic.yaml
kubectl wait --for=condition=Ready --timeout="10m" -n "$NAMESPACE" ironic/ironic
If the resource does not become Ready, check its status and the status of the
corresponding Deployment.
Once it is ready, get the credentials from the associated secret, e.g. with
SECRET=$(kubectl get ironic/ironic -n "$NAMESPACE" --template={{.spec.apiCredentialsName}})
USERNAME=$(kubectl get secrets/$SECRET -n "$NAMESPACE" --template={{.data.username}} | base64 -d)
PASSWORD=$(kubectl get secrets/$SECRET -n "$NAMESPACE" --template={{.data.password}} | base64 -d)
Now you can point BMO at the Ironic’s service at ironic.test-ironic.svc.
Scenario 1: no network boot, no dedicated networking
In this scenario, Ironic will use whatever networking is used by the cluster. No DHCP will be available, bare-metal machines will be provisioned using virtual media. Since there is no dedicated network interface, Keepalived is also not needed.
It is enough to create the following resource:
apiVersion: ironic.metal3.io/v1alpha1
kind: Ironic
metadata:
  name: ironic
  namespace: test-ironic
spec:
  version: "34.0"
HINT: there is no need to configure API credentials: IrSO will generate a random password for you.
However, there is one option that you might want to set in all scenarios: the public SSH key for the ramdisk. Configuring it allows an easier debugging if anything goes wrong during provisioning.
apiVersion: ironic.metal3.io/v1alpha1
kind: Ironic
metadata:
  name: ironic
  namespace: test-ironic
spec:
  deployRamdisk:
    sshKey: "ssh-ed25519 AAAAC3..."
  version: "34.0"
WARNING: the provided SSH key will not be installed on the machines deployed by Ironic. See instance customization instead.
Scenario 2: dedicated networking and TLS
In this scenario, a separate network interface is used (em2 in the example).
The IP address on the interface will be managed by Keepalived, and the Ironic
API will be secured by TLS.
To make TLS work without resorting to insecure configuration, the certificate
must contain the DNS name derived from the service (e.g.
ironic.test-ironic.svc), as well as the provided IP address (192.0.2.1 in
this example).
For simplicity, lets use the openssl CLI to generate a self-signed certificate (use something like Cert Manager in production):
openssl req -x509 -new -subj "/CN=ironic.test-ironic.svc" \
    -addext "subjectAltName = DNS:ironic.test-ironic.svc,IP:192.0.2.1" \
    -newkey ec -pkeyopt ec_paramgen_curve:prime256v1 -nodes \
    -keyout ironic-tls.key -out ironic-tls.crt
kubectl create secret tls ironic-tls -n test-ironic --key=ironic-tls.key --cert=ironic-tls.crt
NOTE: without a dedicated interface we would have to add all cluster IP addresses to the certificate, which is often not desired.
Now you can create your Ironic deployment:
apiVersion: ironic.metal3.io/v1alpha1
kind: Ironic
metadata:
  name: ironic
  namespace: test-ironic
spec:
  deployRamdisk:
    sshKey: "ssh-ed25519 AAAAC3..."
  networking:
    interface: "em2"
    ipAddress: "192.0.2.1"
    ipAddressManager: keepalived
  tls:
    certificateName: ironic-tls
  version: "34.0"
Now you can access Ironic either via the service or at 192.0.2.1:6385.
Scenario 3: dedicated networking with DHCP and Keepalived
In this scenario, network booting will be available on the dedicated network
interface. Assuming the network CIDR is 192.0.2.0/24:
apiVersion: ironic.metal3.io/v1alpha1
kind: Ironic
metadata:
  name: ironic
  namespace: test-ironic
spec:
  deployRamdisk:
    sshKey: "ssh-ed25519 AAAAC3..."
  networking:
    dhcp:
      networkCIDR: "192.0.2.0/24"
    interface: "em2"
    ipAddress: "192.0.2.1"
    ipAddressManager: keepalived
  tls:
    certificateName: ironic-tls
  version: "34.0"
NOTE: when the DHCP range is not provided, IrSO will pick one for you. In
this example, it will be 192.0.2.10 - 192.0.2.253.
What’s next?
Check the API reference (switch to the branch you’re using) for all possible settings you can set on an Ironic object.
External database for Ironic
By default, Ironic uses a local SQLite database, which is not persisted anywhere. In this mode of operation, all data is lost on a pod restart. If you want the Ironic database to be persisted, you need to configure an external MariaDB database.
Linking to an external database
You can request persistence by providing a link to an external database in the
database field:
apiVersion: ironic.metal3.io/v1alpha1
kind: Ironic
metadata:
  name: ironic
  namespace: test-ironic
spec:
  database:
    credentialsName: secret-with-user-password
    host: mariadb.hostname.example.com
    name: database-name
  version: "32.0"
If your database uses TLS, provide the name of the secret with the CA
certificate in the tlsCertificateName field.
Using mariadb-operator
One of the supported ways to install MariaDB for Ironic is mariadb-operator. Please refer to its examples for information on how to use it in your case. Generally, the process is as follows:
-
Create a database server (if not already):
---
apiVersion: v1
kind: Namespace
metadata:
  name: mariadb
---
apiVersion: v1
kind: Secret
metadata:
  name: root-credentials
  namespace: mariadb
type: Opaque
data:
  username: aXJvbmlj
  password: # your password here
---
apiVersion: k8s.mariadb.com/v1alpha1
kind: MariaDB
metadata:
  name: database-server
  namespace: mariadb
spec:
  rootPasswordSecretKeyRef:
    name: root-credentials
    key: password
  storage:
    # configure database storage here
Note: a lot of parameters can be tuned here - see official examples.
-
Create the database for Ironic:
apiVersion: k8s.mariadb.com/v1alpha1 kind: Database metadata: name: ironic-database namespace: test-ironic spec: mariaDbRef: name: database-server # matches the server created above namespace: mariadb # matches the namespace of the server (not Ironic) waitForIt: true characterSet: utf8 cleanupPolicy: Delete collate: utf8_general_ci -
Create a user and grant it all privileges to the new database:
---
apiVersion: v1
kind: Secret
metadata:
  name: ironic-user
  namespace: test-ironic
type: Opaque
data:
  username: aXJvbmljLXVzZXI=  # this MUST match the name of the User
  password: # your password here
---
apiVersion: k8s.mariadb.com/v1alpha1
kind: User
metadata:
  name: ironic-user  # this MUST match the username field in the secret
  namespace: test-ironic
spec:
  mariaDbRef:
    name: database-server  # matches the server created above
    namespace: mariadb     # matches the namespace of the server (not Ironic)
    waitForIt: true
  cleanupPolicy: Delete
  host: '%'
  maxUserConnections: 100
  passwordSecretKeyRef:
    key: password
    name: ironic-user
---
apiVersion: k8s.mariadb.com/v1alpha1
kind: Grant
metadata:
  name: ironic-user-grant
  namespace: test-ironic
spec:
  mariaDbRef:
    name: database-server  # matches the server created above
    namespace: mariadb     # matches the namespace of the server (not Ironic)
    waitForIt: true
  cleanupPolicy: Delete
  database: ironic-database  # matches the name of the Database object
  host: '%'
  privileges:
  - ALL PRIVILEGES
  table: '*'
  username: ironic-user  # matches the name of the User object
Warning: mariadb-operator gets the user name from the name of the User object, while Ironic uses the
usernamefield of the secret. If these do not match, authentication will fail.Note: the default
maxUserConnectionsof 10 is not enough for a normal operation of Ironic. The exact value depends on your environment, 100 is the value used in the CI. -
After making sure that all objects are created and in
Readystate, you can link to the database via its service endpoint:apiVersion: ironic.metal3.io/v1alpha1 kind: Ironic metadata: name: ironic namespace: test-ironic spec: database: credentialsName: ironic-user host: database-server.mariadb.svc name: ironic-database version: "32.0"
Install Ironic
WARNING: this document covers the direct installation of Ironic using shell scripts and Kustomize configuration from the BareMetal Operator repository. This process is being phased out in favour of Ironic Standalone Operator. You should consider using the latter for any new installations.
Metal3 runs Ironic as a set of containers. Those containers can be deployed either in-cluster and out-of-cluster. In both scenarios, there are a couple of containers that must run in order to provision baremetal nodes:
- ironic (the main provisioning service)
- ipa-downloader (init container to download and cache the deployment ramdisk image)
- httpd (HTTP server that serves cached images and iPXE configuration)
A few other containers are optional:
- ironic-endpoint-keepalived (to maintain a persistent IP address on the provisioning network)
- dnsmasq (to support DHCP on the provisioning network and to implement network boot via iPXE)
- ironic-log-watch (to provide access to the deployment ramdisk logs)
- mariadb (the provisioning service database; SQLite can be used as a lightweight alternative)
- ironic-inspector (the auxiliary inspection service - only used in older versions of Metal3)
Prerequisites
See IrSO Prerequisites.
Environmental variables
See ironic-image README for an up-to-date list of supported environment variables and their default values.
Ironic in-cluster installation
For in-cluster Ironic installation, we will run a set of containers within
a single pod in a Kubernetes cluster. You can enable TLS or basic auth or even
disable both for Ironic and Inspector communication. Below we will see kustomize
folders that will help us to install Ironic for each mentioned case. In each
of these deployments, a ConfigMap will be created and mounted to the Ironic pod.
The ConfigMap will be populated based on environment variables from
ironic-deployment/default/ironic_bmo_configmap.env.
As such, update ironic_bmo_configmap.env with your custom values before
deploying the Ironic.
WARNING: Ironic normally listens on the host network of the control plane nodes. If you do not enable authentication, anyone with access to this network can use it to manipulate your nodes. It’s also highly advised to use TLS to prevent eavesdropping.
Installing with Kustomize
In the quickstart guide, we have demonstrated how to install ironic with kustomize, by creating an ironic kustomization overlay. While that is still what you should follow if you have specific requirements for your ironic deployment, we do provide an already-made overlay for the most-common use case, ironic with basic authentication and TLS.
We assume you are inside the local baremetal-operator path, if not you need to
clone it first and cd to the root path.
 git clone https://github.com/metal3-io/baremetal-operator.git
 cd baremetal-operator
The overlay in interest is located at ironic-deployment/overlay/basic-auth_tls.
To make this overlay work, we still need to set up
Authentication and
Ironic Environment Variables,
as instructed in the quickstart guide.
Next, check the Ironic kustomization section in the quickstart guide to see how to generate the necessary configMap and Secrets for the deployment.
Also, cert-manager should have been installed in the cluster before deploying
Ironic. If you haven’t installed cert-manager yet:
kubectl apply -f https://github.com/cert-manager/cert-manager/releases/download/v1.14.3/cert-manager.yaml
Wait a few minutes for all cert-manager deployments to achieve Ready state.
We can then deploy Ironic with basic authentication and TLS enabled:
kustomize build ironic-deployment/overlays/basic-auth_tls | kubectl apply -f -
Alternatively, you can use the deploy.sh script to deploy Ironic with custom
elements. Checkout
detailed instruction,
and the script itself, for more information.
Ironic out-of-cluster installation
For out-of-cluster Ironic installation, we will run a set of docker containers outside of a Kubernetes cluster. To pass Ironic settings, you can export corresponding environmental variables on the current shell before calling run_local_ironic.sh installation script. This will start below containers:
- ironic
- ironic-endpoint-keepalived
- ironic-log-watch
- ipa-downloader
- dnsmasq
- httpd
- mariadb; if
IRONIC_USE_MARIADB= “true”
If in-cluster ironic installation, we used different manifests for TLS and basic auth, here we are exporting environment variables for enabling/disabling TLS & basic auth but use the same script.
TLS and Basic authentication disabled (not recommended)
 export IRONIC_FAST_TRACK="false"  # Example of manipulating Ironic settings
 export IRONIC_TLS_SETUP="false"   # Disable TLS
 export IRONIC_BASIC_AUTH="false"  # Disable basic auth
 ./tools/run_local_ironic.sh
Basic authentication enabled
 export IRONIC_TLS_SETUP="false"
 export IRONIC_BASIC_AUTH="true"
 ./tools/run_local_ironic.sh
TLS enabled
 export IRONIC_TLS_SETUP="true"
 export IRONIC_BASIC_AUTH="false"
 ./tools/run_local_ironic.sh
Kubernetes Cluster API Provider Metal3
Kubernetes-native declarative infrastructure for Metal3.

What is the Cluster API Provider Metal3
The Cluster API brings declarative, Kubernetes-style APIs to cluster creation, configuration and management. The API itself is shared across multiple cloud providers. Cluster API Provider Metal3 is one of the providers for Cluster API and enables users to deploy a Cluster API based cluster on top of bare metal infrastructure using Metal3.
Compatibility with Cluster API
| CAPM3 version | Cluster API version | CAPM3 Release |
|---|---|---|
| v1alpha5 | v1alpha4 | v0.5.X |
| v1beta1 | v1beta1 | v1.1.X |
| v1beta1 | v1beta1 | v1.2.X |
Development Environment
There are multiple ways to setup a development environment:
- Using Tilt
- Other management cluster
- See metal3-dev-env for an
end-to-end development and test environment for
cluster-api-provider-metal3and baremetal-operator.
Getting involved and contributing
Are you interested in contributing to Cluster API Provider Metal3? We, the maintainers and community, would love your suggestions, contributions, and help! Also, the maintainers can be contacted at any time to learn more about how to get involved.
To set up your environment checkout the development environment.
In the interest of getting more new people involved, we tag issues with good first issue. These are typically issues that have smaller scope but are good ways to start to get acquainted with the codebase.
We also encourage ALL active community participants to act as if they are maintainers, even if you don’t have “official” write permissions. This is a community effort, we are here to serve the Kubernetes community. If you have an active interest and you want to get involved, you have real power! Don’t assume that the only people who can get things done around here are the “maintainers”.
We also would love to add more “official” maintainers, so show us what you can do!
All the repositories in the Metal3 project, including the Cluster API Provider Metal3 GitHub repository, use the Kubernetes bot commands. The full list of the commands can be found in the command help documentation. Note that some of them might not be implemented in metal3 CI.
Community
Community resources and contact details can be found in the Metal3 community documentation.
Github issues
We use Github issues to keep track of bugs and feature requests. There are two different templates to help ensuring that relevant information is included.
Bugs
If you think you have found a bug please follow the instructions below.
- Please spend a small amount of time giving due diligence to the issue tracker. Your issue might be a duplicate.
- Collect logs from relevant components and make sure to include them in the bug report you are going to open.
- Remember users might be searching for your issue in the future, so please give it a meaningful title to help others.
- Feel free to reach out to the metal3 community.
Tracking new features
We also use the issue tracker to track features. If you have an idea for a feature, or think you can help Cluster API Provider Metal3 become even more awesome, then follow the steps below.
- Open a feature request.
- Remember users might be searching for your feature request in the future, so please give it a meaningful title to help others.
- Clearly define the use case, using concrete examples. e.g.:
I type this and cluster-api-provider-metal3 does that. - Some of our larger features will require proposals. If you would like to include a technical design for your feature please open a feature proposal in metal3-docs using this template.
After the new feature is well understood, and the design agreed upon we can start coding the feature. We would love for you to code it. So please open up a WIP (work in progress) pull request, and happy coding.
Install Cluster-api-provider-metal3
You can either use clusterctl (recommended) to install Metal³ infrastructure provider or kustomize for manual installation. Both methods install provider CRDs, its controllers and Ip-address-manager. Please keep in mind that Baremetal Operator and Ironic are decoupled from CAPM3 and will not be installed when the provider is initialized. As such, you need to install them yourself.
Prerequisites
-
Install
clusterctl, refer to Cluster API book for installation instructions. -
Install
kustomize, refer to official instructions here. -
Install Ironic, refer to this page.
-
Install Baremetal Operator, refer to this page.
-
Install Cluster API core components i.e., core, bootstrap and control-plane providers. This will also install cert-manager, if it is not already installed.
 clusterctl init --core cluster-api:v1.13.2 --bootstrap kubeadm:v1.13.2 \
 --control-plane kubeadm:v1.13.2 -v5
With clusterctl
This method is recommended. You can specify the CAPM3 version you want to
install by appending a version tag, e.g.
:v1.13.0. If the
version is not specified, the latest version available will be installed.
clusterctl init --infrastructure metal3:v1.13.0
With kustomize
To install a specific version, checkout the
github.com/metal3-io/cluster-api-provider-metal3.git to the tag with the
desired version
git clone https://github.com/metal3-io/cluster-api-provider-metal3.git
cd cluster-api-provider-metal3
git checkout v1.1.2 -b v1.1.2
Then, edit the controller-manager image version in config/default/capm3/manager_image_patch.yaml
apiVersion: apps/v1
kind: Deployment
metadata:
  name: controller-manager
  namespace: system
spec:
  template:
    spec:
      containers:
      # Change the value of image/tag to your desired image URL or version tag
      - image: quay.io/metal3-io/cluster-api-provider-metal3:v1.1.2
        name: manager
Apply the manifests
cd cluster-api-provider-metal3
kustomize build config/default | kubectl apply -f -
Migration Guide: v1beta1 to v1beta2
This guide covers the breaking changes introduced when migrating from Cluster API Provider Metal3 (CAPM3) v1beta1 to v1beta2 API.
Overview
The v1beta2 API introduces several breaking changes including field renames, type changes, and structural modifications. This guide will help you update your manifests and configurations.
The primary driver for these changes is the migration of conditions from
Cluster API’s clusterv1beta1.Conditions to Kubernetes native
metav1.Condition to align with standard Kubernetes patterns. Additionally,
the kube-api-linter was
adopted in v1beta2 to enforce Kubernetes API conventions and best practices,
resulting in many of the field renames, type changes, and structural
improvements documented below.
Breaking Changes
Metal3Machine
Field Renames
The JSON field name for DiskFormat in spec.image has been renamed:
| v1beta1 Field Name | v1beta2 Field Name |
|---|---|
format | diskFormat |
Example migration:
# v1beta1
spec:
  image:
    url: http://example.com/image.qcow2
    checksum: http://example.com/image.qcow2.sha256
    format: qcow2
# v1beta2
spec:
  image:
    url: http://example.com/image.qcow2
    checksum: http://example.com/image.qcow2.sha256
    diskFormat: qcow2
NoCloudProvider Removed
The deprecated NoCloudProvider field has been removed from the v1beta2 API.
Migration:
- Replace all usages of
NoCloudProviderwithCloudProviderEnabled - Note that the logic is inverted: to keep the same behavior, change
NoCloudProvider: falsetoCloudProviderEnabled: true
Example migration:
# v1beta1
spec:
  noCloudProvider: true
# v1beta2
spec:
  cloudProviderEnabled: false
# v1beta1
spec:
  noCloudProvider: false
# v1beta2
spec:
  cloudProviderEnabled: true
Metal3Machine Type Changes (Pointer vs Value)
| Field | Type Change |
|---|---|
spec.hostSelector | HostSelector → *HostSelector |
spec.automatedCleaningMode | *string → string |
Metal3Machine Fields with Added omitzero
| Field |
|---|
spec.image |
spec.customDeploy |
Metal3Machine Status Changes
| v1beta1 Field | v1beta2 Field | Notes |
|---|---|---|
status.ready | status.initialization.provisioned | Bool → *bool pointer |
status.phase | Removed | No longer available |
status.conditions | status.conditions | Type changed (see Conditions section) |
status.failureReason | status.deprecated.v1beta1.failureReason | Moved to deprecated, no longer terminal |
status.failureMessage | status.deprecated.v1beta1.failureMessage | Moved to deprecated, no longer terminal |
Note: In v1beta1, failureReason and failureMessage represented terminal errors
that required manual intervention. In v1beta2, these fields are deprecated and moved
to status.deprecated.v1beta1. They no longer represent terminal errors - error
information should now be obtained from the status.conditions field.
Example v1beta2 Metal3Machine status structure:
status:
  initialization:
    provisioned: true
  conditions:
  - type: Ready
    status: "True"
    reason: Ready
  - type: AssociateBareMetalHost
    status: "True"
    reason: AssociateBareMetalHostSuccess
  - type: AssociateMetal3MachineMetaData
    status: "True"
    reason: AssociateMetal3MachineMetaDataSuccess
  - type: Metal3DataReady
    status: "True"
    reason: Metal3DataSecretsReady
  deprecated:
    v1beta1:
      conditions:  # Legacy v1beta1 conditions for backwards compatibility
      - type: AssociateBMH
        status: "True"
        severity: Info
        reason: AssociateBMHSuccess
        lastTransitionTime: "2026-01-01T00:00:00Z"
      - type: KubernetesNodeReady
        status: "True"
        severity: Info
        reason: KubernetesNodeReady
        lastTransitionTime: "2026-01-01T00:00:00Z"
      - type: Metal3DataReady
        status: "True"
        severity: Info
        reason: Metal3DataReady
        lastTransitionTime: "2026-01-01T00:00:00Z"
      failureReason: null
      failureMessage: null
Metal3Machine Condition Type Name Changes
| v1beta1 Condition Type | v1beta2 Condition Type |
|---|---|
AssociateBMH | AssociateBareMetalHost |
KubernetesNodeReady | AssociateMetal3MachineMetaData |
Metal3DataReady | Metal3DataReady (unchanged) |
Metal3Machine Condition Reason Name Changes
| v1beta1 Reason | v1beta2 Reason |
|---|---|
WaitingForClusterInfrastructure | WaitingForClusterInfrastructureReady |
WaitingForBootstrapReady | WaitingForBootstrapData |
AssociateBMHFailed | AssociateBareMetalHostFailed |
PauseAnnotationRemoveFailed | BareMetalHostPauseAnnotationRemoveFailed |
PauseAnnotationSetFailedReason | BareMetalHostPauseAnnotationSetFailed |
AssociateM3MetaDataFailed | AssociateMetal3MachineMetaDataFailed |
| N/A | AssociateBareMetalHostSuccess (new) |
| N/A | AssociateBareMetalHostViaNodeReuseSuccess (new) |
| N/A | AssociateMetal3MachineMetaDataSuccess (new) |
| N/A | Metal3DataSecretsReady (new) |
| N/A | SecretsSetExternally (new) |
Metal3MachineTemplate
Metal3MachineTemplate Type Changes (Pointer vs Value)
| Field | Type Change |
|---|---|
spec.nodeReuse | bool → *bool |
Metal3Cluster
Metal3Cluster Status Changes
| v1beta1 Field | v1beta2 Field | Notes |
|---|---|---|
status.ready | status.initialization.provisioned | Bool → *bool pointer |
status.conditions | status.conditions | Type changed (see Conditions section) |
status.failureReason | status.deprecated.v1beta1.failureReason | Moved to deprecated, no longer terminal |
status.failureMessage | status.deprecated.v1beta1.failureMessage | Moved to deprecated, no longer terminal |
Example v1beta2 Metal3Cluster status structure:
status:
  initialization:
    provisioned: true
  conditions:
  - type: Ready
    status: "True"
    reason: Ready
  - type: BaremetalInfrastructureReady
    status: "True"
    reason: Ready
  deprecated:
    v1beta1:
      conditions:  # Legacy v1beta1 conditions for backwards compatibility
      - type: BaremetalInfrastructureReady
        status: "True"
        severity: Info
        reason: Ready
        lastTransitionTime: "2026-01-01T00:00:00Z"
      failureReason: null
      failureMessage: null
Metal3Cluster Condition Type Name Changes
| v1beta1 Condition Type | v1beta2 Condition Type |
|---|---|
BaremetalInfrastructureReady | BaremetalInfrastructureReady (unchanged) |
Metal3DataTemplate
Metal3DataTemplate Field Renames
The following JSON field names in spec.metaData have been renamed:
| v1beta1 Field Name | v1beta2 Field Name |
|---|---|
ipAddressesFromIPPool | ipAddressesFromPool |
prefixesFromIPPool | prefixesFromPool |
gatewaysFromIPPool | gatewaysFromPool |
dnsServersFromIPPool | dnsServersFromPool |
Example migration:
# v1beta1
spec:
  metaData:
    ipAddressesFromIPPool:
    - key: node_ip
      name: pool-1
# v1beta2
spec:
  metaData:
    ipAddressesFromPool:
    - key: node_ip
      name: pool-1
Metal3DataTemplate Type Changes (int to int32)
The following JSON field types have been changed from int to int32:
| Field Path | Type Change |
|---|---|
spec.metaData.index.offset | int → int32 |
spec.metaData.index.step | int → int32 |
spec.metaData.ipaddress.step | int → int32 |
spec.networkData.links.ethernet.mtu | int → int32 |
spec.networkData.links.bond.mtu | int → int32 |
spec.networkData.links.vlan.vlanID | int → int32 |
spec.networkData.links.vlan.mtu | int → int32 |
spec.networkData.routes.ipv4.prefix | int → int32 |
spec.networkData.routes.ipv6.prefix | int → int32 |
These type changes should be transparent for most users as the YAML representation remains the same.
Metal3DataTemplate Type Changes (Pointer vs Value)
Value to Pointer:
| Field | Type Change |
|---|---|
spec.metaData.index.offset | int32 → *int32 |
spec.metaData.fromHostInterfaces[].fromBootMAC | bool → *bool |
spec.networkData.routes.ipv4[].prefix | int32 → *int32 |
spec.networkData.routes.ipv4[].services | NetworkDataServicev4 → *NetworkDataServicev4 |
spec.networkData.routes.ipv6[].prefix | int32 → *int32 |
spec.networkData.routes.ipv6[].services | NetworkDataServicev6 → *NetworkDataServicev6 |
spec.networkData.links | NetworkDataLink → *NetworkDataLink |
spec.networkData.networks | NetworkDataNetwork → *NetworkDataNetwork |
spec.networkData.services | NetworkDataService → *NetworkDataService |
Pointer to Value:
| Field | Type Change |
|---|---|
spec.networkData.services.dnsFromIPPool | *string → string |
spec.networkData.services.dns[].dnsFromIPPool | *string → string |
Metal3DataTemplate Fields with Added omitzero
| Field |
|---|
spec |
spec.networkData.links.ethernets[].macAddress.fromAnnotation |
spec.networkData.networks.ipv4[].fromPoolAnnotation |
spec.networkData.networks.ipv6[].fromPoolAnnotation |
spec.networkData.networks.ipv4DHCP[].fromPoolAnnotation |
spec.networkData.networks.ipv6DHCP[].fromPoolAnnotation |
Map to Array Conversions
The following fields have been converted from untyped maps to structured arrays:
NetworkDataLinkBond.parameters
v1beta1 structure:
"parameters": {
  "key1": "value1",
  "key2": "value2"
}
v1beta2 structure:
"parameters": [
  {
    "name": "key1",
    "value": "value1"
  },
  {
    "name": "key2",
    "value": "value2"
  }
]
YAML migration example:
# v1beta1
spec:
  networkData:
    links:
      bonds:
      - id: bond0
        parameters:
          mode: "802.3ad"
          xmit_hash_policy: "layer3+4"
# v1beta2
spec:
  networkData:
    links:
      bonds:
      - id: bond0
        parameters:
        - name: mode
          value: "802.3ad"
        - name: xmit_hash_policy
          value: "layer3+4"
status.indexes
v1beta1 structure:
"indexes": {
  "machine1": 0,
  "machine2": 1
}
v1beta2 structure:
"indexes": [
  {
    "name": "machine1",
    "index": 0
  },
  {
    "name": "machine2",
    "index": 1
  }
]
Metal3DataTemplate TemplateReference Removed
The TemplateReference field was removed from Metal3DataTemplate.
Migration: Remove all usage of the TemplateReference field from your
manifests.
New Types
IndexEntry - Used in Metal3DataTemplate.status.indexes:
Name  string // required
Index int32  // required
NetworkDataLinkBondParam - Used in
Metal3DataTemplate.spec.networkData.links.bond.parameters:
Name  string                   // required
Value apiextensionsv1.JSON     // optional
Metal3Data
Metal3Data Type Changes (Pointer vs Value)
Value to Pointer:
| Field | Type Change |
|---|---|
spec.index | int32 → *int32 |
status.ready | bool → *bool |
Pointer to Value:
| Field | Type Change |
|---|---|
status.errorMessage | *string → string |
Metal3Data Fields with Added omitzero
| Field |
|---|
spec |
Metal3Data TemplateReference Removed
The TemplateReference field was removed from Metal3Data.
Migration: Remove all usage of the TemplateReference field from your
manifests.
Metal3Remediation
Metal3Remediation Type Changes (int to int32)
The following JSON field types have been changed from int to int32:
| Field Path | Type Change |
|---|---|
spec.strategy.retryLimit | int → int32 |
status.retryCount | int → int32 |
Timeout Field Change
The timeout field in RemediationStrategy has been replaced with
timeoutSeconds:
| v1beta1 Field | v1beta2 Field |
|---|---|
timeout (*metav1.Duration) | timeoutSeconds (int32) |
- v1beta1
timeoutfield: accepts duration strings (e.g.,"600s","10m") - v1beta2
timeoutSecondsfield: accepts integer seconds only (e.g.,600)
The minimum allowed value is 100 seconds. The default is 600 seconds.
Example migration:
# v1beta1
spec:
  strategy:
    timeout: 600s
# v1beta2
spec:
  strategy:
    timeoutSeconds: 600
# v1beta1
spec:
  strategy:
    timeout: 10m
# v1beta2
spec:
  strategy:
    timeoutSeconds: 600
Metal3RemediationTemplate
Metal3RemediationTemplate Fields with Added omitzero
| Field |
|---|
spec |
status |
Conditions Format Change
The conditions type has changed from Cluster API’s clusterv1beta1.Conditions
to Kubernetes native metav1.Condition for Metal3Cluster and Metal3Machine:
| v1beta1 Condition Type | v1beta2 Condition Type |
|---|---|
clusterv1beta1.Conditions | []metav1.Condition |
This means:
- v1beta1: Conditions use CAPI-specific format with
severityfield - v1beta2: Conditions use standard Kubernetes format
See the CAPI proposal for more context.
CLI Flag Rename
The CAPM3 CLI flag was renamed:
| v1beta1 Flag | v1beta2 Flag |
|---|---|
enableBMHNameBasedPreallocation | enable-bmh-name-based-preallocation |
Migration: Update your deployment manifests or command-line arguments to use the new flag name.
Non-Breaking Changes
Unhealthy Annotation Update
The unhealthy annotation has been updated from capi.metal3.io/unhealthy
to capm3.metal3.io/unhealthy.
The old annotation is still kept for the migration period but is deprecated. Users are advised to update their deployments to use the new annotation.
Example migration:
# v1beta1 (deprecated, still works)
metadata:
  annotations:
    capi.metal3.io/unhealthy: ""
# v1beta2 (recommended)
metadata:
  annotations:
    capm3.metal3.io/unhealthy: ""
Migration Steps
-
Backup your current resources: Before migrating, ensure you have backups of all your Metal3 custom resources.
-
Update Metal3DataTemplate resources:
- Rename
ipAddressesFromIPPooltoipAddressesFromPool - Rename
prefixesFromIPPooltoprefixesFromPool - Rename
gatewaysFromIPPooltogatewaysFromPool - Rename
dnsServersFromIPPooltodnsServersFromPool - Convert
parametersin bond configurations from map to array format - Remove any
TemplateReferencefields
- Rename
-
Update Metal3Machine resources:
- Rename
formattodiskFormatinspec.image - Replace
noCloudProviderwithcloudProviderEnabled(inverted logic)
- Rename
-
Update Metal3Remediation resources:
- Replace
timeoutwithtimeoutSeconds(convert duration to seconds)
- Replace
-
Update CAPM3 deployment:
- Change CLI flag from
enableBMHNameBasedPreallocationtoenable-bmh-name-based-preallocation
- Change CLI flag from
-
Update annotations (optional but recommended):
- Update
capi.metal3.io/unhealthytocapm3.metal3.io/unhealthy
- Update
-
Update automation/tooling that reads conditions:
- Update code that checks
status.readyto usestatus.initialization.provisioned(affects Metal3Cluster, Metal3Machine) - Update code that reads
status.conditionsto handlemetav1.Conditionformat (affects Metal3Cluster, Metal3Machine) - Update condition type checks from
AssociateBMHtoAssociateBareMetalHost(affects Metal3Machine) - Update condition type checks from
KubernetesNodeReadytoAssociateMetal3MachineMetaData(affects Metal3Machine) - Remove any code that depends on
status.phase(affects Metal3Machine, no longer available) - Note that
status.failureReasonandstatus.failureMessageare now atstatus.deprecated.v1beta1.*and no longer represent terminal errors (affects Metal3Cluster, Metal3Machine). Usestatus.conditionsfor error information instead
- Update code that checks
Metrics
CAPM3 exposes Prometheus-compatible metrics that can be scraped for monitoring and observability. This page explains how to configure and access these metrics. The CAPM3 exposes metrics on port 8443 by default. These metrics provide insights into the controller’s operation, including reconciliation loops, API requests, and resource states. To see the full list of available metrics, check kubebuilder reference
Scraping Metrics
There are two main ways to scrape CAPM3 metrics:
- Quick Way (curl/test Pod): For quick local testing, debugging, or one-off metric checks without setting up a full monitoring stack
- Prometheus Integration: For production environments requiring continuous monitoring, alerting, and long-term storage
1. Quick Way: Manual Scraping with curl/test Pod
Manual scraping is ideal for quick local testing, debugging, or one-off metric checks without setting up a full monitoring stack.
Configuration
If --insecure-diagnostics is set to true, CAPM3 serves metrics via http and
without authentication/authorization. For quick scraping with curl or test pod,
you need to turn on the insecure diagnostics flag in the CAPM3 deployment:
kubectl -n capm3-system get deployment capm3-controller-manager -o json | \
  jq '.spec.template.spec.containers[0].args |= (map(if startswith("--insecure-diagnostics") then "--insecure-diagnostics=true" else . end) + (if any(.[]; startswith("--insecure-diagnostics")) then [] else ["--insecure-diagnostics=true"] end))' | \
  kubectl apply -f -
Alternatively, edit the deployment directly to add - --insecure-diagnostics=true
kubectl -n capm3-system edit deployment capm3-controller-manager
Scraping
-
Get the CAPM3 controller manager pod name and forward the metrics port:
CAPM3_POD=$(kubectl -n capm3-system get pods -l control-plane=controller-manager -o jsonpath='{.items[0].metadata.name}') kubectl -n capm3-system port-forward ${CAPM3_POD} 8443:8443 -
Scrape the metrics endpoint using one of the following methods:
Insecure (http):
curl http://localhost:8443/metricsSecure (https):
TOKEN=$(kubectl create token default)
curl https://localhost:8443/metrics --header "Authorization: Bearer $TOKEN" -k
Using a test Pod in the cluster
For testing within the cluster environment, you can deploy a test pod to scrape metrics directly:
-
Create a test pod with curl installed:
cat <<EOF | kubectl apply -f - apiVersion: v1 kind: Pod metadata: name: metrics-test namespace: capm3-system spec: securityContext: runAsNonRoot: true runAsUser: 1000 seccompProfile: type: RuntimeDefault containers: - name: metrics-test image: curlimages/curl:latest command: ["sleep", "3600"] securityContext: allowPrivilegeEscalation: false capabilities: drop: - ALL restartPolicy: Never EOF -
Get the CAPM3 controller manager pod IP:
CAPM3_POD_IP=$(kubectl -n capm3-system get pods -l control-plane=controller-manager -o jsonpath='{.items[0].status.podIP}') -
Scrape metrics from within the test pod using one of the following methods:
Insecure (http):
kubectl exec -n capm3-system metrics-test -- curl -s http://${CAPM3_POD_IP}:8443/metricsSecure (https):
TOKEN=$(kubectl create token default -n capm3-system)
kubectl exec -n capm3-system metrics-test -- curl -s https://${CAPM3_POD_IP}:8443/metrics --header "Authorization: Bearer $TOKEN" -k
2. Prometheus integration
For production environments, integrate CAPM3 metrics with Prometheus for
continuous monitoring, alerting, and long-term storage. Before configuring
Prometheus ensure that --insecure-diagnostics is not set to enable
the HTTPS-based endpoint for metrics.
Using Prometheus Helm chart (recommended)
The simplest way to integrate with Prometheus is using the official Prometheus Helm chart. The Prometheus Helm chart deploys the required ClusterRole out-of-the-box. Prometheus will automatically discover and scrape CAPM3 metrics because CAPM3 advertises its metrics endpoint through the following Pod annotations:
annotations:
  prometheus.io/path: /metrics
  prometheus.io/port: "8443"
  prometheus.io/scrape: "true"
Available Metrics
CAPM3 exposes standard controller-runtime metrics, including:
- API Request Metrics: Request rates, latencies, and error rates
- Work queue Metrics: Queue depth, processing time, and retry counts
- Controller Metrics: Reconciliation counts and durations
- Go Runtime Metrics: Memory usage, go routines, and GC statistics
For a complete list of available metrics, scrape the /metrics endpoint and
inspect the output.
Cluster-api-provider-metal3 Custom Resources
Metal3Cluster
The Metal3Cluster object contains information related to the deployment of the cluster on Baremetal. It currently has two specification fields :
- controlPlaneEndpoint: contains the target cluster API server address and port
- noCloudProvider(Deprecated use CloudProviderEnabled): (true/false) Whether the cluster will not be deployed with an external cloud provider. If set to true, CAPM3 will patch the target cluster node objects to add a providerID. This will allow the CAPI process to continue even if the cluster is deployed without cloud provider.
- CloudProviderEnabled: (true/false) Whether the cluster will be deployed with an external cloud provider. If set to false, CAPM3 will patch the target cluster node objects to add a providerID. This will allow the CAPI process to continue even if the cluster is deployed without cloud provider.
Example metal3cluster :
apiVersion: infrastructure.cluster.x-k8s.io/v1beta1
kind: Metal3Cluster
metadata:
  name: m3cluster
  namespace: metal3
spec:
  controlPlaneEndpoint:
    host: 192.168.111.249
    port: 6443
  cloudProviderEnabled: false
Metal3Machine
The Metal3Machine contains information related to the deployment of the BareMetalHost such as the image and the host selector. For each Machine, there must be a Metal3Machine.
The fields are:
-
image – This includes two sub-fields,
urlandchecksum, which include the URL to the image and the URL to a checksum for that image. These fields are required. The image will be used for provisioning of theBareMetalHostchosen by theMachineactuator. -
userData – This includes two sub-fields,
nameandnamespace, which reference aSecretthat contains base64 encoded user-data to be written to a config drive on the provisionedBareMetalHost. This field is optional and is automatically set by CAPM3 with the userData from the machine object. If you want to overwrite the userData, this should be done in the CAPI machine. -
dataTemplate – This includes a reference to a Metal3DataTemplate object containing the metadata and network data templates, and includes two fields,
nameandnamespace. -
metaData is a reference to a secret containing the metadata rendered from the Metal3DataTemplate metadata template object automatically. In case this would not be managed by the Metal3DataTemplate controller, if provided by the user for example, the ownerReference should be set properly to ensure that the secret belongs to the cluster ownerReference tree (see doc).
-
networkData is a reference to a secret containing the network data rendered from the Metal3DataTemplate metadata template object automatically. In case this would not be managed by the Metal3DataTemplate controller, if provided by the user for example, the ownerReference should be set properly to ensure that the secret belongs to the cluster ownerReference tree (see doc). The content of the secret should be a yaml equivalent of a json object that follows the format definition that can be found here.
-
hostSelector – Specify criteria for matching labels on
BareMetalHostobjects. This can be used to limit the set of availableBareMetalHostobjects chosen for thisMachine. -
automatedCleaningMode – An interface to enable or disable Ironic automated cleaning during provisioning or deprovisioning of a host. When set to
disabled, automated cleaning will be skipped, wheremetadatavalue enables it. It is recommended to tune the cleaning via Metal3MachineTemplate rather than Metal3Machine. Whenspec.template.spec.automatedCleaningModefield of Metal3MachineTemplate is updated, Metal3MachineTemplate controller will update all the Metal3Machines (generated from the Metal3MachineTemplate) and eventually BareMetalHosts with the same value.
The metaData and networkData field in the spec section are for the user to
give directly a secret to use as metaData or networkData. The userData,
metaData and networkData fields in the status section are for the
controller to store the reference to the secret that is actually being used,
whether it is from one of the spec fields, or somehow generated. This is aimed
at making a clear difference between the desired state from the user (whether it
is with a DataTemplate reference, or direct metaData or userData secrets)
and what the controller is actually using.
The dataTemplate field consists of an object reference to a Metal3DataTemplate
object containing the templates for the metadata and network data generation for
this Metal3Machine. The renderedData field is a reference to the Metal3Data
object created for this machine. If the dataTemplate field is set but either the
renderedData, metaData or networkData fields in the status are unset, then
the Metal3Machine controller will wait until it can find the Metal3Data object
and the rendered secrets. It will then populate those fields.
When CAPM3 controller will set the different fields in the BareMetalHost, it
will reference the metadata secret and the network data secret in the
BareMetalHost. If any of the metaData or networkData status fields are
unset, that field will also remain unset on the BareMetalHost.
When the Metal3Machine gets deleted, the CAPM3 controller will remove its ownerReference from the data template object. This will trigger the deletion of the generated Metal3Data object and the secrets generated for this machine.
hostSelector Examples
The `hostSelector field has two possible optional sub-fields:
-
matchLabels – Key/value pairs of labels that must match exactly.
-
matchExpressions – A set of expressions that must evaluate to true for the labels on a
BareMetalHost.
Valid operators include:
- ! – Key does not exist. Values ignored.
- = – Key equals specified value. There must only be one value specified.
- == – Key equals specified value. There must only be one value specified.
- in – Value is a member of a set of possible values
- != – Key does not equal the specified value. There must only be one value specified.
- notin – Value not a member of the specified set of values.
- exists – Key exists. Values ignored.
- gt – Value is greater than the one specified. Value must be an integer.
- lt – Value is less than the one specified. Value must be an integer.
Example 1: Only consider a BareMetalHost with label key1 set to value1.
spec:
  providerSpec:
    value:
      hostSelector:
        matchLabels:
          key1: value1
Example 2: Only consider BareMetalHost with both key1 set to value1 AND
key2 set to value2.
spec:
  providerSpec:
    value:
      hostSelector:
        matchLabels:
          key1: value1
          key2: value2
Example 3: Only consider BareMetalHost with key3 set to either a, b, or
c.
spec:
  providerSpec:
    value:
      hostSelector:
        matchExpressions:
        - key: key3
          operator: in
          values: [‘a’, ‘b’, ‘c’]
Example 3: Only consider BareMetalHost with key1 set to value1 AND key2
set to value2 AND key3 set to either a, b, or c.
spec:
  providerSpec:
    value:
      hostSelector:
        matchLabels:
          key1: value1
          key2: value2
        matchExpressions:
        - key: key3
          operator: in
          values: [‘a’, ‘b’, ‘c’]
Metal3Machine example
apiVersion: infrastructure.cluster.x-k8s.io/v1beta1
kind: Metal3Machine
metadata:
  name: controlplane-0
  namespace: metal3
spec:
  automatedCleaningMode: metadata
  image:
    checksum: http://172.22.0.1/images/UBUNTU_22.04_NODE_IMAGE_K8S_v1.29.0-raw.img.sha256sum
    checksumType: sha256
    format: raw
    url: http://172.22.0.1/images/UBUNTU_22.04_NODE_IMAGE_K8S_v1.29.0-raw.img
  hostSelector:
    matchLabels:
      key1: value1
    matchExpressions:
      key: key2
      operator: in
      values: { ‘abc’, ‘123’, ‘value2’ }
  dataTemplate:
    Name: controlplane-metadata
  metaData:
    Name: controlplane-0-metadata-0
Metal3MachineTemplate
The Metal3MachineTemplate contains following two specification fields:
- nodeReuse: (true/false) Whether the same pool of BareMetalHosts will be re-used during the upgrade/remediation operations. By default set to false, if set to true, CAPM3 Machine controller will pick the same pool of BareMetalHosts that were released while upgrading/remediation - for the next provisioning phase.
- template: is a template containing the data needed to create a Metal3Machine.
Enabling nodeReuse feature
This feature can be desirable and enabled in scenarios such as upgrade or node remediation. For example, the same pool of hosts need to be used after cluster upgrade and no data of secondary storage should be lost. To achieve that:
-
spec.nodeReusefield of Metal3MachineTemplate must be set toTrue. This tells that we want to reuse the same hosts after the upgrade, or to be exact same BareMetalHosts should be provisioned. -
spec.template.spec.automatedCleaningModefield of Metal3MachineTemplate must be set todisabled. This tells that we want secondary/hosted storage data to persist even after upgrade.
Above field changes need to be made before you start upgrading your cluster.
Node Reuse flow
When spec.nodeReuse field of Metal3MachineTemplate is set to True, CAPM3
Machine controller:
- Sets
infrastructure.cluster.x-k8s.io/node-reuselabel to the corresponding CAPI object name (acontrolplane.cluster.x-k8s.ioobject such asKubeadmControlPlaneor aMachineDeployment) on the BareMetalHost during deprovisioning; - Selects the BareMetalHost that contains
infrastructure.cluster.x-k8s.io/node-reuselabel and matches exact same CAPI object name set in the previous step during next provisioning.
Example Metal3MachineTemplate :
apiVersion: infrastructure.cluster.x-k8s.io/v1beta1
kind: Metal3MachineTemplate
metadata:
  name: m3mt-0
  namespace: metal3
spec:
  nodeReuse: false
  template:
    spec:
      automatedCleaningMode: metadata
      image:
        checksum: http://172.22.0.1/images/UBUNTU_22.04_NODE_IMAGE_K8S_v1.29.0-raw.img.sha256sum
        checksumType: sha256
        format: raw
        url: http://172.22.0.1/images/UBUNTU_22.04_NODE_IMAGE_K8S_v1.29.0-raw.img
      hostSelector:
        matchLabels:
          key1: value1
        matchExpressions:
          key: key2
          operator: in
          values: { ‘abc’, ‘123’, ‘value2’ }
      dataTemplate:
        Name: m3mt-0-metadata
Cluster-api-provider-metal3 features
- Remediation
- Node Reuse
- Pivoting
- Automated cleaning
- Label synchronization
- Data sources
- ClusterClass
- Failure domain
- Annotation-based IPPool
- Controller pod placement
Remediation Controller and MachineHealthCheck
The Cluster API includes the remediation feature that implements an automated health checking of k8s nodes. It deletes unhealthy Machine and replaces with a healthy one. This approach can be challenging with cloud providers that are using hardware based clusters because of slower (re)provisioning of unhealthy Machines. To overcome this situation, CAPI remediation feature was extended to plug-in provider specific external remediation. It is also possible to plug-in Metal3 specific remediation strategies to remediate unhealthy nodes. In this case, the Cluster API MHC finds unhealthy nodes while the CAPM3 Remediation Controller remediates those unhealthy nodes.
CAPI Remediation
A MachineHealthCheck is a Cluster API resource, which allows users to define conditions under which Machines within a Cluster should be considered unhealthy. Users can also specify a timeout for each of the conditions that they define to check on the Machine’s Node. If any of these conditions are met for the duration of the timeout, the Machine will be remediated. CAPM3 will use the MachineHealthCheck to create remediation requests based on Metal3RemediationTemplate and Metal3Remediation CRDs to plug-in remediation solution. For more info, please read the CAPI MHC link.
External Remediation
External remediation provides remediation solutions other than deleting unhealthy Machine and creating healthy one. Environments consisting of hardware based clusters are slower to (re)provision unhealthy Machines. So there is a growing need for a remediation flow that includes external remediation which can significantly reduce the remediation process time. Normally the conditions based remediation doesn’t offer any other remediation than deleting an unhealthy Machine and replacing it with a new one. Other environments and vendors can also have specific remediation requirements, so there is a need to provide a generic mechanism for implementing custom remediation logic. External remediation integrates with CAPI MHC and support remediation based on power cycling the underlying hardware. It supports the use of BMO reboot API and CAPM3 unhealthy annotation as part of the automated remediation cycle. It is a generic mechanism for supporting externally provided custom remediation strategies. If no value for externalRemediationTemplate is defined for the MachineHealthCheck CR, the condition-based flow is continued. For more info: External Remediation proposal
Metal3 Remediation
The CAPM3 remediation controller reconciles Metal3Remediation objects created by CAPI MachineHealthCheck. It locates a Machine with the same name as the Metal3Remediation object and uses BMO and CAPM3 APIs to remediate associated unhealthy node. The remediation controller supports a reboot strategy specified in the Metal3Remediation CRD and uses the same object to store states of the current remediation cycle. The reboot strategy consists of three steps: power off the Machine, apply a Out-of-Service Taint on the related Node, and power the Machine on again. Applying the Out-of-Service Taint is part of the (GA In Kubernetes 1.28) Non-Graceful node shutdown handling which allows stateful workloads to restart on a different node.
Enable remediation for worker nodes
Machines managed by a MachineSet (as identified by the nodepool label) can be
remediated. Here is an example MachineHealthCheck and Metal3Remediation for
worker nodes:
apiVersion: cluster.x-k8s.io/v1beta1
kind: MachineHealthCheck
metadata:
  name: worker-healthcheck
  namespace: metal3
spec:
  # clusterName is required to associate this MachineHealthCheck with a particular cluster
  clusterName: test1
  # (Optional) maxUnhealthy prevents further remediation if the cluster is already partially unhealthy
  maxUnhealthy: 100%
  # (Optional) nodeStartupTimeout determines how long a MachineHealthCheck should wait for
  # a Node to join the cluster, before considering a Machine unhealthy.
  # Defaults to 10 minutes if not specified.
  # Set to 0 to disable the node startup timeout.
  # Disabling this timeout will prevent a Machine from being considered unhealthy when
  # the Node it created has not yet registered with the cluster. This can be useful when
  # Nodes take a long time to start up or when you only want condition based checks for
  # Machine health.
  nodeStartupTimeout: 0m
  # selector is used to determine which Machines should be health checked
  selector:
    matchLabels:
      nodepool: nodepool-0
  # Conditions to check on Nodes for matched Machines, if any condition is matched for the duration of its timeout, the Machine is considered unhealthy
  unhealthyConditions:
  - type: Ready
    status: Unknown
    timeout: 300s
  - type: Ready
    status: "False"
    timeout: 300s
  remediationTemplate: # added infrastructure reference
    kind: Metal3RemediationTemplate
    apiVersion: infrastructure.cluster.x-k8s.io/v1beta1
    name: worker-remediation-request
Metal3RemediationTemplate for worker nodes:
apiVersion: infrastructure.cluster.x-k8s.io/v1beta1
kind: Metal3RemediationTemplate
metadata:
  name: worker-remediation-request
  namespace: metal3
spec:
  template:
    spec:
      strategy:
        type: "Reboot"
        retryLimit: 2
        timeout: 300s
Enable remediation for control plane nodes
Machines managed by a KubeadmControlPlane are remediated according to the
KubeadmControlPlane proposal.
It is necessary to have at least 2 control plane machines in order to use
remediation feature. Control plane nodes are identified by the
cluster.x-k8s.io/control-plane label. Here is an example MachineHealthCheck
and Metal3Remediation for control plane nodes:
apiVersion: cluster.x-k8s.io/v1beta1
kind: MachineHealthCheck
metadata:
  name: controlplane-healthcheck
  namespace: metal3
spec:
  clusterName: test1
  maxUnhealthy: 100%
  nodeStartupTimeout: 0m
  selector:
    matchLabels:
      cluster.x-k8s.io/control-plane: ""
  unhealthyConditions:
  - type: Ready
    status: Unknown
    timeout: 300s
  - type: Ready
    status: "False"
    timeout: 300s
  remediationTemplate: # added infrastructure reference
    kind: Metal3RemediationTemplate
    apiVersion: infrastructure.cluster.x-k8s.io/v1beta1
    name: controlplane-remediation-request
Metal3RemediationTemplate for control plane nodes:
apiVersion: infrastructure.cluster.x-k8s.io/v1beta1
kind: Metal3RemediationTemplate
metadata:
  name: controlplane-remediation-request
  namespace: metal3
spec:
  template:
    spec:
      strategy:
        type: "Reboot"
        retryLimit: 1
        timeout: 300s
Limitations and caveats of Metal3 remediation
-
Machines owned by a MachineSet or a KubeadmControlPlane can be remediated by a MachineHealthCheck
-
If the Node for a Machine is removed from the cluster, CAPI MachineHealthCheck will consider this Machine unhealthy and remediates it immediately
-
If there is no Node joins the cluster for a Machine after the
NodeStartupTimeout, the Machine will be remediated -
If a Machine fails for any reason and the
FailureReasonis set, the Machine will be remediated immediately
Unhealthy Annotation
The capi.metal3.io/unhealthy annotation is used by
Cluster API Provider Metal³ (CAPM3) to mark BareMetalHost objects
that should not be selected for provisioning new Metal3Machine resources.
When this annotation is present, CAPM3 excludes the annotated host from consideration when matching available hardware to new Machines. This prevents the reuse of hosts that are known to be unhealthy or have failed remediation attempts.
Manual usage
Operators can manually mark a host as unhealthy by adding the following annotation
to a BareMetalHost object:
metadata:
  annotations:
    capi.metal3.io/unhealthy: "true"
Removing the annotation re-enables the host for normal provisioning by CAPM3.
Automatic application after remediation timeout
Starting from CAPM3 API version v1alpha4 (available in previous release branches),
this annotation may also be applied automatically when remediation attempts
timeout and the node fails to recover.
During a remediation cycle managed by a Metal3Remediation resource, the following
parameters define retry and timeout behavior:
.spec.strategy.retryLimit— the number of reboot retries permitted before the remediation is considered failed..spec.strategy.timeout— the duration to wait between retries for the node to become healthy.
If the final timeout expires and the node remains unhealthy:
- CAPM3 sets the
MachineOwnerRemediatedCondition=Falsecondition on the affectedMachineto begin deletion of the unhealthyMachineand related remediation objects. - The corresponding
BareMetalHostis automatically annotated with:
metadata:
  annotations:
    capi.metal3.io/unhealthy: "true"
This automatic annotation ensures that CAPM3 does not immediately attempt to reuse the same physical host for another Machine after remediation failure. The host remains excluded from new provisioning until an operator manually removes the annotation after verifying and correcting the underlying issue.
Check the Remediation process for more details.
Node Reuse
This feature brings a possibility of re-using the same BaremetalHosts (referred to as a host later) during deprovisioning and provisioning mainly as a part of the rolling upgrade process in the cluster.
Importance of scale-in strategy
The logic behind the reusing of the hosts, solely relies on the scale-in upgrade strategy utilized by Cluster API objects, namely KubeadmControlPlane and MachineDeployment. During the upgrade process of above resources, the machines owned by KubeadmControlPlane or MachineDeployment are removed one-by-one before creating new ones (delete-create method). That way, we can fully ensure that, the intended host is reused when the upgrade is kicked in (picked up on the following provisioning for the new machine being created).
Note: To achieve the desired delete first and create after behavior in above-mentioned Cluster API objects, user has to modify:
- MaxSurge field in KubeadmControlPlane and set it to 0 with minimum number of 3 control plane machines replicas
- MaxSurge and MaxUnavailable fields in MachineDeployment set them to 0 & 1 accordingly
On the contrary, if the scale-out strategy is utilized by CAPI objects during the upgrade, usually create-swap-delete method is followed by CAPI objects, where new machine is created first and new host is picked up for that machine, breaking the node reuse logic right at the beginning of the upgrade process.
Workflow
Metal3MachineTemplate (M3MT) Custom Resource is the object responsible for enabling of the node reuse feature.
apiVersion: infrastructure.cluster.x-k8s.io/v1beta1
kind: Metal3MachineTemplate
metadata:
  name: test1-controlplane
  namespace: metal3
spec:
  nodeReuse: true
  template:
    spec:
      image:
There could be two Metal3MachineTemplate objects, one referenced by
KubeadmControlPlane for control plane nodes, and the other by MachineDeployment
for worker node. Before performing an upgrade, user must set nodeReuse field
to true in the desired Metal3MachineTemplate object where hosts targeted to
be reused. If left unchanged, by default, nodeReuse field is set to false
resulting in no host reusing being performed in the workflow. If you would like
to know more about the internals of controller logic, please check the original
proposal for the feature
over here
Once nodeReuse field is set to true, user has to make sure that scale-in
feature is enabled as suggested above, and proceed with updating the desired
fields in KubeadmControlPlane or MachineDeployment to start a rolling upgrade.
Note: If you are creating a new Metal3MachineTemplate object (for
control-plane or worker), rather than using the existing one created while
provisioning, please make sure to reference it from the corresponding Cluster
API object (KubeadmControlPlane or MachineDeployment). Also keep in mind that,
already provisioned Metal3Machines were created from the old
Metal3MachineTemplate and they consume existing hosts, meaning even though
nodeReuse field is set to true in the new Metal3MachineTemplate, it would
have no effect. To use newly Metal3MachineTemplate in the workflow, user has to
reprovision the nodes, which should result in using new Metal3MachineTemplate
referenced in Cluster API object and Metal3Machine created out of it.
CAPM3 Pivoting
What is pivoting
Cluster API Provider Metal3 (CAPM3) implements support for CAPI’s ‘move/pivoting’ feature.
CAPI Pivoting feature is a process of moving the provider components and
declared Cluster API resources from a source management cluster to a target
management cluster by using the clusterctl functionality called “move”. More
information about the general CAPI “move” functionality can be found
here.
In Metal3, pivoting is performed by using the CAPI clusterctl tool provided
by Cluster-API project. clusterctl recognizes pivoting as move. During the
pivot process clusterctl pauses any reconciliation of CAPI objects and this
gets propagated to CAPM3 objects as well. Once all the objects are paused, the
objects are created on the other side on the target cluster and deleted from
the bootstrap cluster.
Prerequisite
-
It is mandatory to use
clusterctlfor both the bootstrap and target cluster.If the provider components are not installed using
clusterctl, it will not be able to identify the objects to move. Initializing the cluster usingclusterctlessentially adds the following labels in the CRDs of each related object.labels: - clusterctl.cluster.x-k8s.io: "" - cluster.x-k8s.io/provider: "<provider-name>"So if the clusters are not initialized using
clusterctl, all the CRDS of the objects to be moved to target cluster needs to have these labels both in bootstrap cluster and target cluster before performing the move.Note: This is not recommended, since the way
clusterctlidentifies objects to manage might change in the future, so it’s always safe to install CRDs and controllers through theclusterctl initsub-command. -
BareMetalHost objects have correct status annotation.
Since BareMetalHost (BMH) status holds important information regarding the BMH itself, BMH with status has to be moved and it has to be reconstructed with correct status in target cluster before it is being reconciled. This is now done through BMH status annotation in BMO.
-
Maintain connectivity towards provisioning network.
Baremetal machines boot over a network with a DHCP server. This requires maintaining a fixed IP end points towards the provisioning network. This is achieved through keepalived. A new container is added namely ironic-endpoint-keepalived in the ironic deployment which maintains the Ironic Endpoint using keepalived. The motivation behind maintaining Ironic Endpoint with Keepalived is to ensure that the Ironic Endpoint IP is also passed onto the target cluster control plane. This also guarantees that once moving is done and the management cluster is taken down, target cluster controlplane can re-claim the Ironic endpoint IP through keepalived. The end goal is to make Ironic endpoint reachable in the target cluster.
-
BMO is deployed as part of CAPM3.
If not, it has to be deployed before the
clusterctl initand the BMH CRDs need to be labeled accordingly manually. Separate labeling for BMH CRDs is required because since CAPM3 release v0.5.0 BMO/BMH CRDs are not deployed as part of CAPM3 deployment anymore. This is a prerequisite for both the management and the target cluster. -
Objects should have a proper owner reference chain.
clusterctl movemoves all the objects to the target cluster following the owner reference chain. So, it is necessary to verify that all the desired objects that needs to be moved to the target cluster have a proper owner reference chain.
Important Notes
The following requirements are essential for the move process to run successfully:
-
The move process should be done when the BMHs are in a steady state. BMHs should not be moved while any operation is on-going i.e. BMH is in provisioning state. This will result in failure since the interaction between IPA and Ironic gets broken and as a result Ironic’s database might not be repopulated and eventually the cluster will end up in an erroneous state. Moreover, the IP of the BMH might change after the move and the DHCP-leases from the management cluster are not moved to target cluster.
-
Before the move process is initialized, it is important to delete the Ironic pod/Ironic containers. If Ironic is deployed in cluster the deployment is named
metal3-ironic, if it is deployed locally outside the cluster then the user has to make sure that all of the ironic related containers are correctly deleted. If Ironic is not deleted before move, the old Ironic might interfere with the operations of the new Ironic deployed in target cluster since the database of the first Ironic instance is not cleaned when the BMHs are moved. Also there would be two dnsmasq existent in the deployment if there would be two Ironic deployment which is undesirable. -
The provisioning bridge where the
ironic-endpoint-IPis supposed to be attached to should have a static IP assignment on it before the Ironic pod/containers start to operate in the target cluster. This is important sinceironic-endpoint-keepalivedcontainer will only assign theironic-endpoint-IPon the provisioning bridge in target cluster when it has an IP on it. Otherwise it will fail to attach the IP and Ironic will be unreachable. This is crucial because this interface is used to host the DHCP server and so it cannot be configured to use DHCP.
Step by step pivoting process
As described in clusterctl the whole process of bootstrapping a management cluster to moving objects to target cluster can be described as follows:
The move process can be bounded with the creation of a temporary bootstrap cluster used to provision a target management cluster.
This can now be achieved with the following procedure:
-
Create a temporary bootstrap cluster, the temporary bootstrap cluster could be created tools like e.g. using Kind or Minikube using and after the bootstrap cluster is up and running then the CAPI and provider components can be installed with
clusterctlto the bootstrap cluster. -
Install Ironic components, namely: ironic, ironic-endpoint-keepalived, httpd and dnsmasq.
-
Use clusterctl init to install the provider components
Example:
clusterctl init --infrastructure metal3:v1.13.0
--target-namespace metal3 --watching-namespace metal3
This command will create the necessary CAPI controllers (CAPI, CABPK, CAKCP) and CAPM3 as the infrastructure provider. All of the controllers will be installed on namespace
metal3and they will be watching over objects in namespacemetal3. -
Provision target cluster:
Example:
clusterctl config cluster ... | kubectl apply -f - -
Wait for the target management cluster to be up and running and once it is up get the kubeconfig for the new target management cluster.
-
Use the new cluster’s kubeconfig to install the ironic-components in the target cluster.
-
Use
clusterctlinit with the new cluster’s kubeconfig to install the provider components.Example:
clusterctl init --kubeconfig target.yaml --infrastructure metal3:v1.13.0 --target-namespace metal3 --watching-namespace metal3 -
Use
clusterctlmove to move the Cluster API resources from the bootstrap cluster to the target management cluster.Example:
clusterctl move --to-kubeconfig target.yaml -n metal3 -v 10 -
Delete the bootstrap cluster
Automated Cleaning
Before reading this page, please see Baremetal Operator Automated Cleaning page.
If you are using only Metal3 Baremetal Operator, you can skip this page and refer to Baremetal Operator automated cleaning page instead.
For deployments following Cluster-api-provider-metal3 (CAPM3) workflow, automated cleaning can be (recommended) configured via CAPM3 custom resources (CR).
There are two automated cleaning modes available which can be set via
automatedCleaningMode field of a Metal3MachineTemplate spec or
Metal3Machine spec.
metadatato enable the cleaningdisabledto disable the cleaning
When enabled (metadata), automated cleaning kicks off when a node is in the
first provisioning and on every deprovisioning. There is no default value for
automatedCleaningMode in Metal3MachineTemplate and Metal3Machine. If user
doesn’t set any mode, the field in the spec will be omitted. Unsetting
automatedCleaningMode in the Metal3MachineTemplate will block the
synchronization of the cleaning mode between the Metal3MachineTemplate and
Metal3Machines. This enables the selective operations described below.
Bulk operations
CAPM3 controller ensures to replicate automated cleaning mode to all
Metal3Machines from their referenced Metal3MachineTemplate. For example, one
controlplane and one worker Metal3Machines have automatedCleaningMode set to
disabled, because it is set to disabled in the template that they both are
referencing.
Note: CAPM3 controller replicates the cleaning mode from
Metal3MachineTemplate to Metal3Machine only if automatedCleaningMode is set
(not empty) on the Metal3MachineTemplate resource. In other words, it
synchronizes either disabled or metadata modes between Metal3MachineTemplate
and Metal3Machines.
Selective operations
Normally automated cleaning mode is replicated from Metal3MachineTemplate spec
to its referenced Metal3Machines’ spec and from Metal3Machines spec to
BareMetalHost spec (if CAPM3 is used). However, sometimes you might want to
have a different automated cleaning mode for one or more Metal3Machines than
the others even though they are referencing the same Metal3MachineTemplate. For
example, there is one worker and one controlplane Metal3Machine created from
the same Metal3MachineTemplate, and we would like the automated cleaning to be
enabled (metadata) for the worker while disabled (disabled) for the
controlplane.
Here are the steps to achieve that:
- Unset
automatedCleaningModein the Metal3MachineTemplate. Then CAPM3 controller unsets it for referenced Metal3Machines. Although it is unset in the Metal3Machine, BareMetalHosts will get their default automated cleaning modemetadata. As we mentioned earlier, CAPM3 controller replicates cleaning mode from Metal3MachineTemplate to Metal3Machine ONLY when it is eithermetadataordisabled. As such, to block synchronization between Metal3MachineTemplate and Metal3Machine, unsetting the cleaning mode in the Metal3MachineTemplate is enough. - Set
automatedCleaningModetodisabledon the worker Metal3Machinespecand tometadataon the controlplane Metal3Machinespec. Since we don’t have any mode set on the Metal3MachineTemplate, Metal3Machines can have different automated cleaning modes set even if they reference the same Metal3MachineTemplate. CAPM3 controller copies cleaning modes from Metal3Machines to their corresponding BareMetalHosts. As such, we end up with two nodes having different cleaning modes regardless of the fact that they reference the same Metal3MachineTemplate.

Labels Synchronization between BareMetalHost and Kubernetes Nodes
CAPM3 has mechanism to synchronize BareMetalHost (BMH) labels with predefined prefixes to the corresponding Kubernetes node object on that BMH.
How to use?
To use label synchronization user needs to define prefix(es) for labels. Only labels that fall within prefix set are synchronized. User defines prefixes with annotation in Metal3Cluster object by using metal3.io/metal3-label-sync-prefixes annotation key and gives prefixes as annotation value. Prefixes should be separated by comma.
In the following example we are defining two label prefixes for label synchronization: test.foobar.io and my-prefix.
kubectl annotate metal3cluster test1 metal3.io/metal3-label-sync-prefixes=test.foobar.io,my-prefix -n=metal3 --overwrite
Note: All prefixes should be complaint with RFC 1123.
After adding annotation on Metal3Cluster, we label BMH nodes with labels that start with prefixes defined above:
kubectl label baremetalhosts node-0 my-prefix/rack=xyz-123 -n=metal3
kubectl label baremetalhosts node-0 test.foobar.io/group=abc -n=metal3
Note: Prefixes should be separated from the rest of the label key by “/”, e.g. my-prefix/rack, test.foobar.io/xyz
Now label sync controller will apply same labels to corresponding Kubernetes node.
$ kubectl get nodes --show-labels
NAME          STATUS    ROLES  AGE  VERSION  LABELS
test1-8ndsl   NotReady  <none> 10m  v1.31.0  my-prefix/rack=xyz-123,test.foobar.io/group=abc
Label sync controller removes the labels with defined prefixes if same label does not exist in BMH. Similarly, if we delete the label which exists in BMH from Node it will be re-added at the next reconciliation cycle.
Using CAPM3 Data Sources
Resource Relationships Overview
Assuming you’ve deployed Baremetal Operator and CAPM3, you will likely provision a cluster and control-plane/worker nodes. This process creates several interconnected resources and this document aims to explain those. As metal3 is an infrastructure provider for cluster API (CAPI), it necessarily references also other CAPI resources, however, this document focuses on metal3 resources.
For more details about CAPI resources and to get a big picture, refer to CAPI docs. Please note that the following CAPI examples are only to illustrate how metal3 resources fit into the big picture, so for up to date documentation of CAPI resources, refer to the official docs.
Visualization of relationships between metal3 resources can be found for example here. Note that the graph is not perfect and there can be missing information.
The example values in this document are from a cluster deployed with metal3 dev env.
1. Cluster
The Cluster resource is CAPI resource and includes a reference to the control
plane via the controlPlaneRef field:
controlPlaneRef:
    apiVersion: controlplane.cluster.x-k8s.io/v1beta1
    kind: KubeadmControlPlane
    name: test1
    namespace: metal3
This object defines the cluster and links it to the control plane configuration.
2. KubeadmControlPlane
This is the main entry point for configuring the control plane. This CAPI resource directly references CAPM3 resources used to manage the life cycle of bare metal machines running under the controlplane nodes.
- Refers to a
KubeadmConfigTemplate, which defines kubeadm configuration - Refers to a
Metal3MachineTemplate, which defines the infrastructure for control plane nodes
machineTemplate:
   infrastructureRef:
     apiVersion: infrastructure.cluster.x-k8s.io/v1beta1
     kind: Metal3MachineTemplate
     name: test1-controlplane
     namespace: metal3
3. KubeadmConfigTemplate
KubeadmConfigTemplate is a CAPI resources and defines the kubeadm
configuration to use when initializing new nodes in the cluster. This template
contains multiple important fields, such as (but not limited to)
initConfigurationjoinConfigurationpostKubeadmCommandscommands to run afterkubeadm initpreKubeadmCommandscommands to run beforekubeadm init
Please refer to official docs for more details.
4. Metal3MachineTemplate → Metal3Machine
The Metal3MachineTemplate is metal3 resource and it is used to generate
Metal3Machine resources on demand when KubeadmControlPlane or
MachineDeployment triggers the creation (for example when scaling up). Each
Metal3Machine:
- Is linked to a CAPI
Machineresource. - Consumes a
BareMetalHostBMH instances on the cluster. - Refers to a
Metal3Dataresource which holds specific node configuration
CAPI resource Machine is infrastructure agnostic resource. Metal3Machine is
metal3 specific resource which is used internally in CAPM3 to represent
machines. BareMetalHost represents bare metal server, and hence
Metal3Machines occupy those servers.
status:
...
  renderedData:
    name: test1-controlplane-template-0
    namespace: metal3
5. Metal3DataTemplate → Metal3Data
The Metal3DataTemplate is metal3 resource and it is used to
create Metal3Data objects. These objects contain machine-specific
configuration, such as:
- Static IP settings
- Network interfaces (NICs)
Important: This is one of the more complex parts of CAPM3 configuration because CAPM3 does some preprocessing with the networking data. With other templates the data is mostly just copied over to deployed resources but the networking template supports convenience features like matching NICs (see NIC matching). Misconfiguration here can lead to provisioning errors:
"msg"="Reconciler error"
"error"="Failed to create secrets: NIC name not found enp1s0".
For example, see: CAPM3 Issue #1998
The relevant fields in Metal3Data are
spec:
  claim:
    name: test1-jzktd
    namespace: metal3
  metaData:
    name: test1-jzktd-metadata
    namespace: metal3
  networkData:
    name: test1-jzktd-networkdata
    namespace: metal3
  template:
    name: test1-controlplane-template
    namespace: metal3
claimrefers toMetal3DataClaimmetaDatarefers totest1-jzktd-metadatanamed secretnetworkDatarefers totest1-jzktd-networkdatanamed secrettemplaterefers toMetal3DataTemplate
Example content of networkData secret is
links:
- ethernet_mac_address: 00:fe:8d:20:55:35
  id: enp1s0
  mtu: 1500
  type: phy
- ethernet_mac_address: 00:fe:8d:20:55:36
  id: enp2s0
  mtu: 1500
  type: phy
networks:
- id: externalv4
  ip_address: 192.168.111.100
  link: enp2s0
  netmask: 255.255.255.0
...
NIC matching
If we continue the example above, the corresponding configuration in
Metal3DataTemplate is
  networkData:
    links:
      ethernets:
      - id: enp1s0
        macAddress:
          fromHostInterface: enp1s0
        mtu: 1500
        type: phy
      - id: enp2s0
        macAddress:
          fromHostInterface: enp2s0
        mtu: 1500
        type: phy
    networks:
      ipv4:
      - id: externalv4
        ipAddressFromIPPool: externalv4-pool
        link: enp2s0
...
Notice that the links are configured by interface ID fromHostInterface: enp1s0.
This is an example of preprocessing made by CAPM3.
CAPM3 matches the NICs in the template (or resolves the fromHostInterface: enp1s0) by reaching out and reading BaremetalHost inspection data.
The networks section in the template defines an IP pool from which to take an
IP address (and with which NIC to associate it with). CAPM3 reserves the IP
address by creating an IP claim for IPAM and then inserts the IP address into
the secret which is referenced by the Metal3Data.
Important! CAPM3 utilizes both BMO and IPAM resources to generate the machine specific data.
Template vs. Concrete Resource
Each key resource in CAPM3 (and often in CAPI) typically has a matching
Template resource. These templates are used to create real resources on
demand, and users generally only need to configure the templates.
Once these templates are set, CAPM3 will render the actual resources during cluster creation and updates.
Using ClusterClass with CAPM3
ClusterClass is a feature of Cluster API that enables the cluster operators to
create multiple clusters using a single general template. You can find detailed
explanation of how to use a ClusterClass in the
Cluster API documentation
Prerequisites
ClusterClass support enabled in CAPI
To use ClusterClass with CAPM3, experimental feature ClusterClass has to be
enabled in CAPI deployment. You can find more info on how to enable ClusterClass
support in The Cluster API Book.
Deploying cluster using ClusterClass
Deploying a ClusterClass
To create ClusterClass for CAPM3 a few objects has to be deployed in the management-cluster:
-
Metal3ClusterTemplate - a template that will be used by ClusterClass controller to instantiate the cluster.
-
KubeadmControlPlaneTemplate - a template used to create Kubeadm Control Plane for the instantiated cluster.
-
Metal3MachineTemplate - templates that will be used to create Metal3Machine objects. Can be defined separately for control plane and worker nodes.
-
KubeadmConfigTemplate - a template for Kubeadm config.
-
ClusterClass - the final object that references above objects and consolidates them into single cluster template definition.
You can find example of those objects in the example file available on the CAPM3 repository.
Deploying a Cluster
Definitions described above can be used to deploy multiple clusters. However some resources has to be deployed specifically for the cluster:
-
Metal3DataTemplate - should be created for both worker and control plane nodes in the cluster
-
IPPools - should be created per cluster if required.
-
Cluster - used to instantiate cluster using
ClusterClass. You can change cluster behavior by overriding variables defined in theClusterClass.
Example definitions of those resources can be found in the CAPM3 repository.
Tilt based development environment
If you want to further develop or test ClusterClass support you can use Tilt environment.
-
Clone CAPM3 repository.
git clone https://github.com/metal3-io/cluster-api-provider-metal3.git -
Generate Tilt settings that will enable ClusterClass support in CAPI.
make tilt-settings-clusterclass -
Start Tilt.
make tilt-up -
Generate ClusterClass based example.
make generate-examples-clusterclass -
Deploy example
ClusterClass,Clusterand all the dependencies.make deploy-examples-clusterclass
Failure Domains in Metal3
What is Failure Domain?
Failure Domain: A topology label (e.g., row-a, rack-12) grouping hosts that share a common failure domains.
Why Failure Domain?
Baremetal environments often have racks, rows, or sites with different network setups. The Failure Domain (FD) feature allows users to distribute control-plane nodes across these different locations for improved resilience and fault isolation.
Cluster API (CAPI) supports FD for control-plane nodes through the
KubeadmControlPlane (KCP) controller. KCP reads the set of FDs from
ProviderCluster.Spec.FailureDomains. If defined, these values are copied to
Cluster.Status.FailureDomains. KCP then selects an FD from this set
and places its value in Machine.Spec.FailureDomain. CAPM3 machine controller
reads Machine.Spec.FailureDomain and sets to
metal3Machine.Spec.FailureDomain. By default, KCP attempts to balance Control
Plane Machines evenly across all defined FDs.
How to use?
In public clouds, FDs are pre-defined. But in Metal3, users need to manually define and assign FDs to BareMetalHosts.
-
Label BareMetalHosts with their FD:
metadata: labels: infrastructure.cluster.x-k8s.io/failure-domain: rack-2 -
Define these FDs in the Metal3Cluster specification:
kind: Metal3Cluster
spec:
  failureDomains:
    my-fd-1:
      controlPlane: true
      attributes:
        datacenter: hki-dc1
        row: A
        rack: 1
        powerFeed: pf-1a
    my-fd-2:
      controlPlane: true
      attributes:
        switch: 10Gbps
CAPM3 checks the Metal3Machine.Spec.FailureDomain field. If it is set, CAPM3
tries to associate a BMH from the specified FD. If no BMH is
available in that domain, it will select another available host in any
other FD.
Note: User can populate FD labels to kubernetes node level using label synchronization feature.
Annotation-based IPPool Reference
The fromPoolAnnotation field of a Metal3DataTemplate enables dynamic
IPPool name resolution from annotations on BareMetalHost, Machine, or
Metal3Machine objects. This allows flexible IPPool assignment
based on deployment-time decisions rather than static
template configuration.
Use Cases
The fromPoolAnnotation field can be used in both IPv4 and IPv6 network
configurations:
- Network configuration to specify which IPPool to use for IP address allocation
- Gateway configuration to specify which IPPool to use for gateway IP resolution
- Route gateway configuration to specify which IPPool to use for route gateway IP resolution
Field Specification
The fromPoolAnnotation field contains:
- object: The object type to read the annotation from (
baremetalhost,machine,metal3machine) - annotation: The annotation key containing the IPPool name
Note: When
fromPoolAnnotationis set,fromIPPoolandfromPoolReffields are ignored. The annotation-based reference takes priority.If you don’t need dynamic IPPool resolution, use
fromIPPool(reference by name in same namespace) orfromPoolRef(reference by name, namespace, and API group) for static IPPool assignment in your Metal3DataTemplate.
Example
Example IPPool that will be referenced by the annotation:
apiVersion: ipam.metal3.io/v1alpha1
kind: IPPool
metadata:
  name: provisioning-pool-zone-a
  namespace: metal3
spec:
  clusterName: my-cluster
  gateway: 172.22.0.1
  namePrefix: my-cluster-prov
  pools:
  - start: 172.22.0.100
    end: 172.22.0.200
  prefix: 24
Example Metal3DataTemplate using annotation-based IPPool reference:
apiVersion: infrastructure.cluster.x-k8s.io/v1beta1
kind: Metal3DataTemplate
metadata:
  name: nodepool-1
spec:
  networkData:
    networks:
      ipv4:
      - id: "provisioning"
        link: "vlan2"
        fromPoolAnnotation:
          object: baremetalhost
          annotation: ippool.metal3.io/provisioning
        routes:
        - network: "0.0.0.0"
          prefix: 0
          gateway:
            fromPoolAnnotation:
              object: baremetalhost
              annotation: ippool.metal3.io/provisioning
The corresponding BareMetalHost with the IPPool annotation:
apiVersion: metal3.io/v1alpha1
kind: BareMetalHost
metadata:
  name: worker-1
  annotations:
    ippool.metal3.io/provisioning: "provisioning-pool-zone-a"
spec:
  online: true
When the template is rendered, CAPM3 reads the annotation value
provisioning-pool-zone-a from the BareMetalHost and uses it as the IPPool
name for IP address allocation.
Note: If the annotation does not exist on the referenced object, the IPPool name is rendered as an empty string and the IP address allocation will fail.
CAPM3 controller pod placement
By default, the CAPM3 controller manager deployment is aligned with upstream Cluster API:
- The pod has toleration so it can run on control-plane nodes, which
are typically tainted:
node-role.kubernetes.io/master:NoSchedulenode-role.kubernetes.io/control-plane:NoSchedule
- It does not set any node affinity. This keeps the manifests environment agnostic and lets cluster administrators decide where controllers should run.
This means that, unless additional scheduling constraints are configured, CAPM3 controller pods may run on either control-plane or worker nodes, depending on node labels, taints and the cluster’s scheduling policies.
Hardening pod placement
In many environments it is desirable to keep infrastructure controllers away from regular workloads, for example by running them only on control-plane or dedicated infra nodes. CAPM3 does not enforce this by default, but you can add your own scheduling constraints via:
- CAPI Operator – configure provider specs as documented in the Cluster API Operator provider configuration docs.
- clusterctl – use
clusterctlconfiguration overrides orclusterctl generate providerto customize the rendered manifests. - kustomize – patch the CAPM3 manager
Deploymentto addspec.template.spec.affinity.nodeAffinityand any extra toleration’s.
Example: affinity for control-plane / infra nodes
The CAPM3 repository includes example kustomize patches under
examples/provider-components/, such as
manager_node_affinity_patch.yaml. This patch demonstrates how to:
- Require pods to schedule only on nodes labelled as control-plane or infra, and
- Prefer infra nodes first, then control-plane nodes when both exist.
You can use this example as a starting point and adapt it to match the
labels and policies used in your own clusters. For example, you might
replace node-role.kubernetes.io/infra with a custom label that marks
dedicated infrastructure nodes in your environment.
ProviderID Workflow
This document describes how CAPM3 assigns a ProviderID to a Metal3Machine
and how it propagates that ID to the corresponding Kubernetes Node on the
workload cluster.
Background: What is a ProviderID?
In Cluster API, every infrastructure provider (i.e. CAPM3) must set spec.providerID
on the infrastructure machine object (here, Metal3Machine) once provisioning
is complete. CAPI then copies that value to Machine.spec.providerID and uses it
to correlate the Machine with the Kubernetes Node that the workload kubelet
registers. Without a matching providerID on both the Machine and the Node,
CAPI never sets Machine.status.nodeRef and the cluster never transitions to
Running.
CAPM3 ProviderID Formats
Legacy format — built from the BareMetalHost UID:
metal3://<BMH-UID>
Example: metal3://d668eb95-5df6-4c10-a01a-fc69f4299fc6
Deprecation notice: The legacy ProviderID format will be deprecated in CAPM3 v1.13 and removed in CAPM3 v1.14. New clusters should always use the new format below. Existing clusters using the legacy format must migrate before upgrading to v1.14.
New format — built from Kubernetes object names:
metal3://<namespace>/<bmh-name>/<m3m-name>
Example: metal3://metal3/node-0/test-m3m
This is the only format supported from CAPM3 v1.14 onwards.
The new format is used for all freshly provisioned nodes. The legacy format is still accepted in v1.13 so that clusters provisioned with older CAPM3 versions continue to work after an upgrade — but this compatibility window closes in v1.14.
The metal3.io/uuid Node Label
What it is
metal3.io/uuid is a Kubernetes node label whose value is the BareMetalHost
metadata.uid — the Kubernetes-assigned UID of the BareMetalHost object,
not an Ironic-internal UUID. CAPM3 uses it as the primary mechanism to find the
workload-cluster Node that corresponds to a given BareMetalHost.
Who sets it
CAPM3 does not set this label. It only reads it.
The label must be applied by the kubelet at node-registration time, which
means it must be declared in the kubeadm node registration configuration
before the node boots. Ironic passes the BMH UID to cloud-init under the key
ds.meta_data.uuid. The KubeadmControlPlane or KubeadmConfig must forward
that value to kubelet using kubeletExtraArgs.
nodeRegistration:
  name: '{{ ds.meta_data.name }}'
  kubeletExtraArgs:
  - name: node-labels
    value: 'metal3.io/uuid={{ ds.meta_data.uuid }}'
This snippet must appear in both initConfiguration (the first control
plane node) and joinConfiguration (every subsequent node that joins the
cluster).
Reconciliation workflow
The ProviderID logic is triggered only after the BareMetalHost has reached
Provisioned state. Once that condition is met, the reconciler walks through
the following steps in order and returns as soon as one succeeds.
Step 1 — Check for an existing matching Node
The reconciler computes both the legacy and new ProviderID values for this
machine, then lists all nodes on the workload cluster and compares each node’s
spec.providerID against both values. If a matching node is found, the machine
is marked ready and the reconciler returns — nothing more needs to be done
except wait for CAPI to set Machine.status.nodeRef.
The two IDs are derived as follows:
- The BMH name comes from the
metal3.io/BareMetalHostannotation on theMetal3Machine, which takes the form<namespace>/<name>. - The BMH UID comes from a live lookup of the
BareMetalHostobject.
Step 2 — Cloud provider path
This step is taken when Metal3Cluster.spec.cloudProviderEnabled is true, or
Metal3Cluster.spec.noCloudProvider is explicitly false.
When a cloud provider is present, it is responsible for setting spec.providerID
on the workload-cluster node before CAPM3 runs. CAPM3 searches for a node whose
spec.providerID matches either the legacy format (metal3://<bmh-uuid>) or
the new format (metal3://<namespace>/<bmh-name>/<m3m-name>). When a matching
node is found, CAPM3 copies the node’s spec.providerID value verbatim to
Metal3Machine.spec.providerID and marks the machine ready.
This means the ProviderID on the Metal3Machine will be in whatever format the
cloud provider chose. CAPM3 itself does not set or override a different format in
this path.
Step 3 — Node label path (standard path without a cloud provider)
This is the path taken in the vast majority of Metal3 deployments.
- The BMH UID is read from the associated
BareMetalHostobject. - The workload-cluster node list is filtered by the label selector
metal3.io/uuid=<BMH-UID>. - If zero nodes are found and a bootstrap
ConfigRefis defined, the reconciler requeues — the node has either not yet joined or cloud-init has not finished setting the label. - If more than one node is found with the same label, a hard error is returned — this is a misconfiguration.
- If exactly one node is found:
- If the node has no
spec.providerIDyet: setsMetal3Machine.spec.providerIDto the new format, marks the machine ready, then patchesnode.spec.providerIDon the workload cluster. - If the node already has a ProviderID matching the new format: copies it to
Metal3Machine.spec.providerIDand marks the machine ready (covers the CAPI pivot / move scenario). - If the node already has a ProviderID matching the legacy format: copies it
to
Metal3Machine.spec.providerIDand marks the machine ready. - Any other ProviderID format on the node is an error.
- If the node has no
Only node.spec.providerID is patched on the workload-cluster node. No node
labels are modified.
Step 4 — Fallback: set ProviderID by hostname
This path is taken when Step 3 found no node with the metal3.io/uuid label —
for example, when the label was not configured in the kubeadm bootstrap, or when
the node was provisioned without a bootstrap ConfigRef. It is a best-effort
fallback.
If Metal3Machine.spec.providerID is not yet set, it is first assigned the
new-format value metal3://<namespace>/<bmh-name>/<m3m-name>.
The reconciler then attempts to find the correct workload-cluster node by hostname:
- Hostname is read from
Metal3Machine.status.addresses. - All nodes on the workload cluster are listed.
- Each node’s
kubernetes.io/hostnamelabel (set automatically by kubelet) is compared against the Metal3Machine’s hostname list. - If no match or multiple matches are found, the reconciler requeues.
- If exactly one node matches, its
spec.providerIDis patched with the value assigned toMetal3Machine.spec.providerIDabove.
Summary of Responsibilities
You must configure (before the node boots):
# In KubeadmControlPlane.spec.kubeadmConfigSpec and/or KubeadmConfig.spec
initConfiguration:
  nodeRegistration:
    name: '{{ ds.meta_data.name }}'
    kubeletExtraArgs:
    - name: node-labels
      value: 'metal3.io/uuid={{ ds.meta_data.uuid }}'
joinConfiguration:
  nodeRegistration:
    name: '{{ ds.meta_data.name }}'
    kubeletExtraArgs:
    - name: node-labels
      value: 'metal3.io/uuid={{ ds.meta_data.uuid }}'
CAPM3 sets automatically (no user action needed):
Metal3Machine.spec.providerID— set by the reconciler in Steps 2, 3, or 4.Metal3Machine.status.ready = true— set in the same step that sets the ProviderID.node.spec.providerIDon the workload-cluster Node — patched in Steps 3 and 4.
IPAM (IP Address Manager)
The IPAM project provides a controller to manage static IP address allocations in Cluster API Provider Metal3.
In CAPM3, the Network Data need to be passed to Ironic through the BareMetalHost. CAPI addresses the deployment of Kubernetes clusters and nodes, using the Kubernetes API. As such, it uses objects such as MachineDeployments (similar to deployments for pods) that takes care of creating the requested number of machines, based on templates. The replicas can be increased by the user, triggering the creation of new machines based on the provided templates. Considering the KubeadmControlPlane and MachineDeployment features in Cluster API, it is not possible to provide static IP addresses for each machine before the actual deployments.
In addition, all the resources from the source cluster must support the CAPI pivoting, i.e. being copied and recreated in the target cluster. This means that all objects must contain all needed information in their spec field to recreate the status in the target cluster without losing information. All objects must, through a tree of owner references, be attached to the cluster object, for the pivoting to proceed properly.
Moreover, there are use cases that the users want to specify multiple non-continuous ranges of IP addresses, use the same pool across multiple Template objects, or rule out some IP addresses that might be in use for any reason after the deployment.
The IPAM is introduced to manage the allocations of IP subnet according to the requests without handling any use of those addresses. The IPAM adds the flexibility by providing the address right before provisioning the node. It can share a pool across MachineDeployment or KubeadmControlPlane, allow non-continuous pools and external IP management by using IPAddress CRs, offer predictable IP addresses, and it is resilient to the clusterctl move operation.
In order to use IPAM, both the CAPI and IPAM controllers are required, since the IPAM controller has a dependency on Cluster API Cluster objects.
IPAM components
- IPPool: A set of IP addresses pools to be used for IP address allocations
- IPClaim: Request for an IP address allocation
- IPAddress: IP address allocation
IPPool
Example of IPPool:
apiVersion: ipam.metal3.io/v1alpha1
kind: IPPool
metadata:
  name: pool1
  namespace: default
spec:
  clusterName: cluster1
  namePrefix: test1-prov
  pools:
  - start: 192.168.0.10
    end: 192.168.0.30
    prefix: 25
    gateway: 192.168.0.1
  - subnet: 192.168.1.1/26
  - subnet: 192.168.1.128/25
    prefix: 24
    gateway: 192.168.1.1
  preAllocations:
    claim1: 192.168.0.12
The spec field contains the following fields:
- clusterName: Name of the cluster to which this pool belongs, it is used to verify whether the resource is paused.
- namePrefix: The prefix used to generate the IPAddress.
- pools: List of IP address pools
- prefix: Default prefix for this IPPool
- gateway: Default gateway for this IPPool
- preAllocations: Default preallocated IP address for this IPPool
The prefix and gateway can be overridden per pool. Here is the pool definition:
- start: IP range start address and it can be omitted if subnet is set.
- end: IP range end address and can be omitted.
- subnet: Subnet for the allocation and can be omitted if start is set. It is used to verify that the allocated address belongs to this subnet.
- prefix: Override of the default prefix for this pool
- gateway: Override of the default gateway for this pool
IPClaim
An IPClaim is an object representing a request for an IP address allocation.
Example of IPClaim:
apiVersion: ipam.metal3.io/v1alpha1
kind: IPClaim
metadata:
  name: test1-controlplane-template-0-pool1
  namespace: default
  annotations:
    ipAddress: <optional-annotation-for-specific-ip-request>
spec:
  pool:
    name: pool1
    namespace: default
The spec field contains the following:
- pool: This is a reference to the IPPool that is requested for
The annotations field contains the following optional parameter:
- ipAddress: This can be populated to acquire a specific IP from a given pool
- Note: In case of incorrect IP or conflict, error will be stamped on the IPClaim.
IPAddress
An IPAddress is an object representing an IP address allocation. It will be created by IPAM to fill an IPClaim, so that user does not have to create it manually.
Example IPAddress:
apiVersion: ipam.metal3.io/v1alpha1
kind: IPAddress
metadata:
  name: test1-prov-192-168-0-13
  namespace: default
spec:
  pool:
    name: pool1
    namespace: default
  claim:
    name: test1-controlplane-template-0-pool1
    namespace: default
  address: 192.168.0.13
  prefix: 24
  gateway: 192.168.0.1
The spec field contains the following:
- pool: Reference to the IPPool this address is for
- claim: Reference to the IPClaim this address is for
- address: Allocated IP address
- prefix: Prefix for this address
- gateway: Gateway for this address
Installing IPAM as Deployment
This section will show how IPAM can be installed as a deployment in a cluster.
Deploying controllers
CAPI and IPAM controllers need to be deployed at the beginning. The IPAM controller has a dependency on Cluster API Cluster objects. CAPI CRDs and controllers must be deployed and the cluster objects should exist for successful deployments.
Deployment
The user can create the IPPool object independently. It will wait for its cluster to exist before reconciling. If the user wants to create IPAddress objects manually, they should be created before any claims. It is highly recommended to use the preAllocations field itself or have the reconciliation paused.
After an IPClaim object creation, the controller will list all existing IPAddress objects. It will then select randomly an address that has not been allocated yet and is not in the preAllocations map. It will then create an IPAddress object containing the references to the IPPool and IPClaim and the address, the prefix from the address pool or the default prefix, and the gateway from the address pool or the default gateway.
Deploy IPAM
Deploys IPAM CRDs and IPAM controllers. We can run Makefile target from inside the cloned IPAM git repo.
make deploy
Run locally
Runs IPAM controller locally
    kubectl scale -n capm3-system deployment.v1.apps/metal3-ipam-controller-manager \
      --replicas 0
    make run
Deploy an example pool
make deploy-examples
Delete the example pool
make delete-examples
Deletion
When deleting an IPClaim object, the controller will simply delete the associated IPAddress object. Once all IPAddress objects have been deleted, the IPPool object can be deleted. Before that point, the finalizer in the IPPool object will block the deletion.
References
- IPAM.
- IPAM deployment workflow.
- Custom resource (CR) examples in metal3-dev-env, in the templates.
Troubleshooting
Verify that Ironic and Baremetal Operator are healthy
There is no point continuing before you have verified that the controllers are
healthy. A “standard” deployment will have Ironic and Baremetal Operator running
in the baremetal-operator-system namespace. Check that the containers are
running, not restarting or crashing:
kubectl -n baremetal-operator-system get pods
Note: If you deploy Ironic outside of Kubernetes you will need to check on it in a different way.
Healthy example output:
NAME                                                     READY   STATUS    RESTARTS       AGE
baremetal-operator-controller-manager-85b896f688-j27g5   1/1     Running   0              5m13s
ironic-6bcdcb99f8-6ldlz                                  3/3     Running   1 (2m2s ago)   5m15s
(There has been one restart, but it is not constantly restarting.)
Unhealthy example output:
NAME                                                     READY   STATUS    RESTARTS      AGE
baremetal-operator-controller-manager-85b896f688-j27g5   1/1     Running   0             3m35s
ironic-6bcdcb99f8-6ldlz                                  1/3     Running   1 (24s ago)   3m37s
Waiting for IP
Make sure to check the logs also since Ironic may be stuck on “waiting for IP”. For example:
kubectl -n baremetal-operator-system logs ironic-6bcdcb99f8-6ldlz -c ironic
If Ironic is waiting for IP, you need to check the network configuration. Some things to look out for:
- What IP or interface is Ironic configured to use?
- Is Ironic using the host network?
- Is Ironic running on the expected (set of) Node(s)?
- Does the Node have the expected IP assigned?
- Are you using keepalived or similar to manage the IP, and is it working properly?
Host is stuck in cleaning, how do I delete it?
First and foremost, avoid using forced deletion, otherwise you’ll have a conflict. If you don’t care about disks being cleaned, you can edit the BareMetalHost resource and disable cleaning:
spec:
  automatedCleaningMode: disabled
Alternatively, you can wait for 3 cleaning retries to finish. After that, the host will be deleted. If you do care about cleaning, you need to figure out why it does not finish.
MAC address conflict on registration
If you force deletion of a host after registration, Baremetal Operator will not be able to delete the corresponding record from Ironic. If you try to enroll the same host again, you will see the following error:
Normal RegistrationError 4m36s metal3-baremetal-controller MAC address 11:22:33:44:55:66 conflicts with existing node namespace~name
Currently, the only way to get rid of this error is to re-create the Ironic’s internal database. If your deployment uses SQLite (the default), it is enough to restart the pod with Ironic. If you use MariaDB, you need to restart its pod, clearing any persistent volumes.
Power requests are issued for deleted hosts
Similarly to the previous question, a host is not deleted from Ironic in case of a forced deletion of its BareMetalHost object. If valid BMC credentials were provided, Ironic will keep checking the power state of the host and enforcing the last requested power state. The only solution is again to delete the Ironic’s internal database.
BMH registration errors
BMC credentials may be incorrect or missing. These issues appear in the BareMetalHost’s status and in Events.
Check both kubectl describe bmh <name> and recent Events for details.
Example output:
Normal  RegistrationError  23s   metal3-baremetal-controller  Failed to get
power state for node 67ac51af-a6b3. Error: Redfish exception occurred.
Error: HTTP GET https://192.168.111.1:8000/redfish/v1/Systems/... returned code 401.
BMH inspection errors
The host is not able to communicate back results to Ironic
If the host cannot communicate with Ironic, it will result in a timeout. Accessing serial logs is necessary to determine the exact issue.
Example output from kubectl get bmh -A:
NAMESPACE   NAME     STATE        CONSUMER   ONLINE   ERROR              AGE
metal3      node-1   inspecting             true     inspection error   46m
BareMetalHost’s events from kubectl describe bmh <name> -n <namespace>:
Events:
  Type    Reason              Age    From                         Message
  ----    ------              ----   ----                         -------
  Normal  InspectionStarted   37m    metal3-baremetal-controller  Hardware inspection started
  Normal  InspectionError     7m12s  metal3-baremetal-controller  timeout reached while inspecting the node
Error setting boot mode
Example kubectl get bmh -A:
NAMESPACE   NAME     STATE        CONSUMER   ONLINE   ERROR              AGE
metal3      node-1   inspecting              true     inspection error   8m17s
BareMetalHost’s events:
Normal  InspectionError     5s     metal3-baremetal-controller  Failed to inspect hardware. Reason: unable to start inspection:
Redfish exception occurred. Error: Setting boot mode to bios failed for node ceec28f5-cedb.rror: HTTP PATCH
https://192.168.111.1:8000/redfish/v1/Systems/... returned code 500.
There are two possible causes:
- Hardware does not support the requested boot mode. Really old machines may not support UEFI, while really new machines gradually start phasing out legacy boot.
- Hardware does not support switching between boot modes using Redfish API. This is the case for some iLO 5 machines.
You have options:
- Log into the BMC’s UI and change the boot mode to the preferred value.
- Update your BareMetalHost definition with the
bootModevalue that matches what your hardware supports.
Provisioning errors
Errors during provisioning will be visible when listing the BareMetalHosts:
NAMESPACE   NAME     STATE          CONSUMER      ONLINE   ERROR                AGE
metal3      node-1   provisioning   test1-dt8j2   true     provisioning error   149m
Check BareMetalHost’s events for the specific reason.
Wrong image checksum example:
Normal  ProvisioningError   10m    metal3-baremetal-controller  Image provisioning failed: Deploy
step deploy.write_image failed on node df880558-09da. Image failed to verify against checksum.
location: CENTOS_9_NODE_IMAGE.img; image ID: /dev/sda; image checksum: abcd1234; verification checksum: ...
No root device found example:
Normal  ProvisioningStarted  15s    metal3-baremetal-controller  Image provisioning started for http://172.22.0.1/images/CENTOS_9_NODE_IMAGE.img
Normal  ProvisioningError    1s     metal3-baremetal-controller  Image provisioning failed: Deploy step deploy.write_image failed on node d25ce8de-914e-4146-a0c0-58825274572d. No suitable device was found for deployment using these hints {'name': 's== /dev/vdb'}
No BareMetalHost available or matching
This appears in the Metal3Machine status:
Status:
  Conditions:
    Last Transition Time:  2025-08-15T10:53:05Z
    Message:               No available host found. Requeuing.. Object will be requeued after 30s
    Reason:                AssociateBMHFailed
    Severity:              Error
    Status:                False
    Type:                  AssociateBMH
CAPM3 controller logs when there is no available hosts:
I0815 11:10:35.699004 1 metal3machine_manager.go:332] "No available host found. Requeuing." logger="controllers.Metal3Machine.Metal3Machine-controller" metal3-machine="metal3/test-no-match-2" machine="test-no-match-2" cluster="test1" metal3-cluster="test1"
CAPM3 controller logs when the annotated host is not found:
I0815 06:08:54.687380 1 metal3machine_manager.go:788] "Annotated host not found" logger="controllers.Metal3Machine.Metal3Machine-controller" metal3-machine="metal3/test1-zxzn7-qvl6n" machine="test1-zxzn7-qvl6n" cluster="test1" metal3-cluster="test1" host="metal3/node-0"
Provider ID is missing
This occurs if cloudProviderEnabled is set to true on Metal3Cluster when no
external cloud provider is used. The Metal3Machine will remain stuck in the
Provisioning phase.
Example output from kubectl get metal3machine -A:
NAMESPACE   NAME                AGE    PROVIDERID                           READY   CLUSTER   PHASE
metal3      test1-82ljr         160m   metal3://metal3/node-0/test1-82ljr   true    test1
metal3      test1-bv9mv-2f8th   35m                                                 test1
Metal3Machine’s status:
Status:
  Conditions:
    Reason:   NotReady
    Status:   False
    Type:     Available
    Message:  * NodeHealthy: Waiting for Metal3Machine to report spec.providerID
nodeRef missing
A CAPI-level issue. This can be caused by a failure to boot the image or join it to the cluster. Access to the node or serial logs is needed to determine the exact cause. In particular, cloud-init logs can help pinpoint the issue.
CAPM3 controller logs:
I0815 11:10:36.545990 1 metal3labelsync_controller.go:150] "Could not find Node Ref on Machine object, will retry" logger="controllers.Metal3LabelSync.metal3-label-sync-controller" metal3-label-sync="metal3/node-0"
Trying Metal3 on a development environment
Ready to start taking steps towards your first experience with metal3? Follow these commands to get started!
1. Environment Setup
info: “Naming” For the v1alpha3 release, the Cluster API provider for Metal3 was renamed from Cluster API provider BareMetal (CAPBM) to Cluster API provider Metal3 (CAPM3). Hence, from v1alpha3 onwards it is Cluster API provider Metal3.
1.1. Prerequisites
- System with CentOS 9 Stream or Ubuntu 22.04
- A hosting operating system with QEMU/KVM is required, as this development environment uses VMs to emulate bare metal hosts
- Run as a user with passwordless sudo access
- Minimum resource requirements for the host machine: 4C CPUs, 16 GB RAM memory
Note: The
metal3-dev-envscripts modify parts of the host system, including networking and installed packages. It is strongly recommended to run them in a virtual machine or a dedicated environment to avoid unintended changes to your primary system.
For execution with VMs
- Setup passwordless sudo access
sudo visudo
- Include this line at the end of the sudoers file (replace ‘username’ with the actual account name for passwordless sudo access)
username ALL=(ALL) NOPASSWD: ALL
- Save and exit
- Manually enable nested virtualization if you don’t have it enabled in your system
  # To enable nested virtualization
  # On CentOS Stream 9 (other distros may vary)
  # check the current setting
  $ sudo cat /sys/module/kvm_intel/parameters/nested
  N     # disabled

  $ sudo vi /etc/modprobe.d/kvm.conf
  # uncomment either of the line
  # for Intel CPU, select [kvm_intel], for AMD CPU, select [kvm_amd]

  options kvm_intel nested=1
  #options kvm_amd nested=1

  # unload
  $ sudo modprobe -r kvm_intel

  # reload
  $ sudo modprobe kvm_intel

  $ sudo cat /sys/module/kvm_intel/parameters/nested
  Y     # just enabled
1.2. Setup
info: “Information” If you need detailed information regarding the process of creating a Metal3 emulated environment using metal3-dev-env, it is worth taking a look at the blog post “A detailed walkthrough of the Metal3 development environment”.
This is a high-level architecture of the Metal3-dev-env. Note that for an Ubuntu-based setup, either Kind or Minikube can be used to instantiate an ephemeral cluster, while for a CentOS-based setup, only Minikube is currently supported. The ephemeral cluster creation tool can be manipulated with the EPHEMERAL_CLUSTER environment variable.
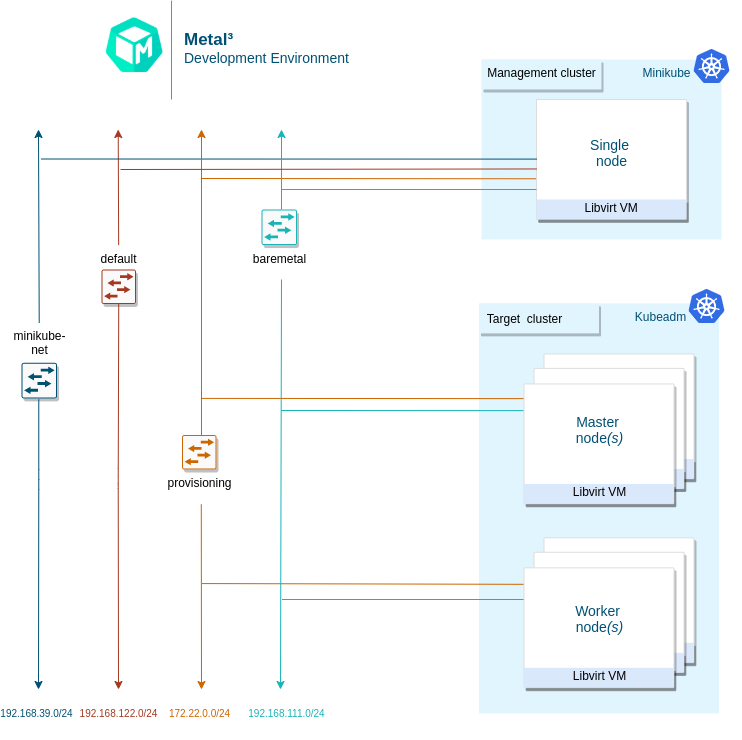
The short version is: clone metal³-dev-env and run
make
The Makefile runs a series of scripts, described here:
-
01_prepare_host.sh- Installs all needed packages. -
02_configure_host.sh- Creates a set of VMs that will be managed as if they were bare metal hosts. It also downloads some images needed for Ironic. -
03_launch_mgmt_cluster.sh- Launches a management cluster usingminikubeorkindand runs thebaremetal-operatoron that cluster. -
04_verify.sh- Runs a set of tests that verify that the deployment was completed successfully.
When the environment setup is completed, you should be able to see the
BareMetalHost (bmh) objects in the Ready state.
1.3. Tear Down
To tear down the environment, run
make clean
info: “Note” When redeploying metal³-dev-env with a different release version of CAPM3, you must set the
FORCE_REPO_UPDATEvariable inconfig_${user}.shto true. warning “Warning” If you see this error during the installation:error: failed to connect to the hypervisor \ error: Failed to connect socket to '/var/run/libvirt/libvirt-sock': \ Permission deniedYou may need to log out then log in again, and run
make cleanandmakeagain.
1.4. Using Custom Image
Whether you want to run target cluster Nodes with your own image, you can
override the three following variables: IMAGE_NAME, IMAGE_LOCATION,
IMAGE_USERNAME. If the requested image with the name IMAGE_NAME does not
exist in the IRONIC_IMAGE_DIR (/opt/metal3-dev-env/ironic/html/images) folder,
then it will be automatically downloaded from the IMAGE_LOCATION value
configured.
1.5. Setting environment variables
info: “Environment variables” More information about the specific environment variables used to set up metal3-dev-env can be found in the metal3-dev-env documentation.
To set environment variables persistently, export them from the configuration file used by metal3-dev-env scripts:
 cp config_example.sh config_$(whoami).sh
 vim config_$(whoami).sh
2. Working with the Development Environment
2.1. BareMetalHosts
This environment creates a set of VMs to manage as if they were bare metal hosts.
There are two different host OSs that the metal3-dev-env setup process is tested on.
- Host VM/Server on CentOS, while the target can be Ubuntu or CentOS, Cirros, or FCOS.
- Host VM/Server on Ubuntu, while the target can be Ubuntu or CentOS, Cirros, or FCOS.
The way the k8s cluster is running in the above two scenarios is different. For
CentOS minikube cluster is used as the source cluster, for Ubuntu, a kind
cluster is being created. As such, when the host (where the make command was
issued) OS is CentOS, there should be three libvirt VMs and one of them should
be a minikube VM.
In case the host OS is Ubuntu, the k8s source cluster is created by using
kind, so in this case the minikube VM won’t be present.
To configure what tool should be used for creating source k8s cluster the
EPHEMERAL_CLUSTER environment variable is responsible. The EPHEMERAL_CLUSTER
is configured to build minikube cluster by default on a CentOS host and
kind cluster on a Ubuntu host.
VMs can be listed using virsh cli tool.
In case the EPHEMERAL_CLUSTER environment variable is set to kind the list of
running virtual machines will look like this:
$ sudo virsh list
 Id    Name       State
--------------------------
 1     node_0     running
 2     node_1     running
In case the EPHEMERAL_CLUSTER environment variable is set to minikube the
list of running virtual machines will look like this:
$ sudo virsh list
 Id   Name       State
--------------------------
 1    minikube   running
 2    node_0     running
 3    node_1     running
Each of the VMs (aside from the minikube management cluster VM) is
represented by BareMetalHost objects in our management cluster. The yaml
definition file used to create these host objects is in ${WORKING_DIR}/bmhosts_crs.yaml.
$ kubectl get baremetalhosts -n metal3 -o wide
NAME STATUS STATE CONSUMER BMC HARDWARE_PROFILE ONLINE ERROR AGE
node-0 OK available ipmi://192.168.111.1:6230 unknown true 58m
node-1 OK available redfish+http://192.168.111.1:8000/redfish/v1/Systems/492fcbab-4a79-40d7-8fea-a7835a05ef4a unknown true 58m
You can also look at the details of a host, including the hardware information gathered by doing pre-deployment introspection.
$ kubectl get baremetalhost -n metal3 -o yaml node-0
apiVersion: metal3.io/v1alpha1
kind: BareMetalHost
metadata:
annotations:
kubectl.kubernetes.io/last-applied-configuration: |
{"apiVersion":"metal3.io/v1alpha1","kind":"BareMetalHost","metadata":{"annotations":{},"name":"node-0","namespace":"metal3"},"spec":{"bmc":{"address":"ipmi://192.168.111.1:6230","credentialsName":"node-0-bmc-secret"},"bootMACAddress":"00:ee:d0:b8:47:7d","bootMode":"legacy","online":true}}
creationTimestamp: "2021-07-12T11:04:10Z"
finalizers:
- baremetalhost.metal3.io
generation: 1
name: node-0
namespace: metal3
resourceVersion: "3243"
uid: 3bd8b945-a3e8-43b9-b899-2f869680d28c
spec:
automatedCleaningMode: metadata
bmc:
address: ipmi://192.168.111.1:6230
credentialsName: node-0-bmc-secret
bootMACAddress: 00:ee:d0:b8:47:7d
bootMode: legacy
online: true
status:
errorCount: 0
errorMessage: ""
goodCredentials:
credentials:
name: node-0-bmc-secret
namespace: metal3
credentialsVersion: "1789"
hardware:
cpu:
arch: x86_64
clockMegahertz: 2694
count: 2
flags:
- aes
- apic
# There are many more flags but they are not listed in this example.
model: Intel Xeon E3-12xx v2 (Ivy Bridge)
firmware:
bios:
date: 04/01/2014
vendor: SeaBIOS
version: 1.13.0-1ubuntu1.1
hostname: node-0
nics:
- ip: 172.22.0.20
mac: 00:ee:d0:b8:47:7d
model: 0x1af4 0x0001
name: enp1s0
pxe: true
- ip: fe80::1863:f385:feab:381c%enp1s0
mac: 00:ee:d0:b8:47:7d
model: 0x1af4 0x0001
name: enp1s0
pxe: true
- ip: 192.168.111.20
mac: 00:ee:d0:b8:47:7f
model: 0x1af4 0x0001
name: enp2s0
- ip: fe80::521c:6a5b:f79:9a75%enp2s0
mac: 00:ee:d0:b8:47:7f
model: 0x1af4 0x0001
name: enp2s0
ramMebibytes: 4096
storage:
- hctl: "0:0:0:0"
model: QEMU HARDDISK
name: /dev/sda
rotational: true
serialNumber: drive-scsi0-0-0-0
sizeBytes: 53687091200
type: HDD
vendor: QEMU
systemVendor:
manufacturer: QEMU
productName: Standard PC (Q35 + ICH9, 2009)
hardwareProfile: unknown
lastUpdated: "2021-07-12T11:08:53Z"
operationHistory:
deprovision:
end: null
start: null
inspect:
end: "2021-07-12T11:08:23Z"
start: "2021-07-12T11:04:55Z"
provision:
end: null
start: null
register:
end: "2021-07-12T11:04:55Z"
start: "2021-07-12T11:04:44Z"
operationalStatus: OK
poweredOn: true
provisioning:
ID: 8effe29b-62fe-4fb6-9327-a3663550e99d
bootMode: legacy
image:
url: ""
rootDeviceHints:
deviceName: /dev/sda
state: ready
triedCredentials:
credentials:
name: node-0-bmc-secret
namespace: metal3
credentialsVersion: "1789"
2.2. Provision Cluster and Machines
This section describes how to trigger the provisioning of a cluster and hosts via
Machine objects as part of the Cluster API integration. This uses Cluster API
v1beta1 and
assumes that metal3-dev-env is deployed with the environment variable
CAPM3_VERSION set to v1beta1. This is the default behavior. The v1beta1
deployment can be done with Ubuntu 22.04 or Centos 9 Stream target host images.
Please make sure to meet resource requirements for
successful deployment:
See support version for more on CAPI compatibility
The following scripts can be used to provision a cluster, controlplane node and worker node.
./tests/scripts/provision/cluster.sh
./tests/scripts/provision/controlplane.sh
./tests/scripts/provision/worker.sh
At this point, the Machine actuator will respond and try to claim a
BareMetalHost for this Metal3Machine. You can check the logs of the
actuator.
First, check the names of the pods running in the baremetal-operator-system
namespace and the output should be something similar to this:
$ kubectl -n baremetal-operator-system get pods
NAME READY STATUS RESTARTS AGE
baremetal-operator-controller-manager-5fd4fb6c8-c9prs 2/2 Running 0 71m
In order to get the logs of the actuator the logs of the baremetal-operator-controller-manager instance have to be queried with the following command:
$ kubectl logs -n baremetal-operator-system pod/baremetal-operator-controller-manager-5fd4fb6c8-c9prs -c manager
...
{"level":"info","ts":1642594214.3598707,"logger":"controllers.BareMetalHost","msg":"done","baremetalhost":"metal3/node-1", "provisioningState":"provisioning","requeue":true,"after":10}
...
Keep in mind that the suffix hashes e.g. 5fd4fb6c8-c9prs are automatically
generated and change in case of a different deployment.
If you look at the yaml representation of the Metal3Machine object, you will
see a new annotation that identifies which BareMetalHost was chosen to
satisfy this Metal3Machine request.
First list the Metal3Machine objects present in the metal3 namespace:
$ kubectl get metal3machines -n metal3
NAME PROVIDERID READY CLUSTER PHASE
test1-controlplane-jjd9l metal3://d4848820-55fd-410a-b902-5b2122dd206c true test1
test1-workers-bx4wp metal3://ee337588-be96-4d5b-95b9-b7375969debd true test1
Based on the name of the Metal3Machine objects you can check the yaml
representation of the object and see from its annotation which BareMetalHost
was chosen.
$ kubectl get metal3machine test1-workers-bx4wp -n metal3 -o yaml
...
annotations:
metal3.io/BareMetalHost: metal3/node-1
...
You can also see in the list of BareMetalHosts that one of the hosts is now
provisioned and associated with a Metal3Machines by looking at the CONSUMER
output column of the following command:
$ kubectl get baremetalhosts -n metal3
NAME STATE CONSUMER ONLINE ERROR AGE
node-0 provisioned test1-controlplane-jjd9l true 122m
node-1 provisioned test1-workers-bx4wp true 122m
It is also possible to check which Metal3Machine serves as the infrastructure
for the ClusterAPI Machine objects.
First list the Machine objects:
$ kubectl get machine -n metal3
NAME CLUSTER NODENAME PROVIDERID PHASE AGE VERSION
test1-6d8cc5965f-wvzms test1 test1-6d8cc5965f-wvzms metal3://7f51f14b-7701-436a-85ba-7dbc7315b3cb Running 53m v1.22.3
test1-nphjx test1 test1-nphjx metal3://14fbcd25-4d09-4aca-9628-a789ba3e175c Running 55m v1.22.3
As a next step you can check what serves as the infrastructure backend for e.g.
test1-6d8cc5965f-wvzms Machine object:
$ kubectl get machine test1-6d8cc5965f-wvzms -n metal3 -o yaml
...
infrastructureRef:
apiVersion: infrastructure.cluster.x-k8s.io/v1beta1
kind: Metal3Machine
name: test1-workers-bx4wp
namespace: metal3
uid: 39362b32-ebb7-4117-9919-67510ceb177f
...
Based on the result of the query test1-6d8cc5965f-wvzms ClusterAPI Machine
object is backed by test1-workers-bx4wp Metal3Machine object.
You should be able to ssh into your host once provisioning is completed.
The default username for both CentOS & Ubuntu images is metal3.
For the IP address, you can either use the API endpoint IP of the target cluster
which is - 192.168.111.249 by default or use the predictable IP address of
the first master node - 192.168.111.100.
ssh metal3@192.168.111.249
2.3. Deprovision Cluster and Machines
Deprovisioning of the target cluster is done just by deleting Cluster and
Machine objects or by executing the de-provisioning scripts in reverse order
than provisioning:
./tests/scripts/deprovision/worker.sh
./tests/scripts/deprovision/controlplane.sh
./tests/scripts/deprovision/cluster.sh
Note that you can easily de-provision worker Nodes by decreasing the number of
replicas in the MachineDeployment object created when executing the
provision/worker.sh script:
kubectl scale machinedeployment test1 -n metal3 --replicas=0
warning “Warning” control-plane and cluster are very tied together. This means that you are not able to de-provision the control-plane of a cluster and then provision a new one within the same cluster. Therefore, in case you want to de-provision the control-plane you need to de-provision the cluster as well and provision both again.
Below, it is shown how the de-provisioning can be executed in a more manual way by just deleting the proper Custom Resources (CR).
The order of deletion is:
- Machine objects of the workers
- Metal3Machine objects of the workers
- Machine objects of the control plane
- Metal3Machine objects of the control plane
- The cluster object
An additional detail is that the Machine object test1-workers-bx4wp is
controlled by the test1 MachineDeployment the object thus in order to avoid
reprovisioning of the Machine object the MachineDeployment has to be
deleted instead of the Machine object in the case of test1-workers-bx4wp.
$ # By deleting the Machine or MachineDeployment object the related Metal3Machine object(s) should be deleted automatically.
$ kubectl delete machinedeployment test1 -n metal3
machinedeployment.cluster.x-k8s.io "test1" deleted
$ # The "machinedeployment.cluster.x-k8s.io "test1" deleted" output will be visible almost instantly but that doesn't mean that the related Machine
$ # object(s) has been deleted right away, after the deletion command is issued the Machine object(s) will enter a "Deleting" state and they could stay in that state for minutes
$ # before they are fully deleted.
$ kubectl delete machine test1-m77bn -n metal3
machine.cluster.x-k8s.io "test1-m77bn" deleted
$ # When a Machine object is deleted directly and not by deleting a
$ # MachineDeployment the "machine.cluster.x-k8s.io "test1-m77bn" deleted" will
$ # be only visible when the Machine and the related Metal3Machine object has
$ # been fully removed from the cluster. The deletion process could take a few
$ # minutes thus the command line will be unresponsive (blocked) for the time
$ # being.
$ kubectl delete cluster test1 -n metal3
cluster.cluster.x-k8s.io "test1" deleted
Once the deletion has finished, you can see that the BareMetalHosts are
offline and Cluster object is not present anymore
$ kubectl get baremetalhosts -n metal3
NAME STATE CONSUMER ONLINE ERROR AGE
node-0 available false 160m
node-1 available false 160m
$ kubectl get cluster -n metal3
No resources found in metal3 namespace.
2.4. Running Custom Baremetal-Operator
The baremetal-operator comes up running in the cluster by default, using an
image built from the
metal3-io/baremetal-operator
repository. If you’d like to test changes to the baremetal-operator, you can
follow this process.
First, you must scale down the deployment of the baremetal-operator running
in the cluster.
kubectl scale deployment baremetal-operator-controller-manager -n baremetal-operator-system --replicas=0
To be able to run baremetal-operator locally, you need to install
operator-sdk. After that, you can run
the baremetal-operator including any custom changes.
cd ~/go/src/github.com/metal3-io/baremetal-operator
make run
2.5. Running Custom Cluster API Provider Metal3
There are two Cluster API-related managers running in the cluster. One includes a set of generic controllers, and the other includes a custom Machine controller for Metal3.
Tilt development environment
Tilt setup can deploy CAPM3 in a local kind cluster. Since
Tilt is applied in the metal3-dev-env deployment, you can make changes inside
the cluster-api-provider-metal3 folder and Tilt will deploy the changes
automatically.
If you deployed CAPM3 separately and want to make changes to it, then
follow CAPM3 instructions. This will save you from
having to build all of the images for CAPI, which can take a while. If the
scope of your development will span both CAPM3 and CAPI, then follow the
CAPI and CAPM3 instructions.
2.6. Accessing Ironic API
Sometimes you may want to look directly at Ironic to debug something. The metal3-dev-env repository contains clouds.yaml file with connection settings for Ironic.
Metal3-dev-env will install the unified OpenStack and standalone OpenStack Ironic command-line clients on the provisioning host as part of setting up the cluster.
Note that currently, you can use either a unified OpenStack client or an Ironic client. In this example, we are using an Ironic client to interact with the Ironic API.
Please make sure to export
CONTAINER_RUNTIME environment variable before you execute
commands.
Example:
[notstack@metal3 metal3-dev-env]$ export CONTAINER_RUNTIME=docker
[notstack@metal3 metal3-dev-env]$ baremetal node list
+--------------------------------------+---------------+--------------------------------------+-------------+--------------------+-------------+
| UUID | Name | Instance UUID | Power State | Provisioning State | Maintenance |
+--------------------------------------+---------------+--------------------------------------+-------------+--------------------+-------------+
| b423ee9c-66d8-48dd-bd6f-656b93140504 | metal3~node-1 | 7f51f14b-7701-436a-85ba-7dbc7315b3cb | power off | available | False |
| 882533c5-2f14-49f6-aa44-517e1e404fd8 | metal3~node-0 | 14fbcd25-4d09-4aca-9628-a789ba3e175c | power off | available | False |
+--------------------------------------+---------------+--------------------------------------+-------------+--------------------+-------------+
To view a particular node’s details, run the below command. The
last_error, maintenance_reason, and provisioning_state fields are
useful for troubleshooting to find out why a node did not deploy.
[notstack@metal3 metal3-dev-env]$ baremetal node show b423ee9c-66d8-48dd-bd6f-656b93140504
+------------------------+------------------------------------------------------------+
| Field | Value |
+------------------------+------------------------------------------------------------+
| allocation_uuid | None |
| automated_clean | True |
| bios_interface | redfish |
| boot_interface | ipxe |
| chassis_uuid | None |
| clean_step | {} |
| conductor | 172.22.0.2 |
| conductor_group | |
| console_enabled | False |
| console_interface | no-console |
| created_at | 2022-01-19T10:56:06+00:00 |
| deploy_interface | direct |
| deploy_step | {} |
| description | None |
| driver | redfish |
| driver_info | {u'deploy_kernel': u'http://172.22.0.2:6180/images/ironic-python-agent.kernel', u'deploy_ramdisk': u'http://172.22.0.2:6180/images/ironic-python-agent.initramfs', u'redfish_address': u'http://192.168.111.1:8000', u'redfish_password': u'******', u'redfish_system_id': u'/redfish/v1/Systems/492fcbab-4a79-40d7-8fea-a7835a05ef4a', u'redfish_username': u'admin', u'force_persistent_boot_device': u'Default'} |
| driver_internal_info | {u'last_power_state_change': u'2022-01-19T13:04:01.981882', u'agent_version': u'8.3.1.dev2', u'agent_last_heartbeat': u'2022-01-19T13:03:51.874842', u'clean_steps': None, u'agent_erase_devices_iterations': 1, u'agent_erase_devices_zeroize': True, u'agent_continue_if_secure_erase_failed': False, u'agent_continue_if_ata_erase_failed': False, u'agent_enable_nvme_secure_erase': True, u'disk_erasure_concurrency': 1, u'agent_erase_skip_read_only': False, u'hardware_manager_version': {u'generic_hardware_manager': u'1.1'}, u'agent_cached_clean_steps_refreshed': u'2022-01-19 13:03:47.558697', u'deploy_steps': None, u'agent_cached_deploy_steps_refreshed': u'2022-01-19 12:09:34.731244'} |
| extra | {} |
| fault | None |
| inspect_interface | agent |
| inspection_finished_at | None |
| inspection_started_at | 2022-01-19T10:56:17+00:00 |
| instance_info | {u'capabilities': {}, u'image_source': u'http://172.22.0.1/images/CENTOS_8_NODE_IMAGE_K8S_v1.22.3-raw.img', u'image_os_hash_algo': u'md5', u'image_os_hash_value': u'http://172.22.0.1/images/CENTOS_8_NODE_IMAGE_K8S_v1.22.3-raw.img.md5sum', u'image_checksum': u'http://172.22.0.1/images/CENTOS_8_NODE_IMAGE_K8S_v1.22.3-raw.img.md5sum', u'image_disk_format': u'raw'} |
| instance_uuid | None |
| last_error | None |
| lessee | None |
| maintenance | False |
| maintenance_reason | None |
| management_interface | redfish |
| name | metal3~node-1 |
| network_data | {} |
| network_interface | noop |
| owner | None |
| power_interface | redfish |
| power_state | power off |
| properties | {u'capabilities': u'cpu_vt:true,cpu_aes:true,cpu_hugepages:true,boot_mode:bios', u'vendor': u'Sushy Emulator', u'local_gb': u'50', u'cpus': u'2', u'cpu_arch': u'x86_64', u'memory_mb': u'4096', u'root_device': {u'name': u's== /dev/sda'}} |
| protected | False |
| protected_reason | None |
| provision_state | available |
| provision_updated_at | 2022-01-19T13:03:52+00:00 |
| raid_config | {} |
| raid_interface | no-raid |
| rescue_interface | no-rescue |
| reservation | None |
| resource_class | None |
| retired | False |
| retired_reason | None |
| storage_interface | noop |
| target_power_state | None |
| target_provision_state | None |
| target_raid_config | {} |
| traits | [] |
| updated_at | 2022-01-19T13:04:03+00:00 |
| uuid | b423ee9c-66d8-48dd-bd6f-656b93140504 |
| vendor_interface | redfish |
+-------------------------------------------------------------------------------------+
API reference
Bare Metal Operator
- Baremetal Operator (CRDs): documentation
- golang API documentation: godoc
Cluster API provider Metal3
- Cluster API provider Metal3 (CRDs): documentation
- golang API documentation: godoc
Ip Address Manager
- Ip Address Manager (CRDs): documentation
- golang API documentation: godoc
Supported release versions
The Cluster API Provider Metal3 (CAPM3) team maintains the two most recent minor releases; older minor releases are immediately unsupported when a new major/minor release is available. Test coverage will be maintained for all supported minor releases and for one additional release for the current API version in case we have to do an emergency patch release. For example, if v1.6 and v1.7 are currently supported, we will also maintain test coverage for v1.5 for one additional release cycle. When v1.8 is released, tests for v1.5 will be removed.
Currently, in Metal³ organization only CAPM3 and IPAM follow CAPI release cycles. The supported versions (excluding release candidates) for CAPM3 and IPAM releases are as follows:
Cluster API Provider Metal3
| Minor release | API version | Status |
|---|---|---|
| v1.13 | v1beta2 | Supported |
| v1.12 | v1beta1 | Supported |
| v1.11 | v1beta1 | Tested |
| v1.10 | v1beta1 | EOL |
| v1.9 | v1beta1 | EOL |
| v1.8 | v1beta1 | EOL |
| v1.7 | v1beta1 | EOL |
| v1.6 | v1beta1 | EOL |
| v1.5 | v1beta1 | EOL |
| v1.4 | v1beta1 | EOL |
| v1.3 | v1beta1 | EOL |
| v1.2 | v1beta1 | EOL |
| v1.1 | v1beta1 | EOL |
IP Address Manager
| Minor release | API version | Status |
|---|---|---|
| v1.13 | v1beta2 | Supported |
| v1.12 | v1beta1 | Supported |
| v1.11 | v1beta1 | Tested |
| v1.10 | v1beta1 | EOL |
| v1.9 | v1beta1 | EOL |
| v1.8 | v1beta1 | EOL |
| v1.7 | v1beta1 | EOL |
| v1.6 | v1beta1 | EOL |
| v1.5 | v1beta1 | EOL |
| v1.4 | v1beta1 | EOL |
| v1.3 | v1beta1 | EOL |
| v1.2 | v1beta1 | EOL |
| v1.1 | v1beta1 | EOL |
The compatibility of IPAM and CAPM3 API versions with CAPI is discussed in the following docs.
Baremetal Operator
Since capm3-v1.1.2, BMO follows the semantic versioning scheme for its own
release cycle, the same way as CAPM3 and IPAM. Two branches are maintained as
supported releases. Following table summarizes BMO release/test process:
| Minor release | Status |
|---|---|
| v0.13 | Supported |
| v0.12 | Supported |
| v0.11 | Tested |
| v0.10 | EOL |
| v0.9 | EOL |
| v0.8 | EOL |
| v0.6 | EOL |
| v0.5 | EOL |
| v0.4 | EOL |
| v0.3 | EOL |
| v0.2 | EOL |
| v0.1 | EOL |
Ironic-image
Since v23.1.0, Ironic follows the semantic versioning scheme for its own
release cycle, the same way as CAPM3 and IPAM. Two or three branches are
maintained as supported releases.
Following table summarizes Ironic-image release/test process:
| Minor release | Status | Ironic Branch |
|---|---|---|
| v35.0 | Supported | stable/2026.1 |
| v34.0 | Supported | bugfix/34.0 |
| v33.0 | Supported | bugfix/33.0 |
| v32.0 | Supported | stable/2025.2 |
| v31.0 | EOL | bugfix/31.0 |
| v30.0 | EOL | bugfix/30.0 (EOL) |
| v29.0 | EOL | stable/2025.1 |
| v28.0 | EOL | bugfix/28.0 (EOL) |
| v27.0 | EOL | bugfix/27.0 (EOL) |
| v26.0 | EOL | bugfix/26.0 (EOL) |
| v25.0 | EOL | bugfix/25.0 (EOL) |
| v24.1 | EOL | stable/2024.1 (EOL) |
| v24.0 | EOL | bugfix/24.0 (EOL) |
| v23.1 | EOL | bugfix/23.1 (EOL) |
Ironic Standalone Operator
Ironic Standalone Operator (IrSO) follows the semantic versioning scheme for its
own release cycle, the same way as CAPM3 and IPAM. A major and minor version can
be supplied to the Ironic resource to request a specific branch of ironic-image
(and thus Ironic). Here are supported version values for each branch and release
of the operator:
| Operator version | Ironic version(s) | Default version | Support status |
|---|---|---|---|
| latest (main) | latest, 35.0, 34.0, 33.0 | latest | Supported |
| 0.9.0 | 35.0, 34.0, 33.0 | 35.0 | Supported |
| 0.8.0 | 34.0, 33.0, 32.0 | 34.0 | Supported |
| 0.7.0 | 33.0, 32,0, 31.0 | 33.0 | EOL |
| 0.6.0 | 32.0, 31.0, 30.0 | 32.0 | EOL |
| 0.5.0 | 31.0, 30.0, 29.0, 28.0, 27.0 | 31.0 | EOL |
| 0.4.0 | 30.0, 29.0, 28.0, 27.0 | 30.0 | EOL |
| 0.3.0 | 29.0, 28.0, 27.0 | latest | EOL |
| 0.2.0 | 28.0, 27.0 | latest | EOL |
| 0.1.0 | 27.0 | latest | EOL |
NOTE: the special version value latest always installs the latest
available version of ironic-image and Ironic. This version value is
supported by all releases of IrSO but only works reliably in the
latest release.
Image tags
The Metal³ team provides container images for all the main projects and also many auxiliary tools needed for tests or otherwise useful. Some of these images are tagged in a way that makes it easy to identify what version of Cluster API provider Metal³ they are tested with.
All container images are published through the Metal³ organization in Quay. Here are some examples:
- quay.io/metal3-io/cluster-api-provider-metal3:v1.13.0
- quay.io/metal3-io/baremetal-operator:v0.13.0
- quay.io/metal3-io/ip-address-manager:v1.13.0
- quay.io/metal3-io/ironic:v35.0.0
- quay.io/metal3-io/ironic-standalone-operator:v0.9.0
CI Test Matrix
The table describes which branches/image-tags are tested in each periodic CI tests:
| INTEGRATION TESTS | CAPM3 branch | IPAM branch | BMO branch/tag | Keepalived tag | MariaDB tag | Ironic tag |
|---|---|---|---|---|---|---|
| metal3-periodic-ubuntu/centos-e2e-integration-test-main | main | main | main | latest | latest | latest |
| metal3_periodic_main_integration_test_ubuntu/centos | main | main | main | latest | latest | latest |
| metal3-periodic-ubuntu/centos-e2e-integration-test-release-1-13 | release-1.13 | release-1.13 | release-0.13 | latest | latest | v35.0.0 |
| metal3-periodic-ubuntu/centos-e2e-integration-test-release-1-12 | release-1.12 | release-1.12 | release-0.12 | latest | latest | v33.0.0 |
| metal3-periodic-ubuntu/centos-e2e-integration-test-release-1-11 | release-1.11 | release-1.11 | release-0.11 | latest | latest | v31.0.0 |
| FEATURE AND E2E TESTS | CAPM3 branch | IPAM branch | BMO branch/tag | Keepalived tag | MariaDB tag | Ironic tag |
|---|---|---|---|---|---|---|
| metal3-periodic-centos-e2e-feature-test-main-pivoting | main | main | main | latest | latest | latest |
| metal3-periodic-centos-e2e-feature-test-release-1-13-pivoting | release-1.13 | release-1.13 | release-0.13 | latest | latest | v35.0.0 |
| metal3-periodic-centos-e2e-feature-test-release-1-12-pivoting | release-1.12 | release-1.12 | release-0.12 | latest | latest | v33.0.0 |
| metal3-periodic-centos-e2e-feature-test-release-1-11-pivoting | release-1.11 | release-1.11 | release-0.11 | latest | latest | v31.0.0 |
| metal3-periodic-centos-e2e-feature-test-main-remediation | main | main | main | latest | latest | latest |
| metal3-periodic-centos-e2e-feature-test-release-1-13-remediation | release-1.13 | release-1.13 | release-0.13 | latest | latest | v35.0.0 |
| metal3-periodic-centos-e2e-feature-test-release-1-12-remediation | release-1.12 | release-1.12 | release-0.12 | latest | latest | v33.0.0 |
| metal3-periodic-centos-e2e-feature-test-release-1-11-remediation | release-1.11 | release-1.11 | release-0.11 | latest | latest | v31.0.0 |
| metal3-periodic-centos-e2e-feature-test-main-features | main | main | main | latest | latest | latest |
| metal3-periodic-centos-e2e-feature-test-release-1-13-features | release-1.13 | release-1.13 | release-0.13 | latest | latest | v35.0.0 |
| metal3-periodic-centos-e2e-feature-test-release-1-12-features | release-1.12 | release-1.12 | release-0.12 | latest | latest | v33.0.0 |
| metal3-periodic-centos-e2e-feature-test-release-1-11-features | release-1.11 | release-1.11 | release-0.11 | latest | latest | v31.0.0 |
| EPHEMERAL TESTS | CAPM3 branch | IPAM branch | BMO branch/tag | Keepalived tag | MariaDB tag | Ironic tag |
|---|---|---|---|---|---|---|
| metal3_periodic_e2e_ephemeral_test_centos | main | main | main | latest | latest | latest |
All tests use latest images of VBMC and sushy-tools.
Metal3-io security policy
This document explains the general security policy for the whole
project thus it is applicable for all of its
active repositories and this file has to be referenced in each repository in
each repository’s SECURITY_CONTACTS file.
Way to report a security issue
The Metal3 Community asks that all suspected vulnerabilities be disclosed by
reporting them to metal3-security@googlegroups.com mailing list which will
forward the vulnerability report to the Metal3 security committee.
Security issue handling, severity categorization, fix process organization
The actions listed below should be completed within 7 days of the
security issue’s disclosure on the metal3-security@googlegroups.com.
Security Lead (SL) of the Metal3 Security Committee (M3SC) is tasked to review the security issue disclosure and give the initial feedback to the reporter as soon as possible. Any disclosed security issue will be visible to all M3SC members.
For each reported vulnerability the SL will work quickly to identify committee members that are able work on a fix and CC those developers into the disclosure thread. These selected developers are the Fix Team. The Fix Team is also allowed to invite additional developers into the disclosure thread based on the repo’s OWNERS file. They will then also become members of the Fix Team but not the M3SC.
M3SC members are encouraged to volunteer to the Fix Teams even before the SL would contact them if they think they are ready to work on the issue. M3SC members are also encouraged to correct both the SL and each other on the disclosure threads even if they have not been selected to the Fix Team but after reading the disclosure thread they were able to find mistakes.
The Fix team will start working on the fix either on a private fork of the affected repo or in the public repo depending on the severity of the issue and the decision of the SL. The SL makes the final call about whether the issue can be fixed publicly or it should stay on a private fork until the fix is disclosed based on the issues’ severity level (discussed later in this document).
The SL and the Fix Team will create a CVSS score using the CVSS Calculator. The SL makes the final call on the calculated risk.
If the CVSS score is under ~4.0 (a low severity score) or the assessed risk is
low the Fix Team can decide to slow the release process down in the face of
holidays, developer bandwidth, etc. These decisions must be discussed on the
metal3-security@googlegroups.com.
If the CVSS score is under ~7.0 (a medium severity score), the SL may choose to carry out the fix semi-publicly. Semi-publicly means that PRs are made directly in the public Metal3-io repositories, while restricting discussion of the security aspects to private channels. The SL will make the determination whether there would be user harm in handling the fix publicly that outweighs the benefits of open engagement with the community.
If the CVSS score is over ~7.0 (high severity score), fixes will typically receive an out-of-band release.
More information can be found about severity scores here.
Note: CVSS is convenient but imperfect. Ultimately, the SL has discretion on classifying the severity of a vulnerability.
No matter the CVSS score, if the vulnerability requires User Interaction, or otherwise has a straightforward, non-disruptive mitigation, the SL may choose to disclose the vulnerability before a fix is developed if they determine that users would be better off being warned against a specific interaction.
Fix Disclosure Process
With the Fix Development underway the SL needs to come up with an overall communication plan for the wider community. This Disclosure process should begin after the Fix Team has developed a Fix or mitigation so that a realistic timeline can be communicated to users. Emergency releases for critical and high severity issues or fixes for issues already made public may affect the below timelines for how quickly or far in advance notifications will occur.
The SL will lead the process of creating a GitHub security advisory for the repository that is affected by the issue. In case the SL has no administrator privileges the advisory will be created in cooperation with a repository admin. SL will have to request a CVE number for the security advisory. As GitHub is a CVE Numbering authority (CNA) there is an option to either use an existing CVE number or request a new one from GitHub. More about the GitHub security advisory and the CVE numbering process can be found here.
The original reporter(s) of the security issue has to be notified about the release date of the fix and the advisory and about both the content of the fix and the advisory as soon as the SL has decided a date for the fix disclosure.
If a repository that has a release process requires a high severity fix then the fix has to be released as a patch release for all supported release branches where the fix is relevant as soon as possible.
In case the repository does not have a release process, but it needs a critical fix then the fix has to be merged to the main branch as soon as possible.
In repositories that have a release process Medium and Low severity vulnerability fixes will be released as part of the next upcoming minor or major release whichever happens sooner. Simultaneously with the upcoming release the fix also has to be released to all supported release branches as a patch release if the fix is relevant for given release.
In case the fix was developed on a private repository either the SL or someone designated by the SL has to cherry-pick the fix and push it to the public repository. The SL and the Fix Team has to be able to push the PR through the public repo’s review process as soon as possible and merge it.
Metal3 security committee members
| Name | GitHub ID | Affiliation |
|---|---|---|
| Dmitry Tantsur | dtantsur | Red Hat |
| Riccardo Pittau | elfosardo | Red Hat |
| Zane Bitter | zaneb | Red Hat |
| Kashif Khan | kashifest | Ericsson Software Technology |
| Lennart Jern | lentzi90 | Ericsson Software Technology |
| Tuomo Tanskanen | tuminoid | Ericsson Software Technology |
| Adam Rozman | Rozzii | Ericsson Software Technology |
Please don’t report any security vulnerability to the committee members directly.
Glossary
Metal3 is a Cluster API provider, you might also want to take a look at CAPI glossary.
Abbreviations
| Abbreviation | Full Name | Description |
|---|---|---|
| BIOS | Basic Input/Output System | Legacy firmware interface for booting computers, being replaced by UEFI |
| BMC | Baseboard Management Controller | Out-of-band management chip enabling remote power control, console access, and hardware monitoring independent of the host OS |
| BMH | BareMetalHost | Metal3 Kubernetes custom resource representing a physical server and its desired state |
| BMO | Bare Metal Operator | Metal3 Kubernetes controller that reconciles BareMetalHost resources by communicating with Ironic |
| CAPI | Cluster API | Kubernetes SIG project providing declarative APIs for cluster creation, configuration, and management |
| CAPM3 | Cluster API Provider Metal3 | Metal3’s infrastructure provider enabling Cluster API to manage bare-metal clusters |
| DHCP | Dynamic Host Configuration Protocol | Network protocol for automatic IP configuration; required for PXE/iPXE boot |
| EOL | End of Life | Version no longer receiving updates or support |
| FIPS | Federal Information Processing Standards | US government security standards for cryptographic modules |
| iDRAC | Integrated Dell Remote Access Controller | Dell’s BMC implementation with Redfish support |
| iLO | Integrated Lights-Out | HPE’s BMC implementation with Redfish support |
| IPA | Ironic Python Agent | Agent running in a ramdisk that executes Ironic commands on bare-metal hosts (inspection, deployment, cleaning) |
| IPAM | IP Address Manager | Metal3 controller managing static IP allocations for cluster nodes |
| IPMI | Intelligent Platform Management Interface | Legacy protocol for remote hardware management; less secure than Redfish |
| iRMC | Integrated Remote Management Controller | Fujitsu’s BMC implementation (deprecated in Metal3) |
| IrSO | Ironic Standalone Operator | Metal3 Kubernetes operator that deploys and manages Ironic |
| MAC | Media Access Control | Unique hardware address identifying a network interface |
| NIC | Network Interface Card | Hardware providing network connectivity |
| PXE | Preboot Execution Environment | Intel standard for network booting via DHCP and TFTP |
| RAID | Redundant Array of Independent Disks | Technology combining multiple disks for performance or redundancy |
| SRIOV | Single Root I/O Virtualization | PCIe standard allowing a device to appear as multiple virtual devices |
| TFTP | Trivial File Transfer Protocol | Simple protocol for transferring boot files; used by PXE |
| TLS | Transport Layer Security | Cryptographic protocol securing network communications |
| UEFI | Unified Extensible Firmware Interface | Modern firmware interface replacing BIOS; supports Secure Boot |
| UUID | Universally Unique Identifier | 128-bit identifier for uniquely identifying resources |
| VBMC | Virtual BMC | Tool emulating IPMI BMC for virtual machines |
Key Terms
| Term | Description |
|---|---|
| Automated Cleaning | Ironic feature that wipes disk metadata before/after provisioning |
| BareMetalHost (BMH) | Metal3 custom resource representing a physical server and its desired state |
| Bare Metal Operator (BMO) | Metal3 controller reconciling BareMetalHost resources via Ironic |
| Bifrost | OpenStack tool for standalone Ironic deployment |
| Bootstrap Cluster | Temporary cluster used to provision a target management cluster |
| cloud-init | Industry-standard tool for cloud instance initialization and configuration |
| Cluster API (CAPI) | Kubernetes SIG project for declarative cluster lifecycle management |
| Cluster API Provider Metal3 (CAPM3) | Metal3’s infrastructure provider for Cluster API |
| clusterctl | CLI tool for Cluster API cluster lifecycle management |
| Custom Resource (CR/CRD) | Kubernetes API extension for domain-specific objects; CRD defines the schema |
| Deprovisioning | Process of removing an OS image and cleaning a host |
| dnsmasq | Lightweight DNS/DHCP/TFTP server used for network boot |
| Failure Domain | Topology grouping of hosts sharing common failure characteristics |
| Finalizer | Kubernetes mechanism preventing resource deletion until cleanup completes |
| Firmware Settings | BIOS/UEFI configuration options manageable through Metal3 |
| Glean | Alternative to cloud-init for instance configuration |
| Hardware Inventory | Discovered hardware details (CPU, RAM, disks, NICs) of a host |
| Hardware RAID | RAID implemented by dedicated hardware controller |
| Host Inspection | Process of discovering and recording hardware details of a bare-metal host |
| Ignition | Configuration system used by Fedora CoreOS and similar distributions |
| Infrastructure Provider | Cluster API component implementing cloud/platform-specific functionality |
| IP Address Manager (IPAM) | Metal3 controller managing static IP allocations for cluster nodes |
| IPAddress | IPAM resource representing an allocated IP address |
| IPClaim | IPAM resource representing a request for an IP address |
| IPPool | IPAM resource defining a pool of IP addresses for allocation |
| iPXE | Open-source network boot firmware extending PXE with HTTP support and scripting |
| Ironic | OpenStack project for bare-metal provisioning, used by Metal3 |
| Ironic Python Agent (IPA) | Agent in ramdisk executing Ironic commands on bare-metal hosts |
| Ironic Standalone Operator (IrSO) | Metal3 operator deploying and managing Ironic |
| ISO | Disc image format (ISO 9660) used for virtual media boot |
| Keepalived | Service providing virtual IP address failover |
| KubeadmControlPlane (KCP) | Cluster API resource managing Kubernetes control plane nodes |
| Kustomize | Kubernetes configuration customization tool |
| Live ISO | Bootable ISO image that runs entirely in memory without disk installation |
| Machine | Cluster API resource representing a single Kubernetes node |
| MachineDeployment | Cluster API resource for declarative worker node management |
| MachineSet | Cluster API resource maintaining a set of Machines |
| Management Cluster | Kubernetes cluster running Metal3/CAPI controllers |
| Metal3Cluster | CAPM3 custom resource representing cluster infrastructure |
| Metal3Machine | CAPM3 custom resource linking a Machine to a BareMetalHost |
| Metal3MachineTemplate | CAPM3 template for creating Metal3Machine resources |
| Network Boot | Booting a machine over the network using PXE/iPXE |
| Network Data | Configuration describing network settings for a provisioned host |
| Node Reuse | Feature allowing reuse of same hosts during rolling upgrades |
| Pivoting | Moving cluster management from bootstrap to target cluster |
| Preparing | Host state where RAID/firmware configuration is applied |
| Provisioning | Process of deploying an OS image to a bare-metal host |
| Provisioning Network | Isolated L2 network for Metal3 to bare-metal communication |
| Ramdisk | Minimal Linux image loaded into RAM for provisioning operations |
| Redfish | Modern RESTful API standard for hardware management, replacing IPMI |
| Remediation | Automated recovery of unhealthy cluster nodes |
| Root Device Hints | Criteria for selecting which disk to use as the root device |
| Software RAID | RAID implemented by the Linux kernel using mdadm |
| Sushy-tools | BMC emulator implementing Redfish protocol for virtual machines |
| Target Cluster | Destination cluster in a pivoting operation |
| User Data | Configuration script/data processed by cloud-init or similar |
| Virtual Media | Boot method using virtual CD/DVD over BMC (no provisioning network needed) |
| Workload Cluster | Kubernetes cluster running user applications |